
Related Manuals for OmniPod PDM Series


Summary of Contents for OmniPod PDM Series
- Page 1 SIMPLE, NONSTOP INSULIN DELIVERY FOR PEOPLE WITH DIABETES WHO INSIST LIFE STILL COMES FIRST. Katie R. SINCE 2015...
- Page 2 Nathaniel P. SINCE 2014...
-
Page 3: Table Of Contents
Refer to the Omnipod Insulin Management System User Guide for complete information on how to use the System, ® and for all related warnings and cautions. The Omnipod Insulin Management System User Guide is available online at ® or by calling Customer Care (24 hours/7 days), at * 6364. -
Page 4: Introduction
Pod can provide up to 3 days of continuous insulin delivery and can be worn anywhere you would give yourself a shot. wear what you want, and do what you want. the Omnipod System helps simplify insulin delivery, ®... -
Page 5: Supply List And Reorder
intROductiOn | Supply list and reorder SuPPLieS/ReORdeR you should have the following supplies on hand at all times: Several new, sealed Pods Lancing device and lancets extra, new Pdm batteries (at least two Glucose tablets or another fast-acting AAA alkaline) source of carbohydrate A vial of rapid-acting u-100 insulin Alcohol prep swabs... -
Page 6: The Pod
intROductiOn | the Pod the POd A small, lightweight Pod that’s easy to apply and wear daily. viewing window Fill Port BOttOm Adhesive Backing needle cap... -
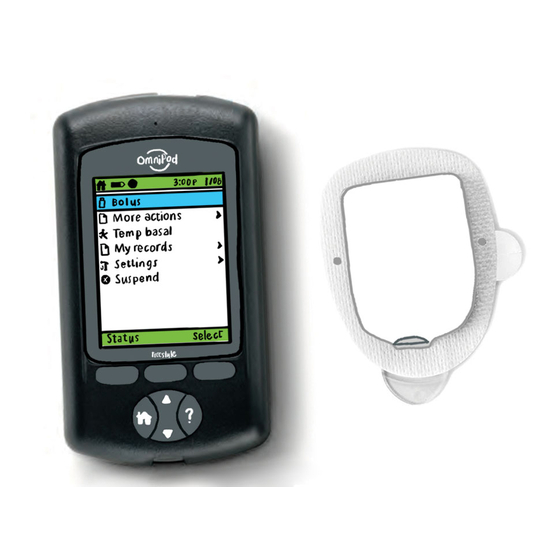
Page 7: The Personal Diabetes Manager (Pdm)
intROductiOn | the Pdm the Pdm A wireless Personal diabetes manager (Pdm) that’s easy to use. uSB Port color Lcd Screen Soft Key Labels Soft Keys home/Power user info/Support up/down controller test Strip Port with Light mAin menu itemS bolus: deliver bolus doses to cover my records: Review insulin delivery, blood glucose carbohydrates and/or correct high blood history, alarm history, carbohydrate history, and... -
Page 8: Basal/Bolus
Caution: Consult User Guide. Correction bolus For more information about the Suggested Bolus Calculator, see Chapter 4, Understanding and Delivering Bolus Doses, in your Omnipod Insulin Management ® A correction bolus can be delivered with System User Guide. -
Page 9: Your Personal Pod Settings
INTRODUCTION | Your personal Pod settings YOUR PERSONAL POD SETTINGS It is always a good idea to keep a copy of your Pod settings handy in the event you have to set up another PDM. Your healthcare provider will provide you with your initial start rates as well as any future changes. CAUTION: Do not attempt to start or make any changes to your PDM settings without formal instruction from your healthcare provider. -
Page 10: Counting Carbohydrates
The section Simple carbohydrates include table sugar, “Omnipod Advanced Features” will teach you about bolusing for certain meals with the OmniPod ® ® “Omnipod® System Advanced Features” will teach honey, syrups, regular soda, fruit juice, jellies and... - Page 11 INTRODUCTION | Counting carbohydrates INTRODUCTION | Counting carbohydrates Check the label. Check the label. The two key pieces of information on the nutrition facts label for carb counting are the The two key pieces of information on the nutrition facts label for carb counting are the serving size and total carbohydrates.
-
Page 12: Omnipod System Instructions
OMNIPOD SYSTEM INSTRUCTIONS | How to change the Pod ® HOW TO CHANGE THE POD You may need to change the Pod: When the reservoir is low or empty, or the Pod is nearing expiration In response to an alarm... -
Page 13: Activate A New Pod
ActivAte A new POd Assemble the following supplies: – vial of insulin at room temperature (u-100, rapid-acting), See user Guide for insulins tested and found to be safe for use with the Omnipod ® insulin management System – One sealed Pod –... - Page 14 OMNIPOD SYSTEM INSTRUCTIONS | Activate a new Pod ® 3:00p 5/15 Fill a new pod with Fill a new pod with insulin. After lling pod, listen for 2 beeps, then press “Next. ” NOTE: Do not remove needle cap at this time.
- Page 15 OMNIPOD SYSTEM INSTRUCTIONS | Activate a new Pod ® 3:00p 5/15 Remove pod’s adhesive backing If pod is wet or dirty, or adhesive is folded, press “Discard. ” If pod OK, apply to site. Discard Back Next Carefully remove white paper Remove and discard the Apply the Pod to the selected site.
-
Page 16: Pod Placement/Prep/Tips
OMNIPOD SYSTEM INSTRUCTIONS | Pod placement/prep/tips ® MAKING THE OMNIPOD SYSTEM ® A PERFECT FIT IN YOUR WORLD It’s easy to nd a place for your Pod. And your Pod is tubeless and lightweight, so you can wear it with freedom. - Page 17 OMNIPOD SYSTEM INSTRUCTIONS | Pod placement/prep/tips ® FEEL COMFORTABLE AND CONFIDENT How to secure and remove your Pod. Below are more ways to help secure and remove your Pod.* These tips from Podders , nurses, and doctors can help you stay tube and worry-free.
-
Page 18: Additional Notes
AdditiOnAL nOteS... -
Page 19: Checking Blood Glucose
WARNING: ® Measurements obtained from alternate site testing should not be used to calculate insulin doses with Omnipod Insulin Management System. Measurements obtained from alternate site testing should not be used to calculate insulin doses with OmniPod Insulin Management System. - Page 20 OMNIPOD SYSTEM INSTRUCTIONS | Checking blood glucose ® OMNIPOD INSTRUCTIONS | Checking blood glucose ® Prepare your lancing device in 3 easy steps. Prepare your lancing device in 3 easy steps. 1. Snap o the cap of the lancing device at an angle, and insert a new 1.
- Page 21 Insulin Management System User Guide. ® Measurements obtained from alternate site testing should not be used to calculate insulin doses with Omnipod Insulin Management System. FreeStyle® and related brand marks are trademarks of Abbott Diabetes Care Inc. in various jurisdictions and used with permission.
-
Page 22: Delivering A Bolus
OMNIPOD SYSTEM INSTRUCTIONS | Delivering a bolus ® DELIVERING A BOLUS 3:00p 5/15 3:00p 5/15 3:00p 5/15 Apply a blood sample Are you going to eat now? to the strip. mg/dL Discard Discard Calibration code: 16 Calibration code: 16 Cancel... -
Page 23: How To Suspend Insulin Delivery
OMNIPOD SYSTEM INSTRUCTIONS | Suspend insulin delivery ® HOW TO SUSPEND INSULIN DELIVERY Sometimes you may need to brie y stop insulin delivery (for example, when editing an active basal program or changing the time or date). 3:00p 5/15 3:00p... -
Page 24: Important Tips And Reminders
Pod, My records Carb history Settings All history the PDM and the Pod Suspend My info should be adjacent and touching. Please refer to the OmniPod Insulin ® Status Select Select Back Bolus Basal Back Select... - Page 25 OMNIPOD SYSTEM INSTRUCTIONS | Important tips and reminders ® How to change correction factors. 3:00p 5/15 3:00p 5/15 3:00p 5/15 3:00p 5/15 Bolus Basal Programs Date/time Bolus calc: On More actions Presets Bolus/basal/calcs Ratios/factors/targets Temp basal System setup Alerts/reminders Temp basal: O...
-
Page 26: Omnipod System Advanced Features
ADVANCED FEATURES | Bolus OMNIPOD SYSTEM ADVANCED FEATURES ® How to use the Extended Bolus Feature. When to use: This feature is most commonly used for high-fat and/or high-protein meals such as pizza, hamburgers, or fried chicken when the digestion of carbohydrates could be delayed. -
Page 27: Advanced Features: Basal
ADVANCED FEATURES | Basal How to set a Temporary Basal Rate. When to use: A temporary basal rate lets you adjust your background insulin for a predetermined period of time. This feature is best used to account for a temporary change in a daily routine, such as physical activity or times of illness. Temporary basal rates can be set for durations of 30 minutes to 12 hours;... - Page 28 ADVANCED FEATURES | Presets THE OMNIPOD SYSTEM ADVANCED FEATURES ® How to use the Temp Basal Presets. When to use: Best used for “temporary” routine activities, such as an exercise class that occurs twice a week. The PDM can store up to 7 temporary basal presets. You will be able to access your temp basal presets when you select Temp Basal from your home screen.
- Page 29 ADVANCED FEATURES | Presets How to use the Carbohydrate Presets. When to use: Best used for easy access to favorite food items, snacks, or meals that you eat frequently. You will be able to access your carb preset during the bolus calculator process. 3:00p 5/15 3:00p...
-
Page 30: Troubleshooting
TROUBLESHOOTING | Hypoglycemia tROuBLeShOOtinG | hypoglycemia HYPOGLYCEMIA HYPOGLYCEMIA hyPOGLycemiA Blood Glucose (BG) less than 70 mg/dL or ≤ 80 mg/dL with symptoms Blood Glucose (BG) less than 70 mg/dL or ≤ 80 mg/dL with symptoms Blood Glucose (BG) 70 mg/dL or less (and/or symptoms) Always follow your healthcare provider’s guidelines first. -
Page 31: Sick Day Management
Settings adjustments. IOB 2.90 u Did you bolus with food? Temp basal 0.25 U/hr 0:30 remains Did you consume alcohol? Consult your Omnipod Insulin Management System User ® Pod exp 1:48p 5/18 Guide for additional information. Home SICK DAY MANAGEMENT Suggested Action Plan Discuss Sick Day Management with your healthcare provider as part of your routine o ce visit. -
Page 32: Hyperglycemia
TROUBLESHOOTING | Hyperglycemia tROuBLeShOOtinG | hyperglycemia HYPERGLYCEMIA hyPeRGLycemiA Blood Glucose (BG) reading of 250 mg/dL or more Blood Glucose (BG) 250 mg/dL or more Always follow your healthcare provider’s guidelines first. the below general guidelines are derived from the Joslin Always follow your healthcare provider’s guidelines first. - Page 33 Is the insulin used expired? about your PDM Settings adjustments. Has the insulin used been exposed to extreme temperatures? If YES, change Pod using a new vial of insulin. Consult your Omnipod Insulin Management ® System User Guide for additional information. WARNING: Hyperglycemia symptoms can be confusing.
-
Page 34: Customizing Reminders And Alerts
A reminder is a notification you can turn on or off at any time and customize to fit your needs. your your needs. there are 4 different kinds of alerts Omnipod System has a number of different reminders: on your Omnipod System: ® ® pod expiration alerts... - Page 35 5. Choose the desired option or set the desired value, then press Select or Enter. Caution: Consult User Guide. To learn more about alarms and how to handle them, see Chapter 10, Alerts and Alarms, in your OmniPod Insulin Management System User Guide. ®...
-
Page 36: Making The Most Of Your Pdm
Disable the bright mode Disable the test strip port light Once you replace your battery these functions resume. PDM Communication One of the key bene ts of the Omnipod Insulin Management System is the wireless, tubeless communication ® between PDM and Pod. - Page 37 Omnipod System customers ® As the Omnipod System team, we pride ourselves on helping our customers navigate the Omnipod ® ® insulin management System and use it successfully to live life on their terms. however, occasionally we find ourselves taking notes from our customers, who have discovered ways to bring their Pod success to the next level.
-
Page 38: Additional Notes
AdditiOnAL nOteS customer care: * 6364 For the calls from abroad: +972-3-6900300 6, herzel Rosenblum St., Sea&Sun, tel-Aviv www.geffenmedical.co.il... - Page 39 Katie R. SINCE 2015...
- Page 40 654.OP.02-18.v1 17594-5X-AW Rev A 08/17 © 2017 Insulet Corporation. Omnipod, the Omnipod logo and Podder are trademarks or registered trademarks of Insulet Corporation in the United States of America and other various jurisdictions. All rights reserved. Ge en Medical and its logo are trademarks or registered trademarks of Ge en Medical Ltd.
Need help?
Do you have a question about the PDM Series and is the answer not in the manual?
Questions and answers