Table of Contents
Advertisement
Quick Links
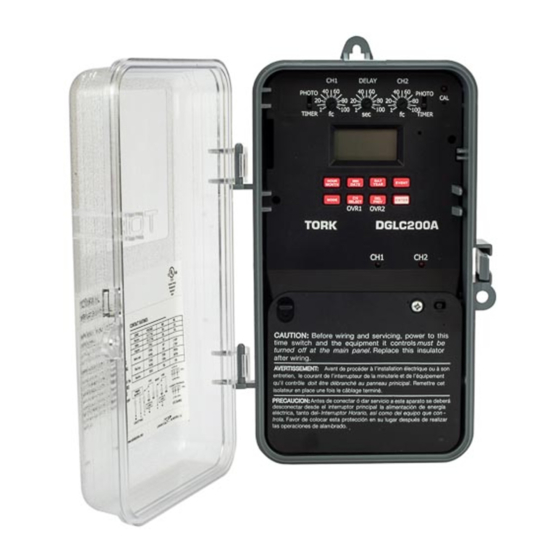
TORK MODEL DGLC
DIGITAL LIGHTING CONTROLLER
Installation & Operation
READ INSTRUCTIONS CAREFULLY BEFORE SETTING UNIT
PHOTOCELL MODEL EPC1 IS SUPPLIED WITH
THE DIGITAL TIME SWITCH
FEATURES
Single channel controller - 2 circuit
Circuit #1: Photocell ON/Time OFF/Time
ON/Photocell OFF, Selectable days
Circuit #2: Photocell ON/Photocell OFF, Everyday
7 day scheduling
Special day scheduling
32 set points
Battery back-up - uses standard 9 volt non-
rechargeable (not supplied). Lithium averages
275 hours of power outage; Alkaline averages
100 hours
Manual override to the next scheduled event
Automatic daylight saving - user selectable
Automatic leap year compensation
AM/PM or 24 Hour format - user selectable
INSTALLATION
UNIT IS TO BE INSTALLED BY A LICENSED ELECTRICIAN
1. Remove the photocell (EPC1) from the time
switch enclosure (lift insulating board at bottom).
2. To remove unit from enclosure: Push tab on
right to swing unit to the left and remove.
3. Mount the enclosure at eye level using screws
or other suitable fastening device. Bring supply
and load wires in through the bottom or side
knockouts. DO NOT USE TOP KNOCKOUTS.
Advertisement
Table of Contents

Subscribe to Our Youtube Channel
Related Manuals for Tork DGLC


Summary of Contents for Tork DGLC
- Page 1 TORK MODEL DGLC DIGITAL LIGHTING CONTROLLER Installation & Operation READ INSTRUCTIONS CAREFULLY BEFORE SETTING UNIT PHOTOCELL MODEL EPC1 IS SUPPLIED WITH THE DIGITAL TIME SWITCH FEATURES Single channel controller - 2 circuit Circuit #1: Photocell ON/Time OFF/Time ON/Photocell OFF, Selectable days...
- Page 2 Clock input wires to controller must be from a dedicated source i.e. no other loads connect- ed to the same circuit. 4. Install standard 9 volt lithium or alkaline battery (not supplied) by gently squeezing the right side of the battery cover on the front of unit and pull to open.
- Page 3 4. Do not put excessive pressure on potentiome- ter. Use thumb and forefinger or small screw- driver to adjust for light level. Avoid shorting screwdriver to upper board. 5. Light level adjustment operates only with Tork Photocell Model EPC1. HOUR OVER-...
- Page 4 MIN/YEAR: Press to set the Minute in the CLK mode and in the Schedule SET mode. Press to advance Year in the DATE mode. OVERRIDE: Press to alter the Load status and/or to Override scheduled event on circuit #1 only. MODE: Press to advance to next mode without affecting the scheduled memory information.
- Page 5 Once the ENTER is pressed, unit goes to RUN mode. You can recognize that the unit is in the RUN mode when the real time (including sec- onds) is displayed. NOTE: Once you select and ENTER the above format (either AM/PM or 24 hour military), you cannot alter it without removing all power to the unit by disconnecting the battery and line power.
- Page 6 TO SET DATE Note: Enter only if automatic daylight saving is desired. If not required, do not set date. Instead, skip the following section and press MODE key until display shows set. Press MODE key until display shows DATE. DATE Press MONTH key to set present month.
- Page 7 MO, TU, WE, TH, FR, SA SU, MO, TU, WE, TH, FR, SA Individual days: SU, MO, TU, WE, TH, FR, SA, and D for Special Day (usually a holiday). A special holiday schedule can be entered if you want to be able to repeat this particular schedule on holidays only.
- Page 8 NOTE: CIRCUIT #1 LOAD STATUS IS SHOWN ON THE DISPLAY. CIRCUIT #2 LOAD WILL TURN ON AT SUNSET AND OFF AT SUNRISE EVERY DAY OF THE WEEK. ® TORK MLI-99(B) 1 GROVE STREET, MT. VERNON, NY 10550 TEL: 914-664-3542 FAX: 914-664-5052...
Need help?
Do you have a question about the DGLC and is the answer not in the manual?
Questions and answers