Advertisement
HEAVY DUTY WIRELESS REVERSING KIT
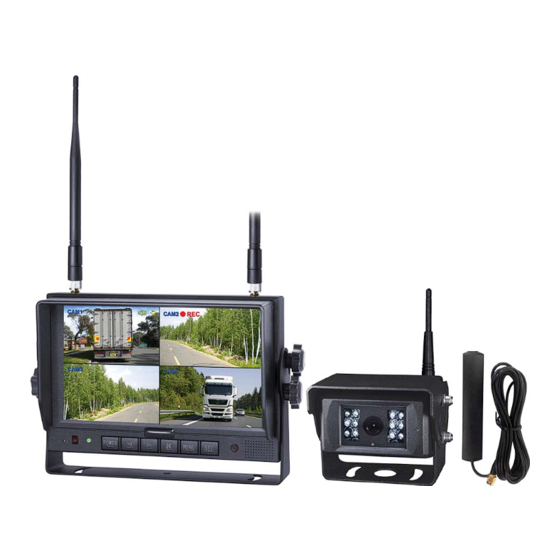
7" LCD DIGITAL QUAD RECORDING MONITOR
with WATERPROOF CCD CAMERA
12 24
MULTIVOLT
1, 2, 3, 4 VIEW
MONITOR
- 2.4 GHz Digital 7" Wireless Colour LCD Monitor
- High Resolution
- Wide Angle Views
- Single ~ Quad Operation
- Recording Function up to 128GB
- Multivolt 12/24V Input
- Remote Control
2
JS007WQK
IP69
WEATHER
P R O O F
CAMERA
2.4GHz WIRELESS
IR CAMERA
YEAR
WARRANTY
The JS007WQK is loaded with user-
friendly features and is ideal for use in
heavy duty vehicles. It comes with a
7"monitor that can display 1,2,3 or 4
cameras and includes one heavy-duty
camera that has an ingress protection
rating of IP69.
and can record up to 128G of action.
• 7 Inch LCD Display
• High Resolution
• 120m Wireless Range
CAMERA
- Heavy Duty Wireless CCD Camera
- 120° Wide Viewing Angle
- Night Vision
- IP69 Waterproof Rating
- 12/24V Operation
- 3dB Patch Antenna for Enhanced Range
INCLUDED
Mounting Brackets:
- Dash Mount
- U-Shape Mount
Accessories:
- Sunshade
- Remote Control
- 3dB Patch Antenna for
Enhanced Range
1
It operates wirelessly
Advertisement
Table of Contents

Related Manuals for Axis JS007WQK


Summary of Contents for Axis JS007WQK
- Page 1 HEAVY DUTY WIRELESS REVERSING KIT 7” LCD DIGITAL QUAD RECORDING MONITOR with WATERPROOF CCD CAMERA The JS007WQK is loaded with user- friendly features and is ideal for use in heavy duty vehicles. It comes with a 7”monitor that can display 1,2,3 or 4...
-
Page 2: Table Of Contents
CONTENTS General...................... 2 Technical Specifications................3 Accessories....................4 Parts Identification..................5 Remote Control Operation..............6 Basic Operation..................7 Menu......................9 Recording Time..................15 Trouble Shooting..................15 GENERAL 1. The device may be powered by a 12 or 24 Volt automotive battery or vehicle electrical system. -
Page 3: Technical Specifications
TECHNICAL SPECIFICATIONS MONITOR LCD Size: 178mm (7”) Resolution: 800 x 3 (RGB) x 480 Contrast: 500:1 Brightness: 400 cd/m² Viewing Angle: U: 50 / D: 70, R/L: 70 Dot Pitch: 0.0642(W) x 0.1790(H) Aspect Ratio: 16:9 Image Orientation: Normal / Mirror / Flip / Mirror Flip Inputs: 4 channels Operating Frequency:... -
Page 4: Accessories
ACCESSORIES U-Support Bracket Center Mount Bracket Sun Shield Power Cable Angle Adjustment Screws IR Remote Control... -
Page 5: Parts Identification
PARTS IDENTIFICATION Digital Color LCD screen Menu Power indicator Remote control sensor Loudspeaker Light level sensor Select channels Press OK button to enter Power switch Volume decrease Volume increase menu item or save user settings. Press OK button - shortcut for start/stop recording. -
Page 6: Remote Control Operation
REMOTE CONTROL OPERATION Press to select MUTE Press to turn on/off the or enable sound monitor Press OK button to enter Press to show menu menu item or save user or exit menu settings. Press OK button - shortcut for start/stop recording. Volume increase and menu selection right Volume decrease and... -
Page 7: Basic Operation
BASIC OPERATION 1.1 Installation of Centre Mounting Bracket: 1. Adjust monitor level by sliding the support to the desired height. 2. Adjust the angle of the monitor and tighten the knob on the centre mounting bracket. Support attaching piece Knob 1.2 Installation of U-Support Bracket: Angle adjustment screws... - Page 8 1.3 Trigger Display: CAM1 1.3.1. When the green wire is activated, the monitor automatically switches to CAM1 CAM2 1.3.2. When the white wire is connected to the positive wire of the left turn light, the monitor automatically switches to CAM2 (left side camera) when the left turn is activated.
-
Page 9: Menu
MENU • Menu operates in single image mode, not in quad view. • Press MENU to display the following options and settings: MODE PICTURE MIR-FLIP RECORD AUTOSCAN SYSTEM PLAY PAIRING 1. Press to select MODE. Press OK to enter the submenu and press to select QUAD/H-SPLIT/SPLIT. - Page 10 2. Press to select PICTURE and press OK to enter the submenu. • Press to select BRIGHTNESS/CONTRACT/HUE/VOLUME and then press OK to enter the setting accordingly. When the icons turn red, press on the menu for selection decreasing or adding. Press OK to exit the menu.
- Page 11 4. Press to select RECORD and press OK to enter. • Press to select REWRITE/FORMAT and then press OK to enter the setting accordingly. When the icons turn red, press on menu to select. Press OK to exit the menu. At the submenu, press MENU to return to main menu.
- Page 12 • Press to select CAM1/CAM2/CAM3/CAM4/SCANTIME and then press OK to enter the setting accordingly. When the icons turn red, press on menu for selection decreasing or adding. Press OK to exit the menu. At the submenu, press MENU to return to main menu. •...
- Page 13 7. Press to select PLAY and press OK to enter. • Press to recording file and press OK to enter playback mode. • Daily recording file can be searched under file folder named in format of YYMMDD. Each file folder includes the video files which are named in for- mat of HHMMSS_Channel Source (1,2,3,4).
- Page 14 8. Press to select PAIRING and press OK to enter or press OK for 3 seconds to enter PAIRING. • AUTO PAIRING: 1. Choose the channel that needs to be set up. The monitor will display the message “PAIRING START 50” and a counter that counts down 50s. 2.
-
Page 15: Recording Time
RECORDING TIME For the recording time of TF cards with different capacities, please refer to the table below. The actual recording time is subject to the operating environment. 128G MODE SINGLE 110h 220h (640x480x1) QUAD 172h (320x240x4) SPLIT 101h 201h (400x480x2) TROUBLESHOOTING The symptoms described below do not necessarily mean a failur within the... - Page 16 JS007WQK...
Need help?
Do you have a question about the JS007WQK and is the answer not in the manual?
Questions and answers