Advertisement
Quick Links
User 's Ma nual
ETS-T40F-RF
100% RAM compatibility Air CPU Cooler
Step 1-A-2
*For Intel LGA775/1150/1155/1156/1366
E
This side face up
D
C
Install the back plate on to the back of the motherboard. Put the stand-offs into the back plate
EN
screws.
Schieben Sie die Montageschrauben mit der Backplate durch die passenden Bohrungen des
DE
Mainboards. Fixieren Sie die Backplate mit den Abstandshaltern.
Installez la plaque arrière à l'arrière de la carte mère. Mettez les entretoises dans les vis de la
FR
plaque arrière,
Installare il backplate nella parte posteriore della scheda madre. Posizionare i distanziatori sulle
IT
viti del backplate.
PL
Umieść płytę mocującą pod płytą główną i przykręć ją za pomocą śrub dystansowych.
Instale el back plate en la parte posterior de la placa base. Coloque los separadores en los
ES
tornillos del back plate.
Установите крепёжную пластину на обратной стороне материнской платы. Установите
RU
промежуточные стойки на винты.
TW
將套上定位螺絲的背板,裝於主機板背面,再將套筒放入定位螺絲內。
CN
将套上定位螺丝的背板,装在主机板背面,再将套筒放入定位螺丝内。
KR
마더보드 뒷면에 Back Plate을 설치해주세요. Back Plate 나사에 지지대를 넣으세요.
マザーボードの背面にバックプレートを設置し、表面にでたポジションスクリューにプラスチック製のスタン
JP
ドオフを装着してください
※スタンドオフには上面/下面の区別があります
ID
Pasang back plate ke belakang motherboard. Masukkan stand-off ke sekrup back plate
FA
stand-off
Part List
A
B
C
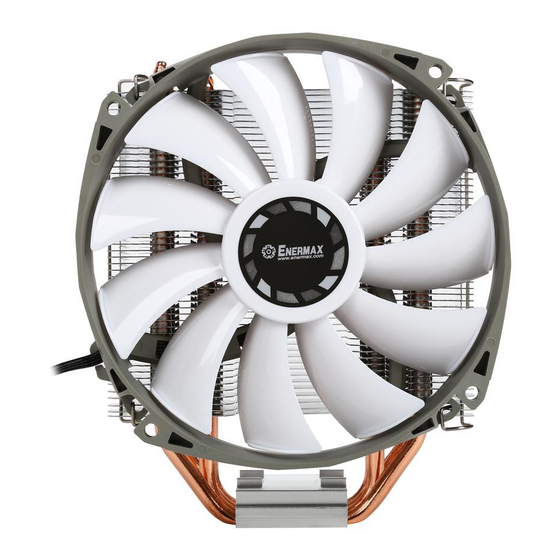
CPU Cooler
Fan
Back Plate
D
E
F
Position Screw
Intel Mounting
Plate
G
H
Mounting
I
AMD Mounting Plate
Spring Screw
Plate Screw
J
K
L
Pressure
Thermal Grease
Intel LGA
Mounting Plate
2011 Screw
N
M
Fan Clip
Vibration-
absorbing Pad
Step 1-B
*For Intel LGA2011
J
EN
Fasten the Intel LGA 2011 screws to the motherboard.
Schrauben Sie die Montageschrauben für den Intel-LGA2011-Sockel in die passenden
DE
Bohrungen Ihres Mainboards
FR
Fixez les vis Intel LGA 2011 à la carte mère.
IT
Fissare le viti LGA 2011 alla scheda madre
PL
Wkręć śruby montażowe (platformy Intel LGA2011) w odpowiednie otwory na płycie głównej.
ES
Fije los tornillos de Intel LGA 2011 a la placa base.
RU
Затяните гайки «Intel LGA 2011» на материнской плате.
TW
將LGA2011螺絲固定於主板上。
CN
将LGA2011螺丝固定在主板上。
KR
마더보드에Intel LGA 2011 나사로 고정해주세요
JP
Intel LGA 2011用スクリューをマザーボード表面から挿し入れて下さい
ID
Kencangkan sekrup Intel LGA 2011 ke Motherboard
FA
LGA 2011
Specifications
Model
ETS-T40F-RF
Intel
®
LGA775/115X/1366/2011/2011-3
Compatible Bracket
AMD
AM2/AM2+/AM3/AM3+/FM1/FM2/FM2+
®
Weight
460 g
Heat Pipe
4x Ø6mm
Material
Copper Heat Pipe/ Aluminum Fins
Thermal Grease
Dow Corning
®
TC5121
Fan Dimension
140 x 140 x 26 mm
Fan Speed
500 ~ 1200 rpm
Air Flow
24.83 ~65.58 CFM / 42.2~101.26 m
3
h
Static Pressure
0.24 ~ 1.55 mmH
O
2
Rated Voltage
12 V
Bearing Type
Twister Bearing
MTBF
160,000 hrs
Noise
10 ~ 19 dBA
Fan connector
4 pin PWM connector
Step 2
*For Intel installation
I
F
Install the Intel mounting plates with the arrow marks towards to the CPU, then fasten them with
EN
spring screws.
Richten Sie die Intel-Montagehalterungen mit den Pfeilsymbolen in Richtung der CPU aus und
DE
schrauben Sie sie mit den Federschrauben fest.
Installez les plaques de montage Intel avec les flèches vers le CPU, puis fixez-les avec des vis
FR
à ressort.
Installare le piastre di montaggio con il simbolo della freccia verso la CPU, successivamente
IT
fissarle con le viti a molla.
Ustaw wsporniki mocujące Intel-a z strzałką w kierunku do procesora i dokręć je do płyty
PL
głównej za pomocą srub sprężystych.
Instale el soporte de montaje de Intel con las flechas hacia la CPU, luego fíjelo con los tornillos
ES
correspondientes.
Установите крепёжные пластины Intel с стрелками в направлении к процессору, затем
RU
закрепите их пружинными винтами.
TW
將Intel支架,將刻印箭頭朝CPU方向,以彈簧螺絲安裝上主板。
CN
将Intel支架的刻印箭头朝CPU方向,用弹簧螺丝安装到主板上。
KR
Intel 마운팅 판을 화살표가 있는CPU쪽으로 설치해, 스프링 나사로 고정해주세요.
Intel用マウントプレートを図のような向きでポジションスクリューに挿し入れ、スプリングスクリューで固
JP
定してください
Pasang Mounting Plate Intel dengan tanda panah ke arah CPU. Kemudian kencangkan dengan
ID
sekrup spring
Intel mounting plates
FA
Step 1-
-1
A
Installation
*For Intel LGA775/1150/1155/1156/1366
C
LGA1366
LGA115X
LGA775
D
Insert the position screws into the proper holes on the back plate.
EN
《If your CPU platform is Intel LGA2011, please skip to step 1-B》
Setzen Sie die Montageschrauben in die passenden Bohrungen auf der Backplate ein《Wenn
DE
Sie einen LGA2011-Sockel verwenden, gehen Sie bitte zu Schritt 1-B über 》
Insérez les pied-vis dans les trous appropriés sur la plaque arrière. "S'il s'agit d'un processeur
FR
Intel LGA2011, passez à l'étape 1-B "
inserire le viti di posizione negli appositi fori sul backplate (Se la vostra piattaforma CPU è Intel
IT
LGA2011 passare direttamente alla fase 1-B).
Włóż śruby montażowe w odpowiednie otwory na płycie mocującej (Backplate).
PL
《Platformy Intel LGA2011: Proszę przejść do punktu 1-B 》
Inserte los tornillos en los orificios correspondientes del back plate. "Si su socket de CPU es
ES
Intel LGA2011, por favor vaya al paso 1-B "
Установите винты для крепёжной пластины в соответствующие отверстия для вашего
RU
процессора. <Если ваша CPU платформа является Intel LGA2011, пожалуйста, перейдите
к шагу номер 1-B>
依系統CPU腳位將定位螺絲固定於背板相對應孔位(如果您的主機板是Intel LGA2011, 請直接跳
TW
至步驟1-B。)
根据系统CPU脚位将定位螺丝固定在背板相对应孔位上(如果您的主机板是Intel LGA2011, 请直接
CN
跳至步骤1-B。)
KR
뒷판 구멍에 알맞은 나사를 넣으세요. 《CPU 플랫폼이 Intel LGA2011라면, Step1-B로 가세요》
ポジションスクリューをバックプレート側から挿し入れてください
※ご使用のプラットフォームに合わせた穴に挿
JP
し入れて下さい
※IntelとAMDでバックプレートの向きが変わりますのでご注意ください(Intel LGA2011をお
使いの方はStep1-Bに進んでください)
Masukkan sekrup ke dalam lubang yang tepat pada back plate "Jika Platform CPU Anda Intel
ID
LGA 2011, lanjutkan ke langkah 1-B"
back plate
position screw
FA
1-B
LGA2011
Step 3-1
*For AMD installation
C
AMD
D
EN
Insert the position screws into the AMD holes on the back plate.
Setzen Sie die Montageschrauben in die passenden AMD-Bohrungen auf der Backplate ein.
DE
FR
Insérez les pied-vis dans les trous d'AMD sur la plaque arrière.
IT
Inserire le viti di posizione nei fori AMD situati sul backplate.
Włóż śruby montażowe w odpowiednie otwory (do procesorów AMD) na płycie mocującej
PL
(Backplate).
ES
Inserte los tornillos en los orificios correspondientes del back plate de AMD.
RU
Установите винты для крепёжной пластины AMD в соответствующие отверстия.
依系統CPU腳位將定位螺絲固定於背板AMD相對應孔位。
TW
CN
根据系统CPU脚位将定位螺丝固定在背板AMD相对应孔位。
KR
뒷 판에 있는 AMD구멍에 알맞은 나사를 넣으세요
ポジションスクリューをバックプレート側『AMD』の穴から挿し入れて下さい
JP
※IntelとAMDでバックプレートの向きが変わりますのでご注意ください
ID
Masukkan sekrup ke dalam lubang AMD pada back plate
FA
AMD
position screw
Advertisement

Related Manuals for ENERMAX ETS-T40F-RF


Summary of Contents for ENERMAX ETS-T40F-RF
- Page 1 Step 1- Specifications Installation *For Intel LGA775/1150/1155/1156/1366 Part List LGA1366 LGA115X CPU Cooler Back Plate Model ETS-T40F-RF LGA775 Intel ® LGA775/115X/1366/2011/2011-3 Compatible Bracket AM2/AM2+/AM3/AM3+/FM1/FM2/FM2+ ® Weight 460 g Insert the position screws into the proper holes on the back plate.
- Page 2 Menginstall kipas seperti ilustrasi merupakan cara untuk memberikan aliran udara pendinginan yang terbaik as the property of others. Reproduction in any manner without the written permission of ENERMAX is strictly .ﺩییﺍﻡﻥ ﻝﺹﺕﻡ ﺍﻩ ﻩﺭیگ ﺯﺍ ﻩﺩﺍﻑﺕﺱﺍ ﺍﺏ ﺍﺭ ﻥﻑ forbidden.
Need help?
Do you have a question about the ETS-T40F-RF and is the answer not in the manual?
Questions and answers