Table of Contents
Advertisement
Quick Links
AD-01
P
Please read these instructions before you start the installation
Features
•
LCD display
•
Dual Triggers
• Programmable 9 x 32 digit phone numbers for each trigger.
•
Programmable as Silent Alarm (dial only) or Audible (siren + dialer)
.
•
Cancel Message and Alarm at remote telephone using * Key or
cancel message only using # Key
• 10 second duration recordable message for each trigger
• Built in memory for telephone numbers and programmed settings
Contents
• 1 x Auto Dialer
• 1 x Telephone cable
• 1 x Fixing kit and Installation & Programming guide
Tools required:
• Small cross head screw driver
• Large cross head screw driver
• Number 6 masonry drill bit
• Hammer drill
• Small hammer
• Pencil, ruler and spirit level
The Auto Dialer.
Important: before you install the Auto Dialer please take these into consideration.
1. Position the Auto Dialer near a phone socket.
2. Before you start to drill holes check for hidden wires and pipe work.
3. Keep the Auto Dialer out of reach of small children.
Slave PSTN Auto Dialer - Installation &
Programming guide
Preparation
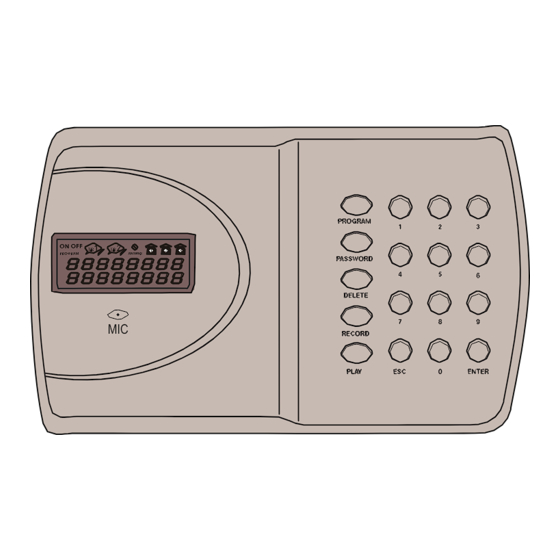
MIC
AutoDialer
Advertisement
Table of Contents

Related Manuals for Keystone AD-01


Summary of Contents for Keystone AD-01
- Page 1 AD-01 Slave PSTN Auto Dialer - Installation & Programming guide Please read these instructions before you start the installation Features AutoDialer • LCD display • Dual Triggers • Programmable 9 x 32 digit phone numbers for each trigger. • Programmable as Silent Alarm (dial only) or Audible (siren + dialer) •...
- Page 2 Installation How to install the Auto Dialer Remove the small screw from the battery compartment cover and keep safe. Mark and drill two holes on a horizontal line 160 mm apart. Insert the masonry plugs; screw the two fixing screws in the plugs leaving 2 mm protruding. Run a cable from the Alarm Control Panel to the Auto Dialer.
- Page 3 Fig 2 How to program the Auto Dialer (If no key is pressed for 30 seconds, the Dialer will automatically exit the programming mode) IMPORTANT: THE DIALER MUST BE IN THE OFF MODE FOR ALL PROGRAMMING. SINCE THE DIALER WILL AUTOMATICALLY TURN ITSELF ON WHEN POWER IS FIRST CONNECTED OR RECONNECTED, YOU NEED TO TURN THE DIALER OFF (ENTER CODE, DEFAULT 1234 AND THEN PRESS EXIT KEY) BEFORE YOU CAN START PROGRAMMING AS BELOW.
- Page 4 (maximum 9 different numbers). IMPORTANT: Enter the symbol * to create a “pause”. So, if you are using the AD-01 with an exchange line that requires a number (such as “9”) followed by a “pause” before dial-out, enter >9>*>Tel number How to Delete Phone Numbers –...
- Page 5 How to designate Telephone Numbers to TRIG 1 and TRIG 2 – Section 6 : Quick guide: Press 1 2 3 4 > PROGRAM > 6 > ENTER > X > ENTER > N > ENTER 1) Key in the four digit user PASSWORD code (factory default 1234) 2) Press PROGRAM >...
- Page 6 How to set Arm Delay times: (Default set at 0 seconds, instant) – Section 5 Set arm delay time between 0, 30 and 60 and 90 seconds: This is the delay between the dialer being armed or primed and the time the triggers are active or ON. Default setting is 0 seconds, or no arm delay. Note that if an arm delay time is programmed, then the ON symbol on the LCD display will flash throughout the programmed time delay period.
- Page 7 How to reset the Auto Dialer Remove the power supply and the telephone line. Take the Auto Dialer down from the wall and remove the 9V battery (if used). Inside the battery compartment is a switch, move it to the ERASE position, place the power back onto the system then press DELETE on the keypad twice, there will be a 2 short beeps from the Auto Dialer.
- Page 8 Q: The Dialer’s input has been activated correctly and the image “Trig 1” or “Trig 2” appears on the LCD display to indicate this. However, it is not then dialing out and an error message is appearing on the LCD display. A: Check the following carefully.
Need help?
Do you have a question about the AD-01 and is the answer not in the manual?
Questions and answers