Table of Contents
Advertisement
Quick Links
User Manual ENG
Thank you for buying the Blaupunkt navigation system for bicycles.
A good choice. We wish you a lot of fun and congestion-free kilometers with your new BikePilot².
In the worst case we will help you.
For technical questions and / or problems, please contact us via our webpage
www.blaupunkt.de
The complete manuals for the hardware and software and manuals for other languages
can be downloaded as well from www.blaupunkt.de
Please register your product as soon as possible on our website. This will give you benefits such
as latest software and the latest map data, etc. - Most of it, of course, free.
Updates and additional maps, you can also order over our website
www.blaupunkt.com.
Advertisement
Table of Contents

Subscribe to Our Youtube Channel
Related Manuals for Blaupunkt BikePilot2


Summary of Contents for Blaupunkt BikePilot2
- Page 1 User Manual ENG Thank you for buying the Blaupunkt navigation system for bicycles. A good choice. We wish you a lot of fun and congestion-free kilometers with your new BikePilot². In the worst case we will help you. For technical questions and / or problems, please contact us via our webpage www.blaupunkt.de...
-
Page 2: Table Of Contents
Contents Safety instructions and maintenance ....................4 Device description ......................... 6 BikePilot² ..........................6 Bike Mount ..........................7 Introduction ........................... 9 Main screens ..........................10 Navigation screen ....................... 10 Trip computer ........................12 Manoeuvre screen ......................12 Main menu ..........................12 Extras ............................ - Page 3 Tour planner ..........................34 13.1 Plan tour ..........................34 13.2 Plan circuit ........................... 35 13.3 Select saved tour ........................ 35 13.4 Detailed view of a tour ......................35 Active Route ..........................36 Remember position ......................... 36 Waypoint manager ........................36 16.1 Choose waypoint.........................
-
Page 4: Safety Instructions And Maintenance
The device and the battery must not be opened under any circumstances. Only use Blaupunkt original accessories. You will then be certain that all of the relevant provisions are complied with and any damage to health or property is avoided. Dispose of unserviceable devices or the battery in accordance with the applicable legal provisions. - Page 5 Declaration of Conformity The device is in compliance with the essential requirements and other relevant regulations of Directive 2014/53/EU (RED). The declaration of conformity can be found via following link: http://www.blaupunkt.com/en/nc/products/navigation/bikepilot/products/single/16402/...
-
Page 6: Device Description
1. Device description 1.1 BikePilot² Charging light Settings Record track Power button Power button: Switches the device on. When you press the power button during use, you have the following options: Switch off: Switches the device off completely. Stand-by: Switches to stand-by mode. Screen off: The screen is switched off, ongoing navigations or activity recordings are retained. -
Page 7: Bike Mount
USB port Reset Button (inside) Micro SD card slot USB port: Port for charging up the battery via the power supply or for connecting the device to a PC via the USB cable. Slot for Micro SD cards: Here the device can have its memory expanded up to a maximum of 64 GB with Micro SD cards from the SDHC category. - Page 8 To secure the device on the retaining bracket, insert it into the retaining bracket with the bicycle mounting base, press the two buttons on the retaining bracket and lock it in the retaining bracket from above. Check that the device is fitted securely before each ride.
-
Page 9: Introduction
2. Introduction The chapters are based around the menu structure of the application. This means you quickly know where you need to look to find an explanation of a particular function. If you are still not able to find something, you can search for particular terms in the Glossary. The Tips and tricks help you to do what you want and quickly get to grips with your device. -
Page 10: Main Screens
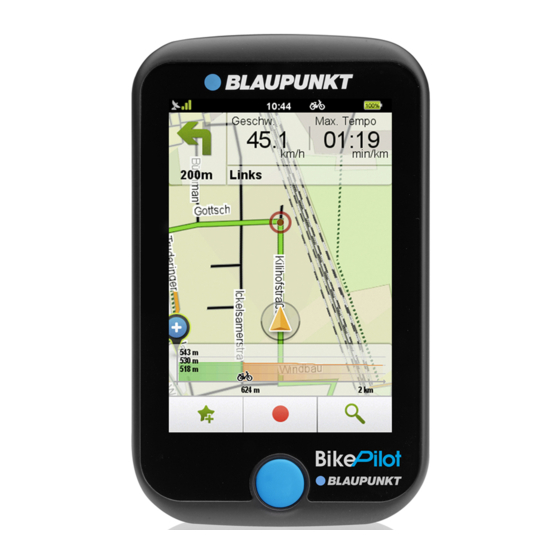
3. Main screens 3.1 Navigation screen Remaining km to destination Bicycle profile GPS-signal-quality Battery status Next manoeuvre Speed Next-but-one manoeuvre Distance to Compass next manoeuvre Position Map view Main menü Click on map Move to map GPS Signal: Indicates the status of the GPS reception. GPS signal is not sufficiently strong to allow positioning. - Page 11 Next Manoeuvre: In the manoeuvre field you are shown, via an arrow, the next turn-off direction, other roads which lead off and the distance to your next manoeuvre. If you are on a roundabout, the other roads which lead off are also shown in addition to your turn-off arrow.
-
Page 12: Trip Computer
3.2 Trip computer When you swipe to the right out of the map screen you will reach the trip computer application, which shows you lots of measured values. It has a second page which you can call up by swiping up or down. You can configure the values in the trip computer yourself by tapping on a field and then choosing in the list which value should be displayed in this field. -
Page 13: Destination Entry
6. Destination entry On the destination entry screen, you have the option of entering any destination you want in order to be navigated to it. Various possibilities for doing this are available to you and they are explained one after the other below. -
Page 14: Points Of Interest
6.3 Points of Interest Your navigation device contains countless points of interest such as restaurants, viewing points, natural monuments, places to stay, places to visit and lots more. If you select Points of interest on the destination entry screen, a list containing all categories appears. -
Page 15: Position On Map
6.5 Position on map Here you can mark a point on the map in order to navigate there. You can also move the map here using your finger. If a point which is located in a city or on a street is marked, the address for this point is displayed. -
Page 16: Sort Menu
Note: The entry format is important here as there are different formats for coordinates. The preset format is based on the pattern of degrees/decimal minutes (dd°mm.mmmm´). To set a different format, tap on Format. A list containing possible formats will then be displayed. You can change the format again at any time in the settings. -
Page 17: Alternative Routes
7.1 Alternative routes If after calculating a route you have calculated alternative routes, they are shown in different colours on the map. You can then select an alternative via the boxes at the bottom which are also marked in the relevant colour and view the information for the selected alternative. -
Page 18: Route Information
7.4 Route information You can retrieve the route information by tapping on . Here you can call up the route information and display the description of the route in list form. The following information is displayed to you in the route description: The name of the respective road. - Page 19 9.1.2 Pause recording The recording can be interrupted at any time if, for example, you take a break. To do this, tap again on the middle button and then on the Pause button. 9.1.3 Resume recording To resume the recording, tap on the middle button and then on the Pause button again. 9.1.4 End recording To end the recording, tap on the middle button for a while or first tap on the middle button and then on the Stop button.
- Page 20 9.1.7 Start activity as track navigation When you start an activity that has already been recorded or saved, you have the possibility of deciding whether you want to start the activity as tracking or would like to convert it into a route in order to obtain turn-off instructions.
-
Page 21: Transferred Tracks
9.1.10 Define starting point If you have selected Convert track to route, initially the route is calculated and displayed on the map. By clicking on “Route” or “Track” you can switch back and forth between the track and the route on the map view. The chequered flag shows the end point of the activity. -
Page 22: Geocaching
You can download geocaches to your device via the Activity Manager. This software can be found here and it is free for downloading: http://www.blaupunkt.com/de/servicesupport/mobile-navigation/ To do this, download the GPX file you want and then import it via the Activity Manager. You will find detailed instructions on how to do this in Chapter 20. - Page 23 11.1.2.2 Detailed view In the detailed view, you are shown information that exists and also offered the possibility to edit the geocache and comment on it. Info - Shows you all the information that exists in relation to this geocache. This includes the description, the distance and all relevant details about the cache.
- Page 24 Projection from a specific point means that a new position, that is to say a waypoint, is determined by means of a bearing (in degrees) and distance from a specific position. If you create a waypoint by coordinates, enter the coordinates of the new waypoint in the same way as you would enter a destination using coordinates.
- Page 25 Note: If you have left a trackable in the geocache, specify this with the additional track number so that the cache owner and the other cachers are informed. If you take a trackable away with you, this should be logged. To do this, specify the code on the trackable and log the fact that it has been taken away.
-
Page 26: Waypoint Manager
CITO-Event Cache - CITO means Cache In Trash Out and is an environmentally friendly initiative by global geocaching communities. Geocachers have been meeting since 2002 to clean up parks or geocache-friendly places all over the world. Earth-Cache - Is a special place which people can visit to learn more about unique geoscience features in the world. -
Page 27: Settings
11.2.3 Delete created waypoints To delete a waypoint that you have created yourself, tap on Delete created waypoints. One or several waypoints can be marked from the complete list and deleted by clicking on Ok. Note: Imported waypoints can be deleted by deleting the corresponding GPX file in the GPX manager. 12. - Page 28 Turns - Avoids or permits many turnoff manoeuvres (only in bicycle mode). Ferries - Uses or avoids routes involving ferry connections. Tunnels - Avoids or uses routing through tunnels. Via ferrata - Avoids or uses routes along via ferrata (only in pedestrian mode) Paths - Uses or avoids routes along paths and dirt tracks (only in bicycle mode).
-
Page 29: Map
12.2 Map Here you can make various settings relating to the map view. To do this, click in the menu on Settings > map. The following options can be changed: 12.2.1 Map perspective With the map perspective you can switch between the two-dimensional and three-dimensional representation of the map. -
Page 30: Profiles
12.3 Profiles Here you will find all settings relating to the activity profiles. 12.3.1 Change activity profile Here you can change the bicycle profile. Four profiles are available to you and you can configure them yourself. Select the profile you want (bicycle 1-3 and pedestrian profile) and confirm with 12.3.2 Edit activity profile Here you can edit the bicycle profile which is currently chosen, and also view all of the statistics for this profile. - Page 31 12.4.3 Brightness Here you can set the brightness of the screen. The brightness settings have a great influence on the power consumption of your navigation device. To save power in battery mode, turn down the brightness level. In addition, you can select whether the screen should automatically be dimmed when the battery is weak in order to save power.
- Page 32 12.4.7 Set position format There are different formats for specifying coordinates. To support the entry of the most common formats, here you can select the format you want. The following formats are available to you: - dd.ddddd° (decimal degrees) - dd°mm.mmmm` (decimal degrees and minutes) - dd°mm`ss.ss (decimal degrees, minutes, seconds)
- Page 33 12.4.10 Main menu functions When you tap on Main menu functions, you see a list containing all available functions. Functions available on the main menu are activated. Deactivated functions are not checked, slide to the end of the list and can then be found in the Extras menu..
-
Page 34: Tour Planner
To access this information, simply tap on . To exit the display, tap on Tap on the button to display information about copyrights for the software used. Here you will also find country-specific copyright notices. 12.4.15 Sort menu Here you can change the order of the functions as you wish. Select a function and move it to the position you want with the aid of the rectangular arrows. -
Page 35: Plan Circuit
13.2 Plan circuit Tap in the tour planner on Plan circuit. Here you can start a circuit from a stipulated starting address. Here too, the preset starting point is your current location. You can enter another starting point via After entering the starting point, you can specify either the required distance or the duration of the circuit. -
Page 36: Active Route
13.4.1 Edit tour To edit a tour, first select a tour and then tap on Then tap on The following setting options are then available to you: – Here it is possible to add further stations, Edit stations change the sequence of the stations and delete stations again. –... -
Page 37: Create Waypoint
16.2 Create waypoint You have various possible options for creating a waypoint. You can use your current position, enter an address, select a position on the map, use one of your previous destinations, enter coordinates or select a point of interest Once the destination has been defined, you are asked to enter a name for the new waypoint. -
Page 38: Tips And Tricks
You must first install the Activity Manager on your PC. To do this, you must first download the program from the internet. You will find the Activity Manager at http://www.blaupunkt.com/servicesupport/mobile-navigation/. After download is complete, double-click on the file Setup.exe and then follow the instructions given by the installation wizard. - Page 39 You now have the following options: Save – The GPX file selected from the list is saved to the PC. Delete – Deletes the selected GPX file from the device or PC. Import – Imports a GPX file from a PC to your Activity Manager. To do this, you must select the directory containing the GPX file.
-
Page 40: Transfer Of Content
GPX files on the map view In the GPX manager, you can display waypoints, tracks and geocaches that you have created yourself. The map can be moved using the arrow keys and the hand icon. The zoom level of the map can be changed with "+" and "-". -
Page 41: Troubleshooting
21. Troubleshooting Problem Possible cause Solution Connect the device to a suitable power source. The device should then start automatically after a Navigation device does not start few minutes. Battery capacity too low If the device is not being used for a prolonged period, please switch it off entirely. -
Page 42: Glossary
22. Glossary Barometer - A barometer is a measuring device used to measure atmospheric pressure. The barometer is used to calculate the current height and is shown on the trip computer. GPS - The Global Positioning System is a satellite-based system for global positioning. Your location can be pinpointed using the conventional GPS satellite system to within 20 metres at any time –... -
Page 43: Technical Data
23. Technical Data 8.9 cm diagonal (3.5“), capacitive Display Screen Resolution 320 × 480 pixels Dimensions approx. 110 x 70.5 x 21 mm 4 GB / 8 GB with “PRO” Flash memory Internal memory 128 MB / 256 MB with “PRO” RAM memory Chip MStar 800 MHz... -
Page 44: Guarantee
The guarantee does not cover damage caused by improper use or external influence (water, falling, sunlight, breakage or impact). Declaration of Conformity Hereby Baros GmbH, declares, that the device Blaupunkt BikePilot², is in compliance with the essential requirements and other relevant regulations of Directives 2014/53/EU (RED), 2011/65/EU (RoHS) and 2014/30/EU (EMC).
Need help?
Do you have a question about the BikePilot2 and is the answer not in the manual?
Questions and answers