
Related Manuals for Seakeeper 6


Summary of Contents for Seakeeper 6
- Page 1 INSTALLATION MANUAL Rev 22 JUNE 2017...
- Page 2 Product: Document #: Rev: INSTALLATION MANUAL SEAKEEPER 6 90402 SEAKEEPER 6 INSTALLATION MANUAL JUNE 2017 Contents: Section 1 – Mechanical Installation Section 2 – Electrical Installation Section 3 – Cooling Installation Section 4 – Startup Section 5 – Installation Checklist and Required Supplies 44425 PECAN COURT, SUITE 151 CALIFORNIA, MARYLAND, 20619, U.S.A...
- Page 3 This document is intended to give details and guidance to a boat builder or equipment installer to install the Seakeeper 6 Stabilization System. The Seakeeper is capable of producing loads up to 17 KN (3820 lbs.) at each of the four mounts and careful consideration should be given to foundation design to insure it is capable of transferring these loads into the hull.
- Page 4 While handling / installing Seakeeper assembly, do not allow electrical fittings that exit bottom of Seakeeper enclosure to come in contact with any surface or object as this could damage the fittings and potentially affect the vacuum integrity of the enclosure.
- Page 5 MANUAL SEAKEEPER 6 90402 3 of 6 Section 1: MECHANICAL INSTALLATION VIEWS SHOWING RECOMMENDED CLEARANCES AROUND SEAKEEPER FOR USE OF HAND-TOOLS, EASE OF MAINTENANCE, INSTALLATION AND PROPER OPERATION. FIGURE 2 – INSTALLED SEAKEEPER CLEARANCE CONSIDERATIONS...
- Page 6 4” (102 mm) from the edge of the saddle beams to provide the necessary clearance for the swing of the motor power cable during precession. Clearances aft of the Seakeeper are shown to provide access for maintenance. ...
- Page 7 Seakeeper noise has been measured under steady state conditions (no wave load) in Seakeeper's lab and in our test boat. The steady state noise is typically in the range of 70-75 dB un-weighted. As the frequencies emitting the highest sound pressures are low (like other marine machinery), it is recommended that the Seakeeper be installed in a machinery space that is already treated with soundproofing.
- Page 8 Selection of Installation Method The Seakeeper 6 can be affixed to the hull structure using two methods 1) Use bolt-in installation or 2) saddle installation. See figures below. OPTION 1- DIRECT FASTENING OF SEAKEEPER FOUNDATION TO SHIPS STRUCTURE Option 1 would be applied when a metal structure is available for attachment.
- Page 9 4) Remove top and angled face cover panels to access lifting eyes 5) Attach spreader bar to the two lifting eyes located on the top of the Seakeeper enclosure. Stay clear of any other parts on the Seakeeper. Seakeeper 6 weighs 395 kg (870 lbs).
- Page 10 Important dimensional and load information is given in this drawing that will impact the design details of the structure that will receive the Seakeeper. It is assumed that a proper structural analysis has been performed for the hull structure to which the Seakeeper will be fastened to insure proper strength margins for the loads the Seakeeper will create during operation.
- Page 11 CAUTION: Tight clearances from cable guide bands and brake side gimbal shaft to hull structure. See below for brake side gimbal shaft clearance. See above figure for dimensions and reference Seakeeper drawing NO. 90398 for complete Seakeeper envelope.
- Page 12 1.5.2 Transfer of Holes to Boat Structure 1) Lower assembled fixture onto hull structure. The four areas where the feet of the Seakeeper will rest should be coplanar to within .06” (1.5mm). See Figure 9. 3) Align fixture in desired location and transfer holes from fixture plate to the foundation structure.
- Page 13 2) Lower Seakeeper into position onto foundation beams and align over drilled holes. 3) Install Seakeeper supplied M12X1.75 – 70mm fasteners– apply a moderate coat of removable thread locker to the threads of each bolt and include a small bead of marine sealant under each washer before installation.
- Page 14 Refer to Seakeeper Drawing No. 90399, Seakeeper 6 Installation Details – Bond In Method. Important dimensional and load information is given in this drawing that will impact the design details of the structure that will receive the Seakeeper as well as selection of the adhesive to bond the Seakeeper into the hull.
- Page 15 Seakeeper’s maximum recommended thickness of .13” or 3mm. Note: Do NOT use the installation fixture to establish Seakeeper envelope dimensions. Refer to Drawing No. 90399 for envelope dimensions.
- Page 16 Product: Document #: Rev: Page: INSTALLATION MANUAL SEAKEEPER 6 90402 14 of 14 Section 1: MECHANICAL INSTALLATION FIGURE 7 – SADDLE INSTALLATION FIXTURE ON NOTIONAL HULL STRUCTURE ...
- Page 17 2) Mask hull area (Fig 9) around foundation saddles for easy clean-up and to create outline of surface area to receive adhesive as (Fig 8). Insure that the bond gap is within Seakeeper’s recommended thickness, or 3mm if using Plexus MA590. FIGURE 9 - MASKING PERIMETER OF SADDLES 3) Raise fixture clear of foundation.
- Page 18 5) Remove any paint or gel-coat from bond surfaces so that adhesive will bond directly to laminate fibers and resin as shown in Figure 8. 6) Thoroughly sand girder bond surfaces with 80 grit sandpaper. (IMPORTANT – BOND STRENGTH MAY BE REDUCED IF THIS STEP IS SKIPPED.) 7) Wipe surfaces clean from dust with alcohol or acetone using new paper towels, not shop rags.
- Page 19 1.6.3 Seakeeper Saddle Preparation 1) Ensure that screws fastening saddles to the installation fixture are tight (Fig 6). 2) Check that each saddle contains 2 plastic screws which will insure an adhesive gap of .080” (2 mm) on top surface of hull as shown in Figure 11.
- Page 20 1.6.4 Bonding Saddles to Hull Note: If using Plexus MA590 adhesive, the Seakeeper saddles should be installed when PC- 120 is confirmed dry. 1) Assemble Plexus cartridge into either the manual or pneumatic gun as shown. Remove cap on cartridge and attach mixing tip.
- Page 21 6) Lower fixture and saddles over the hull structure and apply light downward pressure to each of the four saddles until the two nylon screws rest on the hull structure (SEE FIG. 7). The adhesive...
- Page 22 Allow adhesive to cure per manufacturer’s recommendations. Follow adhesive guidelines for curing time versus temperature prior to removing the fixture. 12) Bonding of Seakeeper saddles onto the hull is now complete. Remove installation fixture. 1.6.5 Installation of Seakeeper The four areas where the feet of the Seakeeper will rest should be coplanar to within .06”...
- Page 23 5) Remove the Seakeeper unit using a spreader bar. 1.7.2 Disposal DO NOT disassemble the Seakeeper to a greater degree than necessary for removal from the boat. DO NOT dispose of a Seakeeper unit in a landfill. The unit must be shipped back to Seakeeper. ...
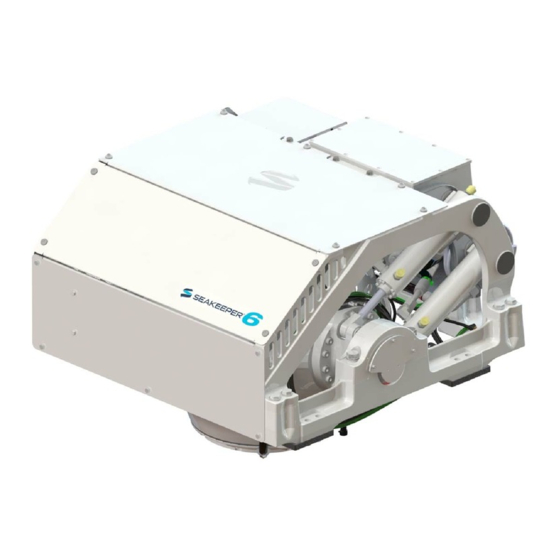
- Page 24 90403 Seakeeper 6 Operation Manual and Mounting Details Seakeeper 6, Front Oblique View Seakeeper 6, Rear Oblique View 12VDC Power Connector Terminator, Female Tee Adapter Touch Screen Display USB Extension Cable 2ft Cable 25m Cable FIGURE 1 – ELECTRICAL EQUIPMENT FOR SEAKEEPER 6...
- Page 25 Tee Adapter. 3. USB EXTENSION CABLE ASSEMBLY MOUNTING INSTRUCTIONS a. Console space required: Approx. 2 W x 2 H inches (51 x 51 mm), within 6 ft (2 m) from Touch Display. b. Mounting Instructions, Surface Mount: Use panel cutout as shown in section 2.5.
- Page 26 110 VAC (nominal), 1 Phase, 50/60 Hz, 25 Amps. ii. 230 VAC (nominal), 1 Phase, 50/60 Hz, 20 Amps. b. A separate circuit breaker should be used for each Seakeeper Drive Box. c. Seawater pumps must be rated at 110 or 230 VAC, consistent with the AC input voltage used, and must be 5 Amps max.
- Page 27 INSTALLATION MANUAL SEAKEEPER 6 90402 4 of 6 Section 2: ELECTRICAL INSTALLATION ii. Connect AC input conductors in CABLE 2 to a double-pole Circuit Breaker at an AC power distribution panel according to Figure 3 above. 1. 110 VAC, 25 Amp circuit breaker 2.
- Page 28 Locate CABLE 5 for AC power output to the Seawater Pump from the Drive Box at the middle of three cable glands as shown in Figure 2. ii. The recommended wiring is shown in Figure 6. Refer to Figure 4 for Cable 5 wire connections.
- Page 29 CSA) customer supplied. i. Install Seakeeper provided DC Power Input Cable, P/N: 20248 as CABLE 1. 1. Route CABLE 1 to DC Power Distribution Panel. 2. Terminate RED conductor to +12 VDC. Terminate BLACK conductor to 12V Rtn or Zero VDC.
- Page 30 Connect the Seakeeper foundation to vessel ground. i. Install CABLE 6 (4AWG or 22.0mm , Customer supplied) from the M6 brass ground stud on the Seakeeper rear brace to a suitable vessel ground. GROUND STUD FIGURE 8 – SEAKEEPER GROUND STUD ON REAR OF FOUNDATION...
-
Page 31: Installation Manual Seakeeper
The operator display should be located on the bridge console. c. Figure 9 below shows the CANbus communications link for the Operator Station. The Terminator goes on one the far end of the Tee Adapter from the Seakeeper. FIGURE 9 – SERIAL COMMUNICATIONS LINK FOR OPERATOR STATION 2. - Page 32 Product: Document #: Rev: Page: INSTALLATION MANUAL SEAKEEPER 6 90402 9 of 9 Section 2: ELECTRICAL INSTALLATION 3. INSTALL OPERATOR STATION EQUIPMENT a. The Operator Station equipment is installed at the selected location using Electrical Equipment Mounting Instructions in Section 2.1.
- Page 33 Product: Document #: Rev: Page: INSTALLATION MANUAL SEAKEEPER 6 90402 10 of 10 Section 2: ELECTRICAL INSTALLATION Display Installation Template The following template is for mounting; before using this template, measure to ensure that the shown size is actual. DISPLAY MOUNTING TEMPLATE ...
- Page 34 1 of 5 Section 3: COOLING INSTALLATION Introduction The Seakeeper 6 is shipped with the cooling circuit filled and ready for use. Only a quick confirmation of glycol level is required. Reference Drawings 90389 Seakeeper 6 Hardware Scope of Supply...
- Page 35 Product: Document #: Rev: Page: INSTALLATION MANUAL SEAKEEPER 6 90402 2 of 5 Section 3: COOLING INSTALLATION FIGURE 2 – SEAKEEPER 6 COOLING COMPONENTS...
- Page 36 If level has dropped, check for evidence of leaks at all connections before adding fluid as described below. If coolant is at the correct level, skip to sea water connection in section 3.3. FIGURE 3 – SEAKEEPER 6 COOLANT LEVEL...
- Page 37 Product: Document #: Rev: Page: INSTALLATION MANUAL SEAKEEPER 6 90402 4 of 5 Section 3: COOLING INSTALLATION Mix 50% ethylene glycol with 50% distilled water in a clean container. Refer to Table 1 or 2) glycol manufacturer’s literature for freezing points.
- Page 38 Flow is calculated from time to fill a known volume. Inspect raw water plumbing after sea trial for any signs of leakage. Heat exchanger contains removable end-caps to provide access for cleaning the tube bundle. FIGURE 4 – SEAKEEPER 6 SEAWATER CONNECTIONS...
- Page 39 2) Supply 110-230 VAC to Motor Drive Box at customer supplied electrical disconnect. 3) If seawater pump for the Seakeeper is not supplied through cable from Motor Drive Box, turn on the boat’s AC or DC dedicated circuit breaker that supplies power to the seawater pump.
- Page 40 6) The seawater pump will operate for two minutes after the ON/OFF button on the display was depressed. After that the seawater pump output is turned on and off based on the temperature of the Seakeeper. Confirm pump operation and flow rate, if practical.
- Page 41 Product: Document #: Rev: Page: INSTALLATION MANUAL SEAKEEPER 6 90402 3 of 3 Section 4: STARTUP will take 4+ hours to coast down to zero rpm from full speed. When the flywheel has stopped the service screen will indicate 0 RPM.
-
Page 42: Installation Checklist
Mechanical Checklist (reference Installation Manual Section 1) Seakeeper Foundation Installed in Hull Foundation bolts torqued to specification Electrical Checklist (reference Seakeeper Drawing 90396 & Installation Manual Section Mount Components Display (near helm) Connect Customer Supplied Cables ... - Page 43 Follow instruction in Section 4.1 of Installation Manual to turn off the Seakeeper AC & DC power and sea water pump may be turned off after the SEAKEEPER is turned off by placing the SEAKEEPER in LOCK mode and Turning the...
- Page 44 M6 terminal lug for grounding Seakeeper at rear 2.3.1 Electrical brace Cable, 10AWG, for grounding Seakeeper at rear 2.3.1 Dwg 90396 Electrical brace to vessel ground (used with item 6) Sea water pump, 110-230V AC 2.2.3 Electrical Relay for sea water pump control (Not required 2.2.3 Electrical...
- Page 45 Product: Document #: Rev: Page: INSTALLATION MANUAL SEAKEEPER 5 90402 4 of 4 Section 5: INSTALLATION CHECKLIST AND SUPPLIES List of common tools that may be required for installation Item Description Wire cutter DC Power, AC Power cables...
Need help?
Do you have a question about the 6 and is the answer not in the manual?
Questions and answers