Advertisement
RONDA startech – Movement Cal. 5130.D & 5130.B
User's Manual English
You have decided to buy a watch, which was assembled by a watch-
maker using a Ronda movement. Please note that no watches are
produced or distributed under the Ronda Brand.
In case of repairs, guarantee claims and questions concerning
the functioning of a watch, purchasers and consumers should
contact their retailer or the watch manufacturer, for which the
relevant information can be found in the sales or guarantee
documentation provided with the watch.
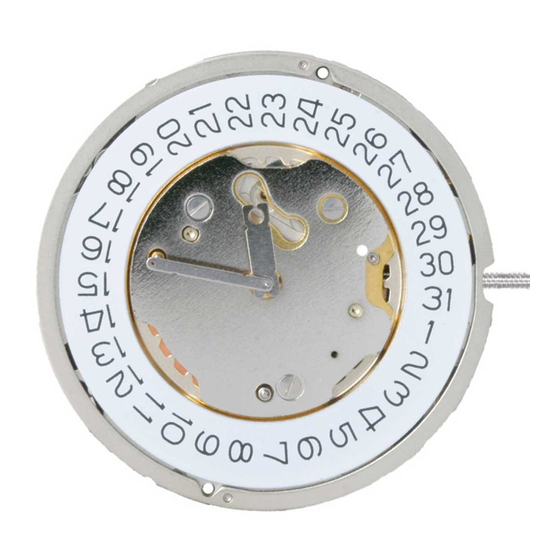
Description of the display and control buttons
Display elements
Minute hand
Date 5130.B
Hour hand
Minute counter
Hour counter
Second counter
Alarm and reference time
(hour and minute)
Second hand
Date 5130.D
01
Multifunction movement
The
alarm
and
chronograph
are combined in Cal. 5130.D and 5130.B.
All functions can be operated with the 2 push-buttons and crown.
Initial status (chronograph hands at zero position)
– start the
chronograph
with
push-button A
– switch the
alarm
on and off with
Chronograph active
Push-button B is also operative for the chronograph as soon as timing is
started with push-button A.
At the end of timing and when the chronograph hands are reset to the zero
positions the push-button functions once again assume their «initial status».
The alarm cannot be adjusted when the chronograph is active.
02
A
2 3
I
II
III
B
A
2 3
I
II
III
B
03
A
3 1
I
II
B
A
0 1
I
II
B
04
A
1 7
I
II
B
Alarm time
A
0 3
I
II
III
B
Reference time
A
0 4
I
II
III
B
Reference time
A
0 4
I
II
III
B
Alarm time
05
A
3 1
I
B
Alarm time
Please note:
The alarm cannot be used as long
as the chronograph is in operation.
06
Control buttons
2 3
Push-button A
Crown
Push-button B
push-button B
Setting the time
*
P ull out the crown to position III
(the watch stops).
Turn the crown until you reach the correct
time 8:45.
* Push the crown back into position I.
Please note:
* In order to set the time to the exact second,
must be pulled out when the second
hand is in position «60».
Once the hour and minute hands have been
set,
must be pushed back into position I
at the exact second.
Setting the date (quick mode)
Pull out the crown to position II (the watch
continues to run).
Turn the crown until the correct
date
appears.
01
Push the crown back into position I.
Please note:
The date of the following day must be set
in the calendar changing phase between
approx. 9 PM and midnight.
5130.B: Setting the date too quickly in quick
mode can result in the incorrect date being
displayed. Switching the date between
01 and 31 (position II) restores the syn-
chronisation.
Setting the time and date
Example:
– Date / time on the watch:
17
– Present date / time:
04
Pull out the crown to position II (watch
continues to run).
Turn the crown until yesterday's date
appears
03
.
Pull out the crown to position III
(the second hand stops.
The display
changes from alarm time to reference
time.)
Turn the crown until the correct date
appears.
* Continue to turn the crown until the
current time 10:39 PM appears.
Push the crown back into position I
(the display changes from reference to
alarm time).
Please note:
Resetting the time also requires the identical
correction of the reference time.
Please refer to «setting the reference time».
* Please observe the AM / PM clock rhythm.
Setting the alarm time
Activate the setting mode
Press the push-button B for at least
2 seconds. As soon as the
small minute
hand
jumps forward 1 minute, this mode
is active.
Setting
Short pressing (less than 1 second):
the alarm time is moved forward by the
minute.
Long pressing (longer than 2 seconds):
the alarm time is moved forward until the
push-button is released.
Please note:
If the push-button B is not activated for
10 seconds, the setting mode of the alarm
time deactivates itself. At the same time,
2 beeps are emitted to indicate that the
alarm is switched on.
3 1
Alarm time
07
0 4
Reference time
0 4
Reference time
0 4
Alarm time
What is the reference time?
The current time is displayed by means of the hour and minute hand.
Parallel to the current time, the reference time runs in the background: the alarm time
refers itself to this reference time. Thus, resetting the time also requires the identical
correction of the reference time.
If the reference time is not synchronised with the current time, this results in the
alarm signal being emitted at a different time to the set alarm time.
08
2 3
2 3
09
2 3
2 3
10
2 3
/ 1:25 AM
/ 10:39 PM
2 3
11
04
2 3
2 3
65,5% = 40mm Druchmesser
65,5% = 40mm Druchmesser
65,5% = 40mm Druchmesser
65,5% = 40mm Druchmesser
12
Battery type: 395 / SR927SW
Accuracy: +20 / -10 seconds per month
Switching the alarm on / off
A
The alarm is switched on / off by briefly
pressing the push-button B:
2 beeps alarm switched on
I
1 beep alarm switched off
B
Please note:
The alarm can be set maximum 12 hours
before the desired alarm time.
Once the set alarm time has been reached,
a signal is emitted for 20 seconds.
This signal is repeated after two minutes.
Following brief pressing of the push-button B,
the signal is immediately switched off.
Setting the reference time
A
P ull out the crown to position III
(second hand stops.
from alarm time to reference
Activating the setting mode
I
II
III
Press the push-button B for at least
2 seconds. As soon as the
hand
B
mode is active.
Short pressing (less than 1 second):
A
the reference time is moved forwards by
the minute.
Medium pressing: (1–2 seconds):
the reference time is moved forwards by
the hour.
I
II
III
Long pressing (longer than 2 seconds):
the reference time is moved forwards until
the push-button is released.
B
A
Push the crown back into position I
(the display changes from reference time
to alarm time).
A 1 beep signal indicates that the alarm
is switched off.
I
II
III
Please note:
B
The reference time must display the same
time as the current time. This means that
resetting the current time also requires the
identical correction of the reference time.
Afterwards, the alarm time has to be reset.
Chronograph: Basic function
A
(Start / Stop / Reset)
Example:
Start: Press push-button A.
Stop:
pushbutton A once more and read
the chronograph counters:
B
4h / 20 min / 38 sec
A
Zero positioning:
Press push-button B.
(The chronograph hands will be reset to
their zero positions.)
Please note:
The alarm cannot be used as long as the
B
chronograph is in operation.
Chronograph:
A
Accumulated timing
Example:
Start:
Stop:
Restart: (timing is resumed)
*
Stop:
B
A
Reset:
The chronograph hands are returned to
their zero positions.
Please note:
* Following
timing can be continued by pressing
push-button A
B
(Restart / Stop, Restart / Stop, ...).
Chronograph:
A
Intermediate or interval timing
Example:
Start: (start timing)
Display interval:
e.g.
20 minutes 17 seconds
continues in the background)
Making up the measured time:
*
B
(the chronograph hands are quickly
advanced to the ongoing measured time).
A
Stop: (Final time is displayed)
Reset:
The chronograph hands are returned to
their zero position
Please note:
* Following
mediates can be displayed by pressing
push-button B (display interval / make up
B
measured time, ...).
Adjusting the chronograph
A
hands to zero position
Example:
One or several chronograph hands are not
in their correct zero positions and have to be
adjusted (e.g. following a battery change).
I
II
III
Pull out the crown to position III (all
chronograph hands are in their correct
B
or incorrect zero position.
changes from alarm time to reference
A
time.)
65,5% = 40mm Druchmesser
Keep push-buttons A and B depressed
simultaneously for at least 2 seconds (the
65,5% = 40mm Druchmesser
second counter hand rotates by
65,5% = 40mm Druchmesser
360° corrective mode is activated.)
III
B
65,5% = 40mm Druchmesser
Adjusting the second counter hand
A
65,5% = 40mm Druchmesser
Single step
Continuous
III
III
Adjusting the next hand B
B
Adjusting the minute counter hand
A
A
and the hour counter hand
(mechanical coupled)
Single step
III
Continuous
Returning the crown to position I
Termination of the chronograph hands
I
II
III
adjustment (can be carried out at any time.
display changes from reference to alarm
The display changes
time.)
small minute
jumps forwards one minute, this
to stop the timing, press
(start timing)
(e.g. 15 min 5 sec following
)
(e.g. 5 min 12 sec following
)
=
20 min 17 sec
(The accumulated measured time is shown)
, the accumulation of the
(timing
, further intervals or inter-
The display
A
1 x short
A
long
III
III
III
A
1 x short
A
long
III
III
The
time.)
09 / 2017
Advertisement
Table of Contents


Need help?
Do you have a question about the Cal. 5130.D and is the answer not in the manual?
Questions and answers