Table of Contents
Advertisement
Quick Links
Advertisement
Table of Contents

Related Manuals for Epson ProSense J-367


Summary of Contents for Epson ProSense J-367
-
Page 1: User Manual
GPS Sports Monitor J-347/367, U-350 User Manual... -
Page 2: Welcome
J-347/367, U-350 User Manual Welcome Welcome Features Measuring a variety of activities Measure running, walking, bike riding, swimming and other activities, and display the results. ❏ Measure distance, pace, routes, and other information. “Measurable items” on page 33 ❏ Measure the time that has elapsed since each start (split time) and lap times. “Measuring workouts”... - Page 3 GPS signal reception, such as in tunnels or indoors. “About the stride sensor” on page 29 ❏ With the Epson View companion application, you can view and manage your workout and activity data from your PC or smartphone. “Managing data with the companion application” on page 59...
-
Page 4: Table Of Contents
J-347/367, U-350 User Manual Contents Contents Welcome............... . . 2 Features. - Page 5 J-347/367, U-350 User Manual Contents Checking data during measuring............39 Recording lap times during measuring.
- Page 6 J-347/367, U-350 User Manual Contents Settings................76 Bluetooth.
-
Page 7: Overview Of The Prosense
J-347/367, U-350 User Manual Overview of the ProSense Overview of the ProSense “Brief description of the ProSense” on page 8 “Brief description of the User's Guide and Startup Guide” on page 9 “Using this Device Safely” on page 11 “Included items and optional accessories” on page 14... -
Page 8: Brief Description Of The Prosense
This device is a sports watch designed with GPS functionality to measure and record running and other workout activity. This device also tracks and records other types of daily activity. With the Epson View companion application, you can analyze, review, and manage your workout and activity data from your PC or smartphone. -
Page 9: Brief Description Of The User's Guide And Startup Guide
J-347/367, U-350 User Manual Overview of the ProSense Brief description of the User's Guide and Startup Guide Thank you for your purchase of the GPS Sports Monitor "ProSense". To ensure correct use of the device, make sure to read the included Startup Guide and then refer to the User's Guide as necessary. -
Page 10: Caution
J-347/367, U-350 User Manual Overview of the ProSense Caution ❏ Unapproved copying of part or all of this guide is strictly forbidden. ❏ The content of this guide is subject to change without prior notice. ❏ Although every effort has been made to ensure the accuracy of this guide, contact us if you have any questions or notice any errors in descriptions in the content of this guide. -
Page 11: Using This Device Safely
J-347/367, U-350 User Manual Overview of the ProSense Using this Device Safely Make sure to read the included "Using this Device Safely" document before using the product to ensure safe use. Incorrect handling may result in product failure or incorrect operation. ❏... -
Page 12: Usb Charging Clip Precautions
Do not attempt to disassemble or repair this product. Doing so may cause electric shock or other accident. Do not leave this product within reach of young children. Use this product at your own risk. Seiko Epson shall not be liable for damages caused to the owner of the device or any third party. -
Page 13: Notes On Electromagnetic Waves
J-347/367, U-350 User Manual Overview of the ProSense Notes on electromagnetic waves ® This device is equipped with Bluetooth Smart technology. This function enables wireless communication of measurement data between the device and a smartphone. This device has been classified as a low electronic data communication system based on Radio Law. Therefore, this device does not require a radio station license. -
Page 14: Included Items And Optional Accessories
J-347/367, U-350 User Manual Overview of the ProSense Included items and optional accessories Included items Make sure you check that all of the following items have been supplied with this product. If any of these items are missing, contact your local reseller. Notes on Usage USB Charging clip (charging and Device... -
Page 15: Setup
J-347/367, U-350 User Manual Setup Setup “Charging the device” on page 16 “Button functions” on page 19 “Configuring initial settings” on page 21 “Device screens” on page 23 “Battery levels” on page 24 “Locking and unlocking the buttons” on page 25 “Turning the device on and off”... -
Page 16: Charging The Device
J-347/367, U-350 User Manual Setup Charging the device Important ❏ Charge this device before using it for the first time. ❏ Use the specified USB Charging clip. ❏ Do not attach the USB Charging clip to a wet or dirty device. Doing so may cause corrosion or malfunction of the device or USB Charging clip contact points, or communication failures. - Page 17 You can use the Epson View companion application to configure initial settings from the PC while charging the device. Visit the following website to download Epson View, create an account, and learn how to use the application to configure the device and perform other operations.
- Page 18 J-347/367, U-350 User Manual Setup Check that charging is complete. Charging is complete once the "Remove clip to setup your watch" message appears. Note ❏ Once the device is fully charged, the overcharge prevention feature engages. The device will not be damaged even if you continue to charge the battery.
-
Page 19: Button Functions
J-347/367, U-350 User Manual Setup Button functions This device is operated using the BACK button, START/STOP button, UP button, ENTER button, and DOWN button. These buttons have different functions depending on the displayed screen. The following table describes the button functions for each screen. Function Time screen/Track Activity Measurement screen... - Page 20 J-347/367, U-350 User Manual Setup Function Time screen/Track Activity Measurement screen Menu/Settings screen screen Button Pressing the button displays the Pressing the button switches Pressing the button selects the activity type for the next between Measurement screens. next option down. measurement or displays the This button is also used to Workout Recall screen.
-
Page 21: Configuring Initial Settings
J-347/367, U-350 User Manual Setup Configuring initial settings Initial settings include personal details such as height and weight. Configuring this information improves accuracy of the recorded data. The initial settings process starts once the USB Charging clip is removed from the device. -
Page 22: Configuring The Device Directly
J-347/367, U-350 User Manual Setup To configure the date and time Configuring the device directly automatically, move to an outdoor location where there are no obstacles Set the display language overhead and select Set by GPS. Select LANGUAGE and then press the ENTER button. -
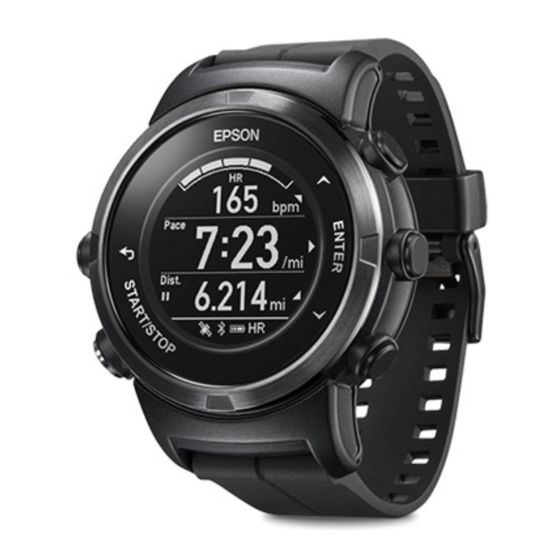
Page 23: Device Screens
J-347/367, U-350 User Manual Setup Device screens Screen display Time screen Current date and day Current time Total steps for the day and indicator of progress toward your target number of steps Icons that represent the status of GPS positioning, wireless communication, and battery level. -
Page 24: Battery Levels
J-347/367, U-350 User Manual Setup Battery levels You can check how much charge remains from the battery icon below the time display. Battery icon and standard usage times Usage function GPS measuring 5 to 10 hours 2 to 5 hours 1 to 2 hours 0 to 1 hour Estimated battery life of time display operation only (no GPS measuring) -
Page 25: Locking And Unlocking The Buttons
J-347/367, U-350 User Manual Setup Locking and unlocking the buttons Locking the buttons To lock the buttons, press and hold the UP button at the following screens. ❏ Time screen ❏ Activity screen ❏ Measuring screen Unlocking the buttons To unlock the buttons, press and hold the UP button. -
Page 26: Turning The Device On And Off
J-347/367, U-350 User Manual Setup Turning the device on and off Turning on the device Press and hold the START/STOP button for 2 seconds to turn on and start the device. Turning off the device Turn off the device if it will be unused for an extended period of time. To turn off the device, press the ENTER button at the Time screen and then select MENU >... -
Page 27: Device Sensors
J-347/367, U-350 User Manual Setup Device sensors GPS signal reception (GPS positioning) GPS positioning GPS positioning is the process by which the device receives a GPS signal and timing information to measure routes, distance, pace, and other information. To ensure accuracy of measurements, use the device under the following conditions in areas of good GPS signal reception. - Page 28 AGPS - Reducing the GPS Positioning Time You can reduce the GPS signal acquisition time by connecting the device with a smartphone and then retrieving GPS satellite information from a network server. Refer to the Epson View website for more information. https://view.epson.com/...
-
Page 29: About The Stride Sensor
J-347/367, U-350 User Manual Setup About the stride sensor This device is equipped with a stride sensor. This sensor enables the device to continue measuring your distance and pace in locations with poor GPS signal reception, such as in tunnels or indoors. Using the device for the first time When using the device for the first time, run or walk for the specified time depending on the location as described in the following table to allow the device to acclimate to your stride. -
Page 30: Measuring Pulse (Heart Rate) During Exercise
J-347/367, U-350 User Manual Setup Measuring Pulse (Heart Rate) during Exercise Wear the device on your wrist and then press the [UP] button to see your pulse (heart rate). You can set five heart rate zones (within the range of the minimum and maximum heart rate) to suit the exercise intensity in User Settings. -
Page 31: Measuring Your Workout
J-347/367, U-350 User Manual Measuring Your Workout Measuring Your Workout “Measuring workouts” on page 32 “Checking data during measuring” on page 39 “Recording lap times during measuring” on page 40 “Changing Measure Set (GPS measurement settings)” on page 41 “Using A-GPS to reduce the GPS positioning time” on page 52 “Configuring the operation of the backlight during measuring”... -
Page 32: Measuring Workouts
J-347/367, U-350 User Manual Measuring Your Workout Measuring workouts This device uses positional and time information received from GPS satellites to measure your distance, pace, and routes. You can also measure split times and lap times during GPS measuring sessions. Split time Measures the elapsed time from the start. -
Page 33: Measurable Items
J-347/367, U-350 User Manual Measuring Your Workout Measurable items Workout Explanation Split Time (Time) Total time from the start of measurements Distance (Dist.) Total distance from the start of measurements Pace (Pace) Current pace (time per kilometer/mile) Lap Time (LapTime) Average lap time Lap Pace (LapPace) Average pace for each lap... - Page 34 J-347/367, U-350 User Manual Measuring Your Workout Settings screen Screen 1 Screen 2 Screen 3 Screen ❏ ❏ ❏ This screen displays the Time LapPace Pitch current settings. ❏ ❏ ❏ Distance Stride Time of Day ❏ AT Lap ❏ Calories ❏...
- Page 35 Does not appear during measuring. Appears only when a Time or Dist. has been set. Note The training parameters/information that appears on screens 1 through 3 and the Lap screen can be changed. Refer to the Epson View companion application for more information. https://view.epson.com/...
-
Page 36: Measurement Preparation (Selecting The Activity Type)
J-347/367, U-350 User Manual Measuring Your Workout Measurement preparation (selecting the Activity Type) At the Time screen, press the DOWN button to select the activity type. The following table lists the available activities. Activity Type Explanation Running (Run) Jogging, running, marathons, etc. Walking (Walk) Walking Treadmill (Treadmill) -
Page 37: Starting Measuring
❏ The oldest data will be overwritten when the device runs out of storage space used for measurement data. We recommend that you use the Epson View companion application to upload data after each measuring. “Managing data with the companion application”... -
Page 38: Stopping And Saving Measuring
J-347/367, U-350 User Manual Measuring Your Workout You can return to the Time screen by waiting 15 Stopping and saving measuring seconds or pressing the ENTER button. Display the Stop menu Press the ENTER button while the measuring is paused to display the Stop menu. Save the data Press the UP orDOWN button >... -
Page 39: Checking Data During Measuring
J-347/367, U-350 User Manual Measuring Your Workout Checking data during measuring Three different screens are available during measuring. Press the UP and DOWN buttons to switch between these screens. The information that appears depends on the selected activity. Screen 1 Screen 2 Screen 3 Screen... -
Page 40: Recording Lap Times During Measuring
J-347/367, U-350 User Manual Measuring Your Workout Recording lap times during measuring Press the ENTER button during measuring to record a lap. The Display Lap screen appears for a few seconds when a lap is recorded. Note The Display Lap screen will also appear when you have reached the distance set for the AT Lap function. -
Page 41: Changing Measure Set (Gps Measurement Settings)
J-347/367, U-350 User Manual Measuring Your Workout Changing Measure Set Note The available settings vary depending on the (GPS measurement activity. settings) “List of Measure Set” on page 43 Various user-configurable measurement settings are available. Configuring settings Display the Workout menu Press the ENTER button at the Measurement screen. - Page 42 ❏ If you configured settings while measuring is paused, press the BACK button twice to display the paused measurement screen. ❏ You can also configure settings from a PC using Epson View. Refer to the following website for more information. https://view.epson.com/...
-
Page 43: List Of Measure Set
J-347/367, U-350 User Manual Measuring Your Workout List of Measure Set AT Lap This function automatically records laps each time a preconfigured distance is reached. “Recording laps automatically (AT Lap)” on page 44 AT Pause (only for Run activity sessions) This function automatically pauses your measuring when you stop running and resumes your measuring when you start running again. -
Page 44: Recording Laps Automatically (At Lap)
J-347/367, U-350 User Manual Measuring Your Workout Recording laps automatically Display the Settings screen (AT Lap) Press the UP or DOWN button > select AT Lap > and then press the ENTER button. This function automatically records laps each time a preconfigured distance is reached. - Page 45 J-347/367, U-350 User Manual Measuring Your Workout Configure settings Press the UP or DOWN button > select Time or Dist. > and then press the ENTER button. Note ❏ To disable this function, select OFF. Finish the configuration Once you have configured all desired settings, press the BACK button to display the Measurement screen.
-
Page 46: Pausing And Resuming Measuring Automatically (At Pause)
J-347/367, U-350 User Manual Measuring Your Workout Pausing and resuming Display the Settings screen measuring automatically (AT Press the UP orDOWN button > select AT Pause > and then press the ENTER button. Pause) This function automatically pauses your measuring when you stop running and resumes your measuring when you start running again. - Page 47 J-347/367, U-350 User Manual Measuring Your Workout Configure settings Press the UP orDOWN button > select ON > and then press the ENTER button. Note ❏ To disable this function, select OFF. Finish the configuration Once you have configured all desired settings, press the BACK button to display the Measurement screen.
-
Page 48: Measuring Preconfigured Time And Distances (Training)
J-347/367, U-350 User Manual Measuring Your Workout Measuring preconfigured time and distances (Training) Training This function measures your performance in regards to preconfigured time and distance goals and also has a mode that helps you maintain a preconfigured pace. Time training You configure a training time to create a timed training session. - Page 49 J-347/367, U-350 User Manual Measuring Your Workout Measuring Preconfigured Time and Configure settings Distances (Time/Dist.) Press the UP orDOWN button > select Time or Dist. > and then press the ENTER button. Display the Workout menu Press the ENTER button at the Measurement screen.
-
Page 50: Setting And Measuring Paces (Target Pace)
Note The target pace can also be configured from a PC if you use the Epson View PC application. In this scenario, you can configure a different target pace for each lap/ interval. Refer to the "Application User's Guide" for more information. -
Page 51: Setting Time/Distance Training Sessions With High/Low Intensity Intervals(Interval Training)
Note (interval training) Interval settings can also be configured from a PC if you use the PC application.Epson View You can freely configure the number of intervals when Brief description of interval training using the PC application. Refer to the "Application User's Guide"... -
Page 52: Using A-Gps To Reduce The Gps Positioning Time
You can reduce the GPS positioning time before your walking or running session by updating the GPS information in the device./ Connect the device to a PC or smartphone and start Epson View to automatically update the GPS information in the device. - Page 53 J-347/367, U-350 User Manual Measuring Your Workout ❏ Deviation from the target pace range in Training mode “Vibration” on page 76...
-
Page 54: Measuring Time (Stopwatch)
J-347/367, U-350 User Manual Measuring Your Workout Check recorded laps. Measuring time (Stopwatch) Use this feature to measure only time without using GPS measuring. Note ❏ Stopwatch data is not stored in the device. ❏ This function cannot measure distance, pace, or other GPS measuring activity. -
Page 55: Checking Workout Measurement Data
J-347/367, U-350 User Manual Checking Workout Measurement Data Checking Workout Measurement Data “Checking history data from previous measurement” on page 56 “Deleting measurement data from the history” on page 58 “Managing data with the companion application” on page 59... -
Page 56: Checking History Data From Previous Measurement
J-347/367, U-350 User Manual Checking Workout Measurement Data Checking history data from previous measurement You can check measured data on the recall screen. -
Page 57: Measurement Data That Can Be Checked In Recall
J-347/367, U-350 User Manual Checking Workout Measurement Data Measurement data that can be checked in recall The following measurement data can be checked. Icons Run activity Indoor run activity Walk activity Bike activity Indoor bike activity Treadmill activity Pool swim activity Measurement data parameters Date measured Start time/End time... -
Page 58: Deleting Measurement Data From The History
J-347/367, U-350 User Manual Checking Workout Measurement Data Deleting measurement data from the history Two methods are available to delete measurement data from the history. ❏ Use the following procedure to delete measurement data from the history. ❏ To delete the entire history and all measurement data, initialize the device. -
Page 59: Managing Data With The Companion Application
With this application, you can review workout measurement data and activity data from your PC. With this application, you can review workout measurement data and activity data from your smartphone and PC. Visit the following website to download Epson View, create an account, and learn how to upload data and perform other operations. -
Page 60: Starting Wireless Communication
J-347/367, U-350 User Manual Checking Workout Measurement Data Starting wireless communication This section describes the procedure to start wireless communication so that the device can be paired with a smartphone. Note ❏ To delete the smartphone pairing, display the Settings menu, select Smartphone and then Forget Device. -
Page 61: Measuring Daily Activity (Meas. Activity)
J-347/367, U-350 User Manual Measuring Daily Activity (Meas. Activity) Measuring Daily Activity (Meas. Activity) “Track activity measurement function” on page 62 “Measuring activity” on page 63 “Checking your activity” on page 64 “Configuring a target number of steps” on page 65 “Checking your target number of steps progress”... -
Page 62: Track Activity Measurement Function
J-347/367, U-350 User Manual Measuring Daily Activity (Meas. Activity) Track activity measurement function This device is equipped with functionality to measure different activities. The device can measure daily activity such as number of steps and calories burnt while the device is worn. Measured data is aggregated on a per-day basis and is viewable on the device or the companion application. -
Page 63: Measuring Activity
J-347/367, U-350 User Manual Measuring Daily Activity (Meas. Activity) Measuring activity Finish the configuration Press the BACK button to display the Time screen. Display the General Settings screen At the Time screen, press the UP button > select Settings > and then press the ENTER button. -
Page 64: Checking Your Activity
J-347/367, U-350 User Manual Measuring Daily Activity (Meas. Activity) Checking your activity Activity data you can check The following two types of data can be checked. ❏ Current activity data (Track Activity screen) ❏ Past seven days worth of activity data (Recall screen) Measurement item Steps Recovery time... -
Page 65: Checking Previous Activity Data (Recall Screen)
Older data is overwritten by the to ON. oldest data first. For this reason, we recommend that you upload data to the Epson View ❏ The default target number of steps is 10,000 steps/ companion application on a timely basis. -
Page 66: Checking Your Target Number Of Steps Progress
J-347/367, U-350 User Manual Measuring Daily Activity (Meas. Activity) Checking your target number of steps progress If you configure a target number of steps, the device displays a target number of steps progress indicator on the Time screen. -
Page 67: Stop Measuring Your Activity
J-347/367, U-350 User Manual Measuring Daily Activity (Meas. Activity) Stop measuring your activity Note Note: When Track Activity is set to OFF, the Track Activity icon is removed from the bottom right of the Time screen (to the right of the battery icon). The device will no longer measure your number of steps, calories burnt, or distance. -
Page 68: Usage Examples For Some Typical Scenarios
J-347/367, U-350 User Manual Usage Examples for Some Typical Scenarios Usage Examples for Some Typical Scenarios “Measuring marathons and walking sessions” on page 69 “Configuring training workouts for races” on page 70 “Configuring racing goals” on page 71 “Checking your daily condition (Activity)” on page 72... -
Page 69: Measuring Marathons And Walking Sessions
J-347/367, U-350 User Manual Usage Examples for Some Typical Scenarios Measuring marathons and walking sessions... -
Page 70: Configuring Training Workouts For Races
J-347/367, U-350 User Manual Usage Examples for Some Typical Scenarios Configuring training workouts for races... -
Page 71: Configuring Racing Goals
J-347/367, U-350 User Manual Usage Examples for Some Typical Scenarios Configuring racing goals... -
Page 72: Checking Your Daily Condition (Activity)
J-347/367, U-350 User Manual Usage Examples for Some Typical Scenarios Checking your daily condition (Activity) -
Page 73: Changing Device Settings
J-347/367, U-350 User Manual Changing Device Settings Changing Device Settings “Changing device settings” on page 74 “Settings” on page 76 “Turn Off” on page 77... -
Page 74: Changing Device Settings
121.htm Configure settings Note Start the Epson View companion application on A wireless connection must be established between the the PC and configure the initial settings. Follow device and a smartphone to configure the device using a the on-screen instructions and enter your smartphone. -
Page 75: Configuring The Device Directly
J-347/367, U-350 User Manual Changing Device Settings Configuring the device directly Finish the configuration Press and hold the BACK button. Display the MENU At the Time screen, press the ENTER button. Display the Settings screen Press the UP orDOWN button > select Settings >... -
Page 76: Settings
J-347/367, U-350 User Manual Changing Device Settings Notifications Settings These settings are used to enable and disable notifications such as smartphone reception of phone Bluetooth calls and email messages when the device is paired with a smartphone. ON/OFF Non-Workout This setting is used to enable and disable Bluetooth. This setting is used to enable and disable notifications at the Time screen. -
Page 77: System
J-347/367, U-350 User Manual Changing Device Settings ❏ Triggering of a notification such as completion of minutes elapses, we recommend that you select a lap or target distance in Training mode Cancel, move to a different location, and try again. (Notifications) ❏... -
Page 78: Certification
J-347/367, U-350 User Manual Changing Device Settings Certification This displays the device certifications. -
Page 79: Regular Maintenance
J-347/367, U-350 User Manual Regular Maintenance Regular Maintenance “Cleaning the device” on page 80 “Waterproof performance” on page 82 “Batteries” on page 82 “Disposing of the device” on page 82 “Problem solving” on page 83 “Updating the firmware” on page 86 “Performing system resets”... -
Page 80: Cleaning The Device
J-347/367, U-350 User Manual Regular Maintenance Cleaning the device Main device and band Periodically cleaning with water Clean the main device with water after each use or periodically. Wipe completely dry with a dry cloth after washing. The band can be washed with a diluted mild detergent. Important ❏... - Page 81 J-347/367, U-350 User Manual Regular Maintenance Important ❏ Do not attach the USB Charging clip to the device while contact points are wet or dirty. Doing so may cause corrosion or malfunction of the contact points, or communication failures. ❏ Do not clean using organic solvents such as benzine, thinner, alcohol, or detergent. This could cause the product to degrade.
-
Page 82: Waterproof Performance
J-347/367, U-350 User Manual Regular Maintenance Waterproof performance Batteries Internal rechargeable device battery You cannot replace the built-in rechargeable battery yourself. If the battery does not retain its charge for as long as it used to due to prolonged use, the battery has likely reached the end of its service life. In this situation, contact your local reseller or our repair center to replace the battery for a fee. -
Page 83: Problem Solving
J-347/367, U-350 User Manual Regular Maintenance Problem solving Check each item. Problem Solution Basic actions The screen is not displayed. You cannot start using the device immediately after purchase until the device is charged. Try charging the device first. Also, nothing is displayed if the battery runs out. - Page 84 J-347/367, U-350 User Manual Regular Maintenance Problem Solution GPS signal reception is weak or Perform GPS positioning again with the device outside with no failing. obstructions overhead for 15 minutes. “GPS signal reception (GPS positioning)” on page 27 Go to a location outside with no obstructions overhead. GPS signals cannot be received while indoors.
- Page 85 J-347/367, U-350 User Manual Regular Maintenance Problem Solution Web application An error screen appears and Do not move the device and USB Charging clip during communication is interrupted communication processes. Avoid communicating data under during data exchanges with the environments where static electricity can be easily generated. If an error occurs, try reconnecting the USB Charging clip and attempting the communication again.
-
Page 86: Updating The Firmware
❏ The USB Charging clip attached to the device is correctly connected to the PC. Important Refer to the download page on the Epson website The device and all settings/history data are for more information on firmware update initialized when the firmware is updated. Refer to procedures. -
Page 87: Performing System Resets
J-347/367, U-350 User Manual Regular Maintenance Performing system resets Perform a system reset if operation becomes unstable. Press the UP, ENTER, and DOWN buttons simultaneously. The screen is reset and the device restarts. Note Measurement data is not recorded if a system reset is performed while measuring. The following shows the differences between a system reset and initializing. -
Page 88: Initializing The Device
J-347/367, U-350 User Manual Regular Maintenance Initializing the device Initializing the device Press the UP orDOWN button > select Yes > and then press the ENTER button. If you want to delete all measurement data and clear the device's memory, you need to initialize the device. Display the menu At the Time screen, press the ENTER button. -
Page 89: Appendix
J-347/367, U-350 User Manual Appendix Appendix “Product specifications” on page 90 “Understanding the icons” on page 92 “Glossary” on page 93 “Trademarks” on page 95... -
Page 90: Product Specifications
J-347/367, U-350 User Manual Appendix Product specifications Device specifications Model No. J-347/367, U-350 Size (thickness) 15.7mm Weight J-347/367: 61g U-350: 63g Water resistance Water resistant up to 5 bars of pressure Operating Clock display (when Track Activity enabled, Auto Sleep enabled, Up to 7 days *1 *2 time Bluetooth enabled, and Auto Search disabled) -
Page 91: Option Specifications
J-347/367, U-350 User Manual Appendix The device periodically receives a GPS signal to reduce the initial GPS positioning time. Auto Sleep is active for 14 hours per day (internal evaluation criteria) Operating time varies depending on GPS signal reception quality and device settings. The operating time is significantly reduced when GPS signal reception is poor, such as indoors. -
Page 92: Understanding The Icons
J-347/367, U-350 User Manual Appendix Understanding the icons Icons Name Run mode (measuring while running) Walking mode (measuring while walking) Treadmill mode (measuring treadmill workout sessions) Device is acquiring a GPS signal (GPS On) GPS positioning Average pace Distance Calories burnt Stopwatch Split time AT Lap... -
Page 93: Glossary
The total time from starting to Split time stopping the workout. This companion application allows Epson View you to use a smartphone or PC browser to review session and measurement data from your device. This function automatically pauses AT Pause... - Page 94 J-347/367, U-350 User Manual Appendix Definition Term Your current pace acquired from GPS Pace information. Your pace for the current lap. Lap pace Your time for the lap. Lap time...
-
Page 95: Trademarks
User Manual Appendix Trademarks ❏ EPSON and EXCEED YOUR VISION are registered trademarks of the Seiko Epson Corporation. ❏ Microsoft and Windows are registered trademarks of the Microsoft Corporation in the United States of America and other countries. ❏ OS X and macOS are registered trademarks of Apple Inc. in the United States of America and other countries. - Page 96 GPS Sports Monitor J-347/367, U-350 http://www.epson.jp/support/support_menu/ks/121.htm XXXXXXXXX ©2017 Seiko Epson Corporation. All rights reserved.
Need help?
Do you have a question about the ProSense J-367 and is the answer not in the manual?
Questions and answers