Lightware MMX8x4-HT400MC Quick Start Manual
Hide thumbs
Also See for MMX8x4-HT400MC:
- User manual (194 pages) ,
- User manual (163 pages) ,
- User manual (125 pages)
Advertisement
Quick Links
Download this manual
See also:
User Manual
Quick Start Guide
MMX8x4-HT400MC
Important Safety Instructions
Please read and keep the information in the attached safety instructions supplied with the
product before you start using the device.
Introduction
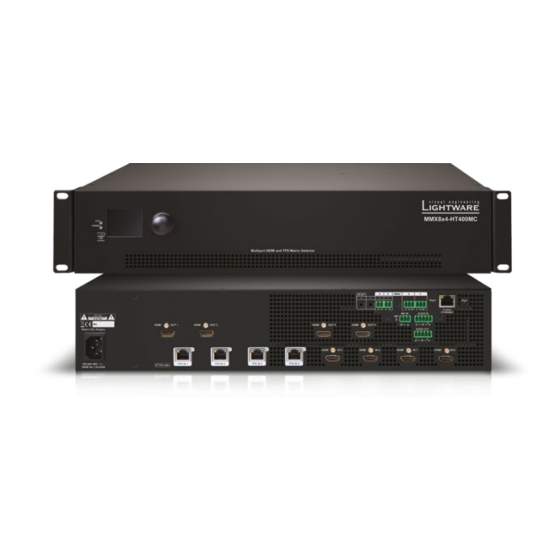
MMX8x4-HT400MC is a standalone matrix switcher specifically designed for conference
room environments with eight video inputs (four HDMI and four TPS) and four HDMI video
outputs. 4K / UHD (30Hz RGB 4:4:4 or 60Hz YCbCr 4:2:0), 3D capabilities and HDCP are fully
supported. MMX8x4-HT400MC has a dedicated Special Audio Input block with input ports for
microphone and line-in. The built-in sound mixer allows free mixing of the microphone or the
line-in and the de-embedded audio from one of the input HDMI signals.
The MMX8x4-HT400MC matrix is compatible with any
third-party HDBaseT
TM
device.
HDBaseT
and the HDBaseT Alliance logo are trademarks of the HDBaseT Alliance.
TM
Compatible Devices
The MMX8x4-HT400MC matrix is compatible with other Lightware TPS devices, matrix TPS
and TPS2 boards, 25G boards, as well as third-party HDBaseT-extenders, but not compatible
with the phased out TPS-90 extenders.
Box Contents
LAN cross-link cable,
Matrix unit
IEC power connector
CAT5e type, 3m length
Phoenix Combicon 3-pole
Phoenix Combicon 5-pole
Safety and warranty info,
connector (3x)
connector (2x)
Quick Start Guide
Infrared emitter unit
with Phoenix Combicon
Infrared emitter unit with
Jack connector (2x)
2-pole connector (2x)
Front View
4
5
3
MAIN MENU
> System Settings
LIVE
2
Ports
POWER
EDID
USB
Control
1
1
USB port
USB mini-B port for controlling the unit locally by Lightware Device
Controller software.
2
POWER LED
on
Power LED indicates that the unit is
powered on.
3
LIVE LED
blinking slow
The unit is on and operates properly.
blinking fast
The unit is in bootload mode.
4
LCD screen
Displays the front panel menu. Basic settings are available.
5
Jog dial
Browse the menu by turning the knob, click on the desired item to
knob
check or change it.
Rear View
Sn:
HDMI
OUT 1
HDMI
OUT 2
Made in EU, Hungary
100-240 VAC
TPS IN 1
TPS IN 2
TPS LINK
50/60 Hz 1.4-0.85A
2
1
1
AC connector
Standard IEC connector accepting 100-240 V, 50 or 60 Hz.
2
TPS inputs
RJ45 connectors (4x) for incoming TPS signal; not PoE-compliant.
3
HDMI inputs
HDMI input ports (4x) for sources.
4
Audio output
5-pole Phoenix connector for balanced analog audio; the signal
port
can be mixed from the de-embedded audio of the TPS/HDMI
inputs or the microphone input or the line in. See details from the
audio features on the next page.
Connecting Steps
TPS transmitter
PC
Projector
device
TPS
HDMI
HDMI
RS-232
MAIN MENU
MMX8x4-HT400MC
LIVE
> System Settings
Input Ports
POWER
Output Ports
USB
Control
Multiport HDMI and TPS Matrix Switcher
Power
LAN
Audio
Audio
Audio
USB
Power
Laptop
Audio Amplifier Microphone
Media Player
outlet
Multiport HDMI and TPS Matrix Switcher
LCD Menu and Navigation
The front panel has a color LCD showing the most important settings and parameters (E.g.
network settings, port status, crosspoint state). The jog dial control knob can be used to
navigate between the menu items or change the value of a parameter. The knob can be
pressed to enter a menu or edit/set a parameter.
Menu navigation
& change parameter
MAIN MENU
Turn
> System Settings
Ports
EDID
r
e
w
q
9
8 7 6
4
3
RS232
2
1
I I R R O O U U T T
4
3
2
1
Reset
TX
TX
TX RX
TX
RX
MIC IN
AUDIO IN
48V
L
R
HDMI
OUT 3
HDMI
OUT 4
AUDIO OUT
L
R
HDMI
IN 5
HDMI
IN 6
HDMI
IN 7
TPS IN 3
TPS IN 4
3
4
Audio output port
5-pole Phoenix connector for balanced analog audio; the
signal can be mixed from the de-embedded audio of the
TPS/HDMI inputs or the microphone input or the line in. See
details from the audio features on the next page.
5
Audio input port
3-pole Phoenix connector for microphone input and
5-pole Phoenix connector for balanced analog audio input.
6
Boot button
Reset or power on the device while keep pushing the hidden
button takes the matrix in bootload mode.
TPS
Connect an HDBase-T
TM
-compatible transmitter to TPS input port (not
PoE-compliant).
HDMI
Connect an HDMI source (e.g. PC) to the HDMI input port.
HDMI
Connect an HDMI sink (e.g projector) to the HDMI output port.
Infra emitter
RS-232
Optionally connect a serial device (e.g projector) to the 3-pole Phoenix
connector to transmit RS-232 commands.
IR
Optionally connect the infra emitter to the infra output port (2-pole Phoenix or
IR
1/8" Stereo Jack connector) to transmit infra signal.
LAN
Optionally connect the UTP cable (straight or cross, both are supported) in order
to control the matrix switcher via the Lightware Device Controller software.
USB
Optionally connect the USB cable in order to control the matrix switcher via the
Lightware Device Controller software.
Audio
Optionally for analog output connect an audio device (e.g. audio amplifier) to the
analog audio output port by an audio cable.
Audio
See the Installation Guide for Connecting a Microphone section on the next
page before connecting the microphone. Not proper setting can cause a damage.
Audio
Optionally for audio input port: connect the audio source (e.g. media player) to
the audio input port by an audio cable.
Power
Connect the power cord to the AC power socket to the matrix unit.
Powering the device is recommended as the final step.
Mounting Options - Standard Rack Installation
Two rack ears are supplied with the product, which are fixed on left and right side as shown in
the picture. The default position allows mounting the device as a standard rack unit installation.
MMX8x4-HT400MC
The matrix switcher is 2U-high and one-rack wide.
Always use all the four screws for fixing
the device ears to the rack rail. Choose
properly sized screws for mounting. Keep
minimum two threads left after the nut
screw.
Ventilation
Menu selection
To ensure the correct ventilation and
& set parameter
avoid overheating let enough free space
Press
around the appliance. Do not cover the
appliance, let the ventilation holes free on
both sides.
7
Ethernet port
8
Reset button
9
RS-232 ports
Boot
q
48 V LED
Control
ETHERNET
5
Turn off the phantom power before connecting the microphone!
4
w
Serial/ Infra
HDMI
IN 8
ports
e
Infra output
ports
r
HDMI output
Serial Output Voltage Levels (TTL and RS-232)
Logic low level
Logic high level
*Using a receiver with at least 1k impedance to any voltage between 0V and 5V to get the voltages.
The document is valid with the following firmware version: 1.0.0
The User's manual of this appliance is available on www.lightware.com.
See the
Downloads
Lightware Visual Engineering LLC.
rack rail
rack shelf mounting ear
rack screw
flat washer
cage nut
min. 2
threads left
RJ45 connector to control the matrix via LAN.
Reboots the matrix; the same as switching it off and on again.
3-pole Phoenix connectors (2x) for bi-directional RS-232
communication.
on
Phantom power turned on.
off
Phantom power turned off.
2-pole Phoenix connectors (2x) for IR output or TTL output
serial signal.
3.5 mm TRS (Jack) connectors (2x) for infra signal transmission
(both of them are outputs).
HDMI output connectors (4x) for sink devices.
TTL*
RS-232
0 .. 0.25V
3 V .. 15 V
4.75 .. 5.0V
-15 V .. -3 V
Further Information
section on the website of the product.
Contact Us
sales@lightware.com
+36 1 255 3800
support@lightware.com
+36 1 255 3810
Peterdy 15, Budapest H-1071, Hungary
Doc. ver.: 1.1
19200080
Advertisement

Related Manuals for Lightware MMX8x4-HT400MC


Summary of Contents for Lightware MMX8x4-HT400MC
-
Page 1: Quick Start Guide
AUDIO IN outputs. 4K / UHD (30Hz RGB 4:4:4 or 60Hz YCbCr 4:2:0), 3D capabilities and HDCP are fully Phantom power turned off. supported. MMX8x4-HT400MC has a dedicated Special Audio Input block with input ports for HDMI OUT 1 HDMI... - Page 2 Typical Application Audio Cable Wiring Guide These settings can be done from a computer using the Lightware Device Controller The independent analog audio output contains three different audio signal as it seen the MMX8x4 series matrix is built with 5-pole Phoenix input and output connectors. See below a (LDC) software.
Need help?
Do you have a question about the MMX8x4-HT400MC and is the answer not in the manual?
Questions and answers