
Related Manuals for Wohler iAM-MADI-8


Summary of Contents for Wohler iAM-MADI-8
-
Page 1: User Guide
iAM-MADI • iAM-MADI -8 • iAM-MADI -16 1RU, 8/16 of 64-Channel, MADI Audio Monitor User Guide (Software Release: V1.4) Part Number 821804, Revision A... - Page 2 In no event will Wohler Technologies, Inc. be liable for direct, indirect, special, incidental, or consequential damages resulting from any defect in the hardware, software, or its documentation, even if advised of the possibility of such damages.
-
Page 3: Table Of Contents
TABLE OF CONTENTS Contents User Guide ............ 1 TABLE OF CONTENTS ........3 Contents ..............3 CHAPTER 1: Installation ........5 Introduction ..............5 Overview ............. 5 Safety ................ 5 Instructions ............5 Safety Symbols ............. 6 Mounting .............. 6 Heat Dissipation ............ - Page 4 CHAPTER 3: Specifications ......12 Figure 3–1: IAM-MADI Block Diagram ..... 13 CHAPTER 4: Using the iAM-MADI Web GUI ..14 Web Browser / Control Device ........14 First Time- IP Assignments .......... 14 Dashboard ..............15 Sign In ..............16 Channel Naming ............17 Configuration Setup ............
-
Page 5: Chapter 1: Installation
Optical fiber connections require an optional SFP hardware module and software license. Refer to Specifications section for or contact Wohler sales for more information. The iAM-MADI has individual channel volume controls and mute switches. Any channel in the MADI stream may be audibly monitored and mixed with the other selected channels. -
Page 6: Safety Symbols
9. Unplug the equipment during lightning storms or when unused for long periods of time. 10. Refer all servicing to qualified service personnel. Servicing will be required under all of the following conditions: a. The equipment has been damaged in any way, such as when the power- supply cord or plug is damaged. -
Page 7: Sympathetic Vibration
Sympathetic Vibration Sympathetic vibration from other equipment (cables, etc.,) in the rack may be serious enough to interfere with the unit’s sound quality. If you experience sympathetic vibrations, use thin card stock, felt, foam, or weather-stripping between the vibrating surfaces. Tie loose cables securely with cable ties. Mechanical Bracing The 1RU chassis is securely attached to the front panel. -
Page 8: Chapter 2: Local Operation
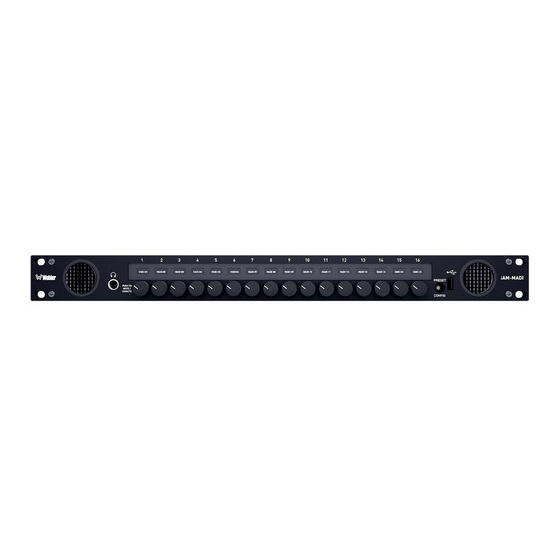
CHAPTER 2: Local Operation Front Panel Figure 2–1: Front Panel Layout Strip-Channel Channel Displays Volume/Mute Control Strips Volum e/Mut Left Right Preset/Config Switch Headphone Jack Speaker Speaker USB Port The number above the channel control strips does not indicate any particular source channel number or arrangement. -
Page 9: Rear Panel
The monitor and power adapter have been tested as a combined apparatus to verify compliance with applicable safety and electromagnetic compliance standards. Use of another power adapter provided by the user may negate the compliance or not perform properly. Wohler Technologies cannot accept any responsibility for the outcome in such cases. ... -
Page 10: Channel Displays
Channel Displays Display information for each channel strip is shown in Figure 1-3 below. The OLED display intensity will dim after one hour of inactivity to prolong display life. Pressing any knob’s switch will restore normal brightness levels without affecting the monitor mix. Figure 2-3: Strip-Channel Display Active (Mixed Right) Muted (Mixed Left &Right) -
Page 11: Preset / Config Menu
Preset / Config Menu Operators can select another preset or check machine status by pressing the red PRESET / CONFIG button on the front panel. It is recessed to prevent accidental activation. If accidentally pressed, pressing “EXIT MENU” or any button below a blank display will exit the menu and return to normal monitor operation unchanged. -
Page 12: Transfer Presets Via Usb
Transfer Presets via USB Pressing “GET USB CONFIGS” (#5) begins the process of loading preset configurations from the front panel USB port. CHAPTER 3: Specifications Table 3–1: Specifications Specification Values/Domains Power requirements 100 V to 240 V AC ± 10%, 50/60Hz Power consumption 30 Watts Dimensions;... -
Page 13: Figure 3–1: Iam-Madi Block Diagram
Figure 3–1: IAM-MADI Block Diagram Page... -
Page 14: Chapter 4: Using The Iam-Madi Web Gui
CHAPTER 4: Using the iAM-MADI Web The IAM-MADI Web GUI allows you to customize the monitor’s configuration to perfectly suit your needs. The default presets configure all 64 MADI channels in consecutive fashion. The following setup steps are not necessary to use the iAM- MADI in the default configuration. -
Page 15: Dashboard
Close the control panel and reboot the host computer after making an IP address change like this to be sure the change takes effect. Either reconnect to the installed network or continue with this direct connection to access the iAM-MADI Web GUI. Make the corresponding address, mask and gateway changes in the iAM-MADI Network Setup page. -
Page 16: Sign In
Sign In Only authorized users should be allowed to make preset and network changes. Anybody can view status of iAM-MADI units on the network, but logging in with a password is required to make any changes. When logging in is required to make a change, the following page will appear. -
Page 17: Channel Naming
Channel Naming Each channel can be preassigned a name in the configuration database. These names will be automatically assigned to the channel-strip label fields in a preset when selected. Names (Labels) can be changed in the Configuration page for a specific preset without affecting the names assigned here. - Page 18 The MADI Input Selection box switches between BNC coax and Optical fiber input jacks. The optical input must be enabled by a software license for it to appear as a choice. An SFP module must be installed for it to work. The iAM-MADI loops the incoming stream to both coax and fiber outputs (if installed).
-
Page 19: System Setup
Below that, the MADI Optical option has been clicked on (to check it) and is awaiting entry of the license key provided by Wohler Customer Service. Once entered, saved and accepted, the new license is available for use. -
Page 20: Network Setup
Network Setup This is the place to make network IP Address changes to the iAM-MADI unit. IP Address: Enter the network address. Leading zeroes are not required. IP Mask should usually be 255.255.255.0 unless your network can work across multiple subnets. Gateway Address should usually be the same domain and subnet address numbers, with the last octet being .1. -
Page 21: Import Configuration
Import Configuration Use this page to retrieve presets from a USB flash drive, inserted in the front panel port. Follow instructions on the bottom of the page to complete the procedure. Save / Restore Database (DB) iAM-MADI can internally store up to fifteen (15) configuration sets of presets. This page is used to manage the databases within an iAM-MADI unit. - Page 22 Refer to the list of databases at page bottom. There will only be one database until a new one is Saved. Use Restore to reverse database corruption if you notice or suspect the presets are not appearing correctly. There is no need to Delete a database until the maximum number has been reached, to make room for a new one.
-
Page 23: Software Upgrades
USB flash drive and install into your iAM-MADI. Download the Software The iAM-MADI upgrade software can be found at http://www.wohler.com, under Product Downloads on the Products > iAM-MADI page, in Support > Downloads, or contact Wohler Customer Support for more information. - Page 24 The iAM-MADI will display a message when the upgrade is complete and reboot. Remove the USB drive any time after upgrade is complete. Either Refresh the browser by clicking on the Wohler logo, or close and reopen the browser for normal operation of the Web GUI after the iAM-MADI reboots.
Need help?
Do you have a question about the iAM-MADI-8 and is the answer not in the manual?
Questions and answers