Table of Contents
Advertisement
Advertisement
Table of Contents

Subscribe to Our Youtube Channel
Related Manuals for Envertech EVT248


Summary of Contents for Envertech EVT248
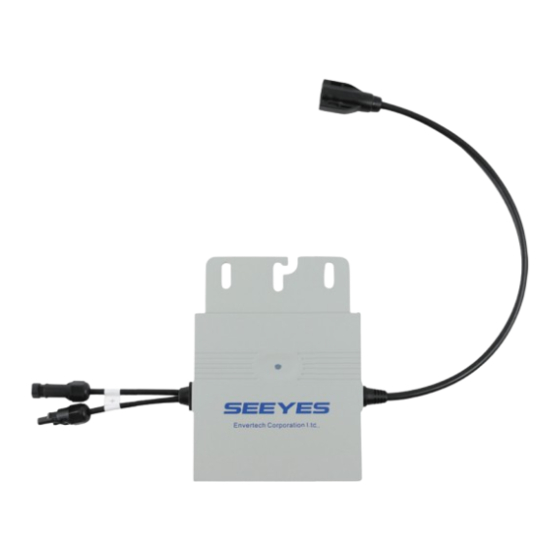
- Page 1 User manual Microinverter EVT248...
- Page 2 The EVT248 Microinverter as a cutti ng-edge spokesman for the microinverters in the new era, has full sincerity and devoti on to stability, details and more advanced tech. EVT248 seeks to enable best improved solar energy harvest, highest possible reliability, much simplifi ed installati on and most effi cient management of solar power systems.
-
Page 3: Important Safety Information
1. Important Safety Informati on 1.1 READ IT FIRST This manual contains important instructi ons for installati on and maintenance of the EVT248 microinverter. To reduce the risk of electrical shock, and to ensure safe installati on and operati on of the microinverter, the following safety symbols appear throughout this document to indicate dangerous conditi ons and important safety instructi ons. -
Page 4: Safety Instructions
• Do not disconnect the PV module from the Envertech microinverter without fi rst removing AC power. • Be aware that the EVT248 has the ability to auto adjust voltage and frequency according to the setti ngs based on local standards. Only an authorized installer who has got permission from local electrical uti lity and meets with the following requirements shall be allowed to set the Envertech microinverter. -
Page 5: How It Works
The Envertech microinverter maximizes energy producti on from your photovoltaic (PV) array. Each Envertech microinverter is individually connected to one PV module in your array. This unique confi gurati on means that an individual Maximum Peak Power Point Tracker (MPPT) controls each PV module. -
Page 6: Optimal Reliability
Microinverter systems are inherently more reliable than traditi onalinverters. The distributed nature of a Microinverter system ensures that there is no single point failure in the PV system. Envertech Microinverters are designed to operate at full power at ambient temperatures as high as +65°C (150°F). -
Page 7: Product Information
248 W Maximum output current 1.07 A 3.2 MAJOR CHARACTERISTICS Nominal voltage 220 V / 230 V / 240 V Envertech microinverter has the following Nominal frequency 50 Hz / 60 Hz characteristi cs which make Envertech Power factor > 0.99 microinverter “High Effi... -
Page 8: Packing Checklist
4. Packing checklist 4.1 ACCESSORIES Aft er you receive the Envertech microinverter, please check if there is any damage on the carton, and then check the inside completeness for any visible external damage on the microinverter and accessories. Contact your dealer if anything is damaged or missing. -
Page 9: Planning Of Microinverter Installati On
5.2 LIGHTNING AND SURGE SUPPRESSION Envertech microinverters have integral surge protecti on. However, if the surge has excess energy, the protecti on built into the microinverter can be exceeded, and the equipment can be damaged. For this reason, Envertech recommends that you protect your system with lightning and/or surge suppression devices. -
Page 10: Microinverter Installati On
05 AC Extension Cable 06 AC Trunk Plug Tag 07 AC Trunk End Cap 08 AC Trunk Unlock Tool DANGER DO NOT connect or disconnect the PV module and Envertech Microinverter without fi rst removing AC power from the PV system. -
Page 11: Installation Steps
Step 6: Mount PV panels on the racking system and connect DC leads to the microinverters. Step 7: Place the labels on the EVT248 installati on diagram to identi fy the locati on of each microinverter. Step 8: Energize the system by turning on the breaker in the distributi on panel. Then you are welcome to visit our energy and monitoring website EnverPortal to enjoy the performance of your solar system. -
Page 12: Cable Assembly
6.4 CABLE ASSEMBLY 18 mm ~ 25 mm 1) Strip cable jacket 18 mm ~ 25 mm. 2) Disassemble the seal, the clamp ring and the Nut, then insert through the cable. 3) Insert every wire into the holes. 4) Push he cable to the end. Gently try to pull out the cable. -
Page 13: Energize The System
4. The EVT248 has the ability to auto adjust voltage and frequency according to the setti ngs based on local standards. If adjustments are required by your local uti lity, the installer can use EnverBridge to manage the grid profi... -
Page 14: Troubleshooting And Maintenance
8.2 TROUBLESHOOT AN INOPERABLE MICROINVERTER To troubleshoot an inoperable microinverter, follow the steps in the order shown below. WARNING: Be aware that only qualifi ed personnel should troubleshoot the PV array or the Envertech microinverter. Best Practi ce: Never disconnect the DC wire connectors under load. Ensure that no current is fl owing in the DC wires prior to disconnecti ng. - Page 15 L to N 184 to 264 VAC 5. Using an Envertech disconnecti ng tool, disconnect the AC cable for the faulty microinverter from the cable. 6. Verify that uti lity power is present in the microinverter by measuring line to line and line to neutral at the Cable connector.
-
Page 16: Microinverter Maintenance
PV installati on. WARNING It is recommended that maintenance operati ons shall be only performed by qualifi ed personnel or Envertech personnel. The maintenance schedule may vary depending on the environmental conditi ons of the installati on site.
Need help?
Do you have a question about the EVT248 and is the answer not in the manual?
Questions and answers