Table of Contents
Advertisement
Advertisement
Table of Contents

Related Manuals for Antelope GOLIATH HD


Summary of Contents for Antelope GOLIATH HD
- Page 3 Owner’s Manual...
-
Page 5: Table Of Contents
1. Safety Notes ..........................5 2. Introduction 3. Features 4. Installation Guide and Activation Guide 5. Front Panel Explained 6. Rear Panel Explained 7. Touchscreen Explained 8. Software Control Panel 9. In The Box 10. Troubleshooting 11. Technical Specifications 12. Antelope Audio Support Resources... -
Page 7: Safety Notes
1. Safety Notes To reduce the risk of electrical shocks, fire, and related hazards: ● Do not remove screws, cover, or cabinet. There are no user serviceable parts inside. Refer servicing to qualified service personnel. ● Do not expose this device to rain, moisture or spillover of liquid of any kind. ●... -
Page 8: Introduction
Mic Preamp technology, all in realtime. interface remote control. Goliath HD guarantees quiet operation even in the most demanding control Needless to say Goliath HD is armed with the full rooms. Don’t be surprised if soon expensive machine Antelope Audio arsenal of hardware-based FPGA rooms become a thing of the past. -
Page 9: Features
3. Features ● Hardware-based vintage effects: EQs, Compressors, Reverb, Guitar Amps & Cabinets ● Proprietary Field Programmable Gate Array (FPGA) with massive modeling capabilities ● 2 × HDX ports ● 1 × USB 3.0 ● 1 × Thunderbolt Gen2 ● 16 × Universal Inputs (Mic In/Line In) on XLR (Inputs 1-4 HiZ compatible, 1 & 2 connected to AD Inserts) ●... -
Page 10: Installation Guide And Activation Guide
Open your preferred DAW and ensure the device is selected as an input and output. Note: Make sure your Goliath HD has the most recent firmware installed. Check this by selecting the Info panel and clicking on the Firmware Update button. - Page 11 Activation Guide It is essential to activate your Goliath HD before using it. Once connected to your AC and via USB 3.0 or Thunderbolt™ to your computer follow the steps below: Navigate to www.antelopeaudio.com/support/downloads and then to Goliath HD. Download the Goliath HD Launcher.
-
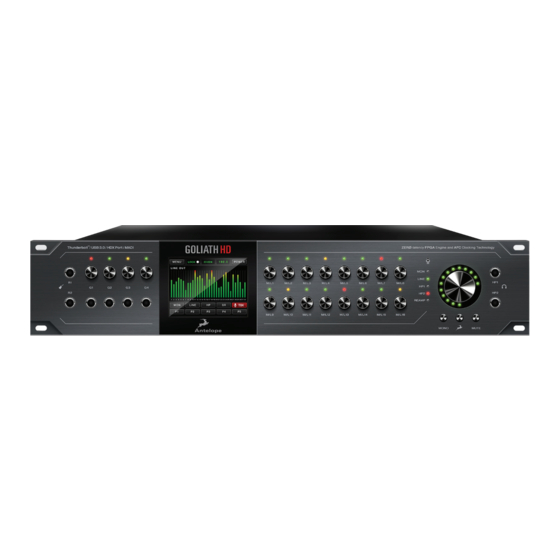
Page 12: Front Panel Explained
Goliath HD. with other buttons. 3. High resolution “capacitive touch” TFT display Antelope button & Mono button: Enters Multi function touch screen that displays touch screen calibration mode. various information and gives control over certain functions of the device. -
Page 13: Rear Panel Explained
BNC connector used to accept Word Clock 20. Thunderbolt™ Port reference. Enables you to connect your Goliath HD to 13. 10M Input a Thunderbolt™ port on a Mac computer This BNC Input Connector allows the Go- using a Thunderbolt™... -
Page 14: Touchscreen Explained
The Goliath features a touch screen on its front panel. From it you can access all options of the device. The touch screen features the following options: Menu Here you can adjust different Goliath HD parameters: Comm Interface Selects which is the current type of connection between the computer and the Goliath, USB or Thunderbolt™. -
Page 15: Main Display
Main Display Tap it you select the meters to be currently displayed. Lock Indicates whether the Goliath HD is locked to an incoming signal or not. Enter the Monitor menu to adjust the Monitor volume level from the main Volume Knob. - Page 16 LINE Enter the Line Out menu to adjust the output volume level. Cycle through the two Headphone outputs and set their volume levels. PREAMP Volume Cycle through the preamp inputs and set their volume levels.
- Page 17 Shows the current Clock Source for the Goliath, set by default to Oven. The selected source is displayed on the top of the touchscreen. Tap to choose from the available clock sources. Your selection will be shown in the section above. Here you select the Sample Rate for the Goliath.
-
Page 18: Software Control Panel
This dropdown menu allows you to select how the Goliath HD is to be synchronized. Select ‘Oven’ for internal sync, WC (Word Clock) to sync the Goliath HD to an external device through the Word Clock input or ADAT, MADI, S/PDIF, AES for syncing with incoming digital signals, or through HDX / Thunderbolt™... - Page 19 6. Lock light When your Goliath HD is slaved to another clock source the panel will lock, displaying a “Pad Lock” symbol to the clock source and you also won’t be able to change the presets. Presets do not store clock source info or sample rate.
-
Page 20: Mixer Tab
25. Channel Gain (value adjustable in 1 dB steps), Ctrl+Left-Click (Win) / Cmd+Left-Click (Mac) mutes the channel 26. Peak Meter 27. 48V Phantom Power Switch (independently assignable) 28. Phase Reverse button 29. Stereo Link 30. “How To...” Video Tutorials 31. Alternative Routing Matrix View 8.2. - Page 21 Quick Start AuraVerb appears as a pre-fader send effect on the Goliath HD mixer 1. To send a signal to the reverb, turn up the send control on a mixer channel and use the reverb output level to adjust the return to the mixer’s master channel.
- Page 22 the initial reverberated sound. This parameter is used to place the reverberated signal later in time with respect to the unprocessed signal. Natural settings for this are based on the size of the environment and range from 0 to 32 milliseconds. Fine adjustment of this parameter with respect to the tempo of the song or dramatic timing of the piece can help set the feel of the reverb within the mix.
- Page 23 8.3 Effects Tab Click on the Effects Tab to reveal the 16 Goliath HD AFX Channel strips. You can choose between EQs, Compressors, Vintage Guitar Amps and Cabinets. Goliath HD comes with the entire yet ever-growing Antelope Audio library of real-time FPGA Vintage FX modeling legendary studio gear.
- Page 24 The Meters tab allows you to measure the volume levels of all audio signals coming from and to the Goliath HD. A dropdown menu allows you to easily switch between the routing matrix sections, whose signal levels you want to visualize.
- Page 25 1. HDX Compensation Mode Dropdown Menu 2. HDX 1 Device Dropdown Menu & Reset Button 3. HDX 1 Channels 4. HDX 2 Device Dropdown Menu & Reset Button 5. HDX 2 Channels 6. Loop Sync In 7. Loop Sync Enable / Master Indicators 8.
- Page 26 8.7. Settings Tab Click on the gear icon to open the “Settings” window. 1. Oscillator 1 and Mute 2. Oscillator 2 and Mute 3. Oscillator Output Levels 4. S/PDIF SRC Indicator 5. TBK HP1 / HP2 / MONITOR Indicators 6. Reamp Volume 7.
-
Page 27: In The Box
● Check what clocking mode you are in. Are you receiving the clock signal from the source? ● Check that the relevant lock light on the control panel of the Goliath HD is lit up. ● Try a different cable and another source if available. - Page 28 ● What buffer size is your DAW set to? ● If it is significantly low i.e. lower than 128 samples in your buffer size, try increasing it. Try increasing the buffer size from the Goliath control panel (Windows Only) ● Have you checked the input and output routing is correct in your DAW? ●...
-
Page 29: Technical Specifications
11. Technical Specifications Analog Inserts 2 × Inserts on 1/4" TRS (dedicated for inputs 1, 2) Analog Inputs 2 × DB25 (16 channels) 16 × Mic / Line on XLR combos (incl. 4 × Hi-Z) 4 × Hi-Z inputs on 1/4" TRS on front Analog Outputs 4 ×... -
Page 30: Antelope Audio Support Resources
A web resource with all device manuals, datasheets and software: http://www.antelopeaudio.com/en/support/downloads Control Panel Newsfeed The software control panel for Goliath HD incorporates a newsfeed at the bottom, which displays all new updates and relevant information: You Tube Page Tutorial videos, interviews, user cases and promos for forthcoming products: http://goo.gl/yfOmZf... - Page 32 Version 1 / 26.05.2017...
Need help?
Do you have a question about the GOLIATH HD and is the answer not in the manual?
Questions and answers