Table of Contents
Advertisement
Advertisement
Table of Contents

Subscribe to Our Youtube Channel
Related Manuals for Antelope Orion Studio Thunderbolt


Summary of Contents for Antelope Orion Studio Thunderbolt
- Page 2 Owner’s Manual...
-
Page 3: Table Of Contents
1. Safety Notes 2. Introduction 3. Features 4. Installation Guide 5. Front Panel Explained 6. Rear Panel Explained 7. Software Control Panel 8. Advanced User Tips 9. In The Box 10. Troubleshooting 11. Technical Specifications 12. Antelope Audio Support Resources... -
Page 4: Safety Notes
1. Safety Notes To reduce the risk of electrical shocks, fire, and related hazards: ● Do not remove screws, cover, or cabinet. There are no user serviceable parts inside. Refer servicing to qualified service personnel. ● Do not expose this device to rain, moisture or spillover of liquid of any kind. ●... -
Page 5: Introduction
16 analog outs, a couple of reamp outputs, as well as 16 channels I/O via ADAT and 2 channels I/O via S/PDIF. Orion Studio uses Antelope’s battle-tested DSP, based on a custom FPGA with massive parallel processing capabilities. Orion Studio’s DSP chip is eight times more powerful than the ones in similar devices due to the proprietary FPGA. -
Page 6: Features
● 2 channels I/O via S/PDIF ● Antelope’s renowned 64-bit Acoustically Focused Clocking Technology ● Antelope’s proprietary Oven Controlled Oscillator for supreme clocking stability ● 1 Word Clock Output, 1 Word Clock Input ● Five presets for fast and easy recall of favorite setups ●... -
Page 7: Installation Guide
4. Installation Guide Connect to the DC power source via rear panel connector. Windows: 1. Connect the USB cable to the USB port on your computer. 2. Download and install the Orion Studio software control panel and drivers from www. antelopeaudio.com/en/support/downloads This will enable you to control your device from your computer and select all necessary settings. -
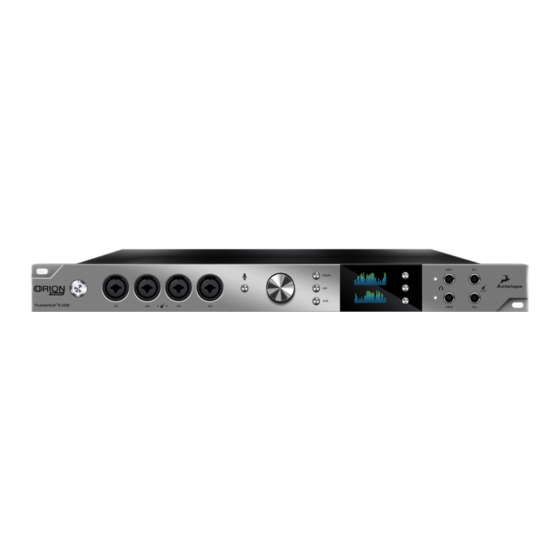
Page 8: Front Panel Explained
5. Front Panel Explained 1. Power button Toggles standby/operation state 2. 4 Instrument/Mic Preamp/Line Inputs 4 Class A mic preamps, with phantom power over Combo input with switchable line/HiZ input. 3. Talkback button Press the Talkback button to activate the talkback microphone. This can be distributed to your selected headphones and/or monitors using the software control panel. - Page 9 7. Functional buttons By pressing the top and middle Function buttons you can cycle thru the display and view various information Βy holding down the Top Function button you can access the System Menu of the device, which allows you to access the following sub-menus and confirm them by pressing the rotary control: 1.
-
Page 10: Rear Panel Explained
6. Rear Panel Explained 10. DC Power Connection For use with Antelope’s DC power supply, only. 11. USB High-Speed Orion Studio uses USB connector Type B and operates up to 192kHz sample rate with Antelope ASIO on Windows & Mac OS X. -
Page 11: Software Control Panel
7. Software Control Panel 7.1. Routing Tab and Main View options The universal panel view sits constantly on the upper half of the control panel, allowing for quick access to the most important features. Main view: 1. Power/Standby button 2. Monitor A/Monitor B select button 3. - Page 12 Orion Studio supports sample rates higher than 48kHz for ADAT. The following table show what the various options for ADAT implement in order to be consistent with the input/output of your other devices connected via ADAT. Clock Source ADAT options: (Note that there is no S-Mux check-box for ADAT as it is automatically enabled when you select ADAT 2X or ADAT 4X): Clock Source Mode ADAT Configuration...
- Page 13 21. Channel gain (value can be adjusted in 1 dB steps) 22. Peak meter 23. Independently assignable 48V phantom power switch 24. Phase Reverse button 25. Stereo Link...
-
Page 14: Mixer Tab
7.2. Mixer Tab 1. Fader (double-click to reset to zero) 2. Fader Level indication 3. Solo 4. Mute 5. Stereo Link 6. Pan 7. Send 8. Master Mix Fader 9. Mute Master 10. Mixer 1-4 Show/Hide Orion Studio comes with four software low latency mixers which provide near zero latency mix and monitoring that can be distributed using the control panel. - Page 15 For example, you can drag all of the twenty-four USB play channels to Mixer 1 channels and then drag and drop MIX 1 L/R to LINE OUT 1&2 providing a stereo bus mix to LINE OUT channels 1 and 2. The low latency mixers provide the basic functions of a real mixer such as: Solo, Mute, Pan, Link channels, Volume Level controlled by faders and a Master Fader, so you can easily make a stereo mix, plus an Auxiliary send in order to use the DSP effects.
- Page 16 AuraVerb’s Color control allows you to adjust the overall tone of the reverb. On “0” the space created is darker, like a lushly carpeted area. On “100” the reverb is brightest, which can add some sizzle to a lead vocal, for example. •...
- Page 17 1. Frequency Adjust Dials (double-click to return to default) 2. Gain Adjust Dials (double-click to return to default) 3. Q Adjust Dials (double-click to return to default) 4 & 7. Frequency Band Analysis Screen 5. Save / Load / Bypass 6.
- Page 18 7.4. Meters Tab...
-
Page 19: Options Tab
7.5. Options Tab Click on the ‘Settings’ gear icon to open the ‘Settings’ window. 1. Monitor Out Trim 2. Line Out Trim 3 & 4. Oscillator 1 and Mute 5 & 6. Oscillator 2 and Mute 7. Oscillator level 8. Line Out Volume 9. -
Page 20: Advanced User Tips
USB-play channels to the Line Out channels by dragging and dropping from the top section to the bottom. For more info on routing see the “Orion Studio - Routing with ease” video from the Antelope Audio You Tube page. - Page 21 Connectivity: If you believe there is no sound being received to an input or delivered from an output: ● Check your source. Is there a signal being transmitted form the source? ● Is your source in the correct sample rate for the Orion Studio to receive? ●...
-
Page 22: Technical Specifications
11. Technical Specifications Analog Inputs 4 x Mic / Line Instrument on XLR combos on the front 8 x Mic / Line on XLR combos on the rear Analog Inserts 2 x Inserts on TRS (inputs 1,2) Digital Inputs 2 x ADAT (up to 16) 1 x S/PDIF Word Clock Input 1 x Input @ 75 Ohms 3Vpp on BNC 32 - 192kHz... -
Page 23: Antelope Audio Support Resources
32, 44.1, 48, 88.2, 96, 176.4, 192 12. Antelope Audio Support Resources Antelope Audio offers a range of services and support resources for your Antelope hardware, firmware and software control panels. Several categories of frequently asked questions are available on the website: http://www.antelopeaudio.com/en/support... - Page 25 Version 1.0 / 24.11.2015...
Need help?
Do you have a question about the Orion Studio Thunderbolt and is the answer not in the manual?
Questions and answers