
Related Manuals for Expobar BRILLIANCE


Summary of Contents for Expobar BRILLIANCE
- Page 1 RILLIANCE User Manual / EN Article no. 1730058 Rev. 090506 CREM International AB Box 960, 671 29 ARVIKA (Suecia) Tel.: +46 (0)570-477 00; Fax: +46 (0)570-47719 info.se@creminternational.com www.creminternational.com...
-
Page 2: Table Of Contents
Brilliance Manual Page 2 NDEX INDEX ............................2 MACHINE DESCRIPTION: ....................4 ........................4 RONT AND SIDE &O ..................... 5 EAR SIDE PEN DOOR VIEW MACHINE INSTALLATION....................5 ......................5 UITABLE LOCATIONS ......................5 ATER CONNECTION ....................6 LECTRICAL CONNECTION ........................ - Page 3 Brilliance Manual Page 3 ......................17 RINDER ADJUSTER ................17 RINDED COFFEE DOSER ADJUSTMENT ......................18 ILLING CANISTERS ....................18 ILLING OFFEE OPPER HYGIENE AND MAINTENANCE ..................19 ........................... 19 LEANING ..................19 LEANING THE MIXING SYSTEM ..................20 EASSEMBLY OF MIXER SYSTEM ..................
-
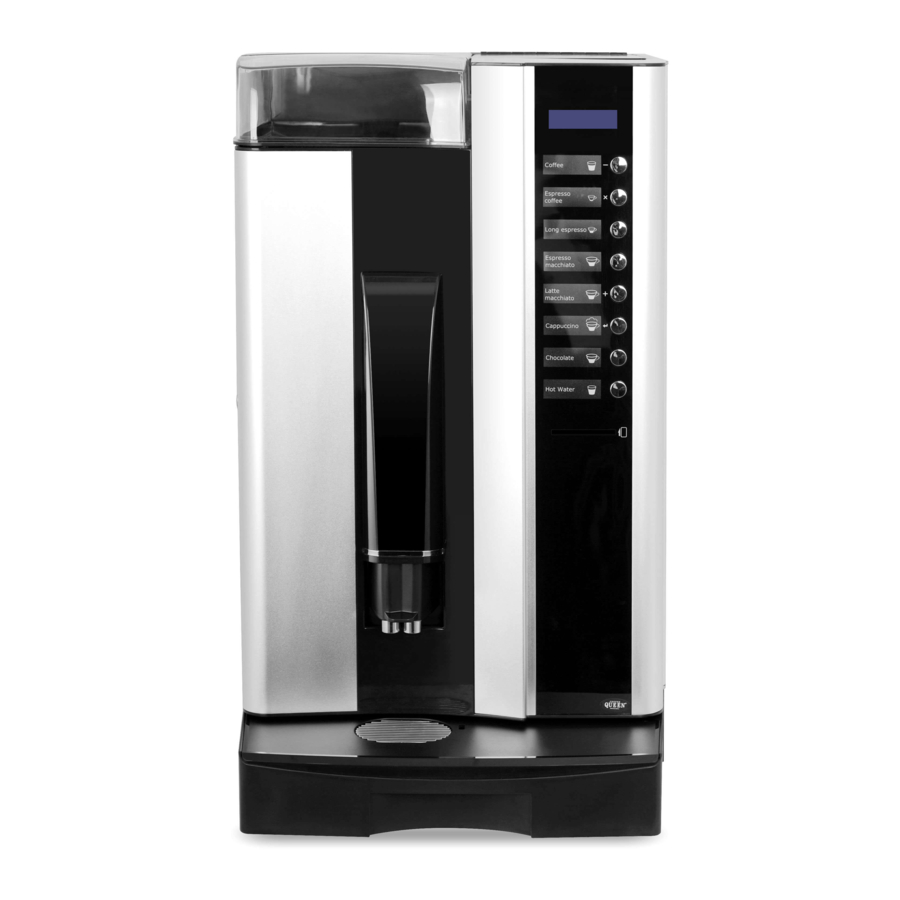
Page 4: Machine Description
Brilliance Manual Page 4 ACHINE DESCRIPTION 2.1 Front and side Technical characteristics: Bean Hopper Display Dimension Height 664 mm Width 394 mm Selection button Depth 474 mm Weight Empty Kg 35 Product label Full Kg 39 Water Connection ½”outside connection... -
Page 5: Rear Side &Open Door View
Brilliance Manual Page 5 2.2 Rear side &Open door view Soluble canisters Mixer Bowl Espresso group Driptray Height-adjustable Spouts Water inlet Main switch Electric inlet Grounds container ACHINE INSTALLATION 3.1 Suitable locations This distributor is not suitable for outdoors service. -
Page 6: E Lectrical Connection
Brilliance Manual Page 6 3.3 Electrical connection Connect the machine to a grounded 230VAC 50Hz connection or a grounded 110VAC 60Hz connection (depending on the model); check the adequate voltage and frequency at the back of the machine. 3.4 Initialization When the machine is new received, its boiler is not completely full of water. -
Page 7: Technical Programming
Brilliance Manual Page 7 ECHNICAL PROGRAMMING To set which button makes what on the machine, set prizing, and adjust different parameters of the machine. 5.1 Getting into the settings menu With the door open and the power switched off, Canc hold buttons 1&5... -
Page 8: Info Menu
Brilliance Manual Page 8 5.4 INFO Menu The Info Menu is the first one to appear in the settings menu: INFO Now accepting with button K6(Enter), Global Counter Doses the general totals of the erogations made Global Counter Doses by the machine are shown. On the... - Page 9 Brilliance Manual Page 9 volume of water. If the quantity is set to 0, no espresso will be brewed on the selection, neither grinding will be performed. Next setting, will adjust if the brewing of the espresso will be Enter done before, or after having brewed the part of soluble drinks.
-
Page 10: D Oses A Djustment T Ime S Cheme
Brilliance Manual Page 10 Now it comes the adjusting of the soluble ingredients. The quantity of soluble powder that will be added to the actual recipe. Two canisters are available. Soluble time 3&4 are not used in this machine: keep them set to 0. Each amount of product is set by increasing (pressing “+”) or decreasing (pressing “-“) the time during which the soluble is added. -
Page 11: M Achine P Arameters M Enu
Brilliance Manual Page 11 5.8 Machine Parameters Menu After the doses menu, we arrive to the Machine Parameters menu: MACHINE PARAM. In this menu we will be able to adjust important parameters of the machine. Pressing the “Enter” button, we get into the menu and the display shows the first parameter available to be adjusted: 5.8.1 Language:... -
Page 12: Espresso Group Enabling/Disabling
Brilliance Manual Page 12 5.8.5 Espresso group enabling/disabling The next screen enables the Express group. This setting must be set to “enabled”, as to allow the express group to work. With buttons “+” and “-“ we change between “enabled” and “disabled”;... -
Page 13: Keyboard Number Inversion
Brilliance Manual Page 13 5.8.9 Keyboard number inversion This setting invert the numeration of the keyboard. This means that button nr. 1 becomes button nr.8; button nr. 2 becomes button nr. 7, and so on. With buttons “+” and “-“ we change between “enabled”... -
Page 14: Prices Setting
Brilliance Manual Page 14 5.9.3 Prices setting Now it comes the adjusting of each selection’s price. On the first row of the display we see which selection price (from 1 to 9) we are adjusting. At the second row, we see the price assigned to it. - Page 15 Brilliance Manual Page 15 5.12 Full Scheme of the Settings Menu Info Enter Global Counter Doses Coffee water Vol Enter / Key N ## cc Key Total Canc Enter Enter / Brewing coffee N Brewing coffee N AFTER SOLUBILE BEFORE SOLUBILE...
- Page 16 Brilliance Manual Page 16 MACHINE PARAM. COIN BOX Enter Espanol Ente LANGUAJE Deutsch COIN BOX ENGLISH COIN BOX Italiano Canc ENABLED Canc DISABLED Francais Enter Temperature Decimal Price Temperature ºC Canc ºF Canc Enter Enter T.act.= Actual Boiler Boiler Temperat.
-
Page 17: Machine Function
Brilliance Manual Page 17 ACHINE FUNCTION 6.1 Start up process When the machine is supplied with energy, it checks that the internal Air Break deposit has enough water; if not, it opens the inlet electro valve as to fill this deposit. During this filling process, the heating of the boiler is disabled and the display shows “Please wait, Boiler Filling... -
Page 18: F Illing Canisters
Brilliance Manual Page 18 6.4 Filling canisters In order to refill the canisters: 1.- Open the main door of the machine. 2.- Open the superior Cover. 3.- Take out (this to avoid unnecessary spillage in the machine) ingredient canisters. 4.- Remove lid and fill canister with 3&4... -
Page 19: Hygiene And Maintenance
Brilliance Manual Page 19 YGIENE AND MAINTENANCE Following today’s directives regarding sanitation and security, the operator of an automatic distributor is responsible of the hygiene of the materials in contact with food. Therefore he is responsible of maintaining the automatic distributor as to prevent bacteria to appear. -
Page 20: R Eassembly Of Mixer System
Brilliance Manual Page 20 7.3 Reassembly of mixer system 7. Reassemble the assembly 8. Make sure that the motor 9. Assemble whipper , pull plate by turning whippers plane side will be until you hear a clicking noise. lock knob (F) clockwise. -
Page 21: R Emoving The Espresso Group
Brilliance Manual Page 21 7.4 Removing the espresso group To remove the espresso group follow the following steps: 7.4.1 Push 7.4.2 Release down the espresso Spout conduct holder Release the espresso As to allow the conduct from the maximum free... -
Page 22: R E - Assembling The Coffee Group In Place
Brilliance Manual Page 22 7.5 Re-assembling the coffee group in place To place the espresso group back in place, make sure that on the front side of the espresso group, the mark on the group’s axle, match the outer triangle symbol . This is the normal Front side “wait”... - Page 23 Brilliance Manual Page 23 Once the lid opened, turn the axle of the group as to position the inner mechanism close to the opening as to proceed to its cleaning: Position Proceed to here the clean mechanism Very important: Now, turn the group around, and proceed to clean the upper filter of the espresso chamber. (See it...
-
Page 24: R Emoving The Drip Tray
Brilliance Manual Page 24 After the cleaning, proceed to dry the mechanism up. Invert it and shake it as to force water out as maximum as possible. Dry up all the surfaces, and pay special attention to dry up the superior cone of the group, as this is the one receiving the grinded coffee. -
Page 25: C Leaning The Machine
Brilliance Manual Page 25 7.9 Cleaning the machine Cleaning has to be done typically at installation, and weekly or even more often depending on the use on the machine. Neutral detergents (avoid solvents that could damage paint or plastics) are to be used in this operation. -
Page 26: Money Smartcard
Brilliance Manual Page 26 8.1 New Smart Cards & Data SmartCards: When a new Smart Card is inserted, (with the Smart Card enabled in the settings menu), this is what is shown in the screen: Create Enter Money card created... -
Page 27: T Emporary Warnings & Messages
Brilliance Manual Page 27 & D LARMS ISPLAY ESSAGES There are two levels of alarms & messages: 9.1 Temporary warnings & messages This warnings or messages, once solved the issue, will vanish and let the machine work. 9.1.1 Insuff. Credit A selection was made without having enough credit on the inserted SmartCard. -
Page 28: Stop Irregular Cycle
Brilliance Manual Page 28 If you are refilling coffee beans after having get the “No Coffee” signal, the machine will be showing the error “No Coffee”. To reset this error after having refilled the machine, restart the machine, turning off the main switch, and again, turning it on. -
Page 29: Outgoing Speed Of Espresso Decreases
Brilliance Manual Page 29 9.3 What to do if 9.3.1 Outgoing speed of espresso decreases Very likely the espresso group is missing regular cleaning. Proceed to clean it as described in the “cleaning the group” section, paying special attention to the group’s filters.
Need help?
Do you have a question about the BRILLIANCE and is the answer not in the manual?
Questions and answers