Advertisement
Quick Links
IMPORTANT
Before Commencing Assembly:
• Read all instructions COMPLETELY
• Ensure all listed parts are present
If any parts are missing from Parts List 1, please
contact 1800 822 823.
If any parts are missing from Parts List 2, please
Contact HAFELE, Australia at 1300 559 387.
.
• Ensure you have the required tools to
complete the assembly
(Philips Head Screwdriver, Hammer &
Wood Glue)
CAUTION
• Ensure your work surface is solid, level,
clean and flat (DO NOT WORK ON
CARPET)
• Ensure ALL melamine edges are facing
as described in the Assembly Instructions.
IF YOU NEED TO CONTACT US WITH
REGARD TO THIS PRODUCT PLEASE CALL
1800 822 823 AND QUOTE THE BATCH
NUMBER SHOWN ON THE CARTON.
WARNING: Contains small parts, keep out
of reach of children.
615 Goodwood Road, Panorama SA 5041
PO Box 18 Melrose Park SA 5039
Telephone: 1800 822 823, Fax: (08) 8460 0009
Email: furniture@bedfordgroup.com.au
www.bedfordgroup.com.au
Page 1 of 9
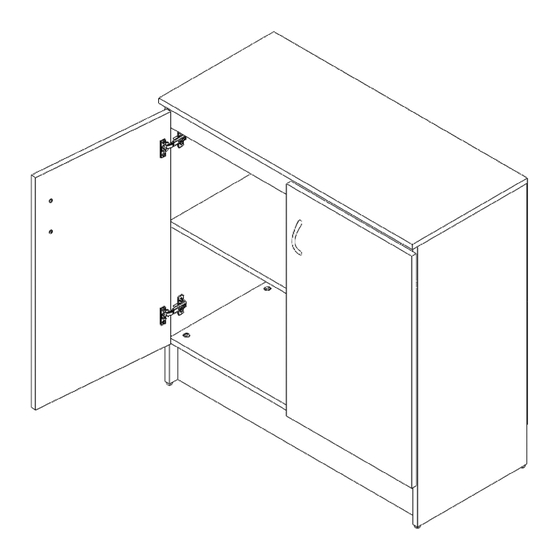
2 Door Base Unit
28/04/2009
ASSEMBLY GUIDE
Revision 3
Advertisement

Subscribe to Our Youtube Channel
Related Manuals for Bedford 2 Door Base Unit


Summary of Contents for Bedford 2 Door Base Unit
- Page 1 ASSEMBLY GUIDE 2 Door Base Unit IMPORTANT Before Commencing Assembly: • Read all instructions COMPLETELY • Ensure all listed parts are present If any parts are missing from Parts List 1, please contact 1800 822 823. If any parts are missing from Parts List 2, please Contact HAFELE, Australia at 1300 559 387.
- Page 2 Parts List 1 2 Door Base Unit Part No. Description Qty. Part No. Description Qty. Part No. Description Qty. LH Cabinet End RH Cabinet End LH Door Part No. Description Qty. Part No. Description Qty. Part No. Description Qty. RH Door Back Part No.
- Page 3 Parts List 2 2 Door Base Unit Part No. Description Qty. Part No. Description Qty. Part No. Description Qty. Hinge Screw (15mm) Hinge Glides Part No. Description Part No. Description Qty. Part No. Description Qty. Qty. Handle Screw (20mm) Screw Cams...
- Page 4 Step 1 Cabinet end panel Please lay left cabinet end panel (1) on a flat protected surface with holes facing up. Screw the hardware pins (14) in the holes shown. Insert the screw cams (13) into the holes with arrows pointing to the top of the unit. Make sure to push the screw cams (13) all the way in by gently tapping them in with a hammer.
- Page 5 Finish Step 4 Start Assembling fix shelf, bottom and rails to 8 (Toe Rail) cabinet end Edge Strip With the right cabinet end (2) lying flat and with its melamine edge facing away the assembler, fix the toe rail (8) and top rails (9) to the cabinet end (2).
- Page 6 Step 6 Attaching the unit top 6 (Top) Edge Strip Stand the unit upright and fit the top (6) with edge strip facing toward the front of the unit. Lock the cams (13) in position by rotating in clockwise direction using A llen Key (20).
- Page 7 Step 8 Assembling hinge to the door panel Lay the door panel (3) on a protected surface with holes facing up. The door panel (3) can easily be identified by large 26mm diameter holes. Attach hinge s to the door panel (3) by positioning the body of hinge in large 26mm diameter holes and secure in place using hinge screws (12).
- Page 8 Step 10 Hinge adjustment • Screw 1 is used for gap adjustment between cabinet end and door. • Screw 2 is used to secure hinge to end. • Screw 3 and 4 are used for gap adjustment between cabinet top and door as well as to secure hinge plate to cabinet end.
- Page 9 Bedford Furniture Employee – Nick Fuller Bedford Furniture is part of the Bedford Group. Bedford is a South Australian not-for-profit organisation dedicated to enhancing the lives of people with a disability or disadvantage through employment, training, residential services and life-skills.
Need help?
Do you have a question about the 2 Door Base Unit and is the answer not in the manual?
Questions and answers