Table of Contents
Advertisement
Quick Links
MODELS:
INSTALLATION AND OPERATION INSTRUCTIONS
!
WHAT TO DO IF YOU SMELL GAS
Do not try to light any appliance. Extinguish any open flame. Open windows.
Do not touch any electrical switch; do not use any telephone in your building.
Immediately call your gas supplier from a neighbor's telephone. Follow the gas
supplier's instructions.
If you cannot reach your gas supplier, call the fire department.
!IMPORTANT: SAVE THIS MANUAL FOR FUTURE REFERENCE.
DO NOT store or use gasoline or other flammable vapors and liquids in the vicinity of
this or any other appliance.
!
QUE FAIRE SI UNE ODEUR DE GAZ EST DÉCELÉE?
NE mettre en fonction aucun appareil. Éteindre toute flamme nue. Ouvrir les fenêtres.
NE PAS toucher aux commutateurs. NE PAS utiliser de téléphone dans le bâtiment
Appeler immédiatement le fournisseur de gaz en utilisant le téléphone d'un voisin. Suivre les
instructions du fournisseur de gaz.
Si le fournisseur de gaz ne peut être joint, appeler le service des incendies.
! IMPORTANT : CONSERVER LE PRÉSENT MANUEL POUR RÉFÉRENCE ULTÉRIEURE.
NE PAS stocker ni utiliser d'essence ou d'autres vapeurs/liquides inflammables
de cet appareil ou de tout autre appareil
SINGLE JET BROODER
SSJ30–N/L (2A, 2B, 3, 9, 5B, 5D)
FOR YOUR SAFETY
CONSIGNES DE SÉCURITÉ
près
Form No. 43539049
Oct 2013
Advertisement
Table of Contents

Related Manuals for Space-Ray SSJ30-N2B


Summary of Contents for Space-Ray SSJ30-N2B
-
Page 1: Installation And Operation Instructions
SINGLE JET BROODER SSJ30–N/L (2A, 2B, 3, 9, 5B, 5D) MODELS: INSTALLATION AND OPERATION INSTRUCTIONS FOR YOUR SAFETY WHAT TO DO IF YOU SMELL GAS Do not try to light any appliance. Extinguish any open flame. Open windows. Do not touch any electrical switch; do not use any telephone in your building. Immediately call your gas supplier from a neighbor’s telephone. -
Page 2: Table Of Contents
OWNER/INSTALLER: For your safety this manual must be carefully read before installing, operating or servicing this brooder. This brooder is intended for use with either Natural Gas or Propane Gas. It must be installed by a qualified service person or a licensed contractor in accordance with state and local codes. In the absence of these codes, the installation must conform to the National Fuel Gas Code ANSI Z223.1 (latest edition) also know a NFPA54 or the CAN/CGA-B149.1/2 Installation Code in Canada. -
Page 3: General Information
GENERAL INFORMATION This brooder is a self-contained infrared radiant brooder for agricultural locations where flammable gases or vapors are not generally present. Installation of the brooders must be in accordance with all applicable codes shown in the instructions and/or the local codes and authorities having jurisdiction. In the absence of local codes, the brooder must be installed in accordance to the National Fuel Gas Code ANSI Z223.1/NFPA54 in the U.S. -
Page 4: Brooder Control Options
BROODER CONTROL OPTIONS Control No. 2A/2B For single or multi-zone installations using central or multiple thermostats. This 24- volt, AC, zone-type control also can operate on DC voltage as a back up. The gas valve includes a built-in regulator. A 24-volt power supply is required. Brooder can be operated by a 24-volt thermostat, computer or an environmental controller. -
Page 5: Brooder Assembly
Hose Kits – No. 2A, 2B, 5B & 5D Controls: 6FT Hose with 3/8” swivel female flare fittings and 6” spring, Part #30522061 10FT Hose with 3/8” swivel female flare fittings and 6” spring, Part #30522101 Each kit includes (2) 45 deg. flare fittings (3/8” tube x 1/2”... - Page 6 CERAMIC CONE AND PAN ASSEMBLY 1. Loosely attach the three (3) support braces to the burner pan using three (3) ¼-20 screws and nuts from the fastener kit. Align the braces with the slotted holes located in the ceramic holder ring and slide through the upper portion of the braces. See Figure 1.
- Page 7 CANOPY AND HANGER ASSEMBLY 1. Place the three (3) canopy support plates over each support brace. Place the canopy over the assembly so that the support braces slide through the slotted holes of the canopy. NOTE: Orient the two (2) holes in the canopy with the support brace closest to the large hole located in the burner pan.
- Page 8 CONTROL ARM, PILOT AND BURNER JET ASSEMBLY (Pilot Models 2A, 2B, 3 and 9 Only) 1. Gently pull the thermocouple out and away from the pilot assembly. Take care not to crimp the capillary portion of the thermocouple. FIGURE 5 2.
- Page 9 3. Secure the pilot assembly to the burner pan using two (2) #10-24 screws and nuts from the fastener kit. See Figure 6. 4. Reattach the thermocouple to the pilot assembly by sliding it through the large hole located in the burner pan and into the pilot assembly until it snaps into position.
- Page 10 3. Slide the main burner and orifice fitting through the center hole located in the burner pan. NOTE: The tubing may need to be bent slightly by hand for alignment with the fitting. Take care not to crimp the tubing. 4.
- Page 11 ELECTRODE AND CABLE ASSEMBLY (DSI Models 5B and 5D Only) 1. Fasten the electrode holder bracket assembly to the support brace using two (2) #10-24 screws and nuts. See Figure 6d. NOTE: The electrode holder bracket is attached to the support brace located in-line with the control arm tubing.
-
Page 12: Minimum Clearances To Combustibles
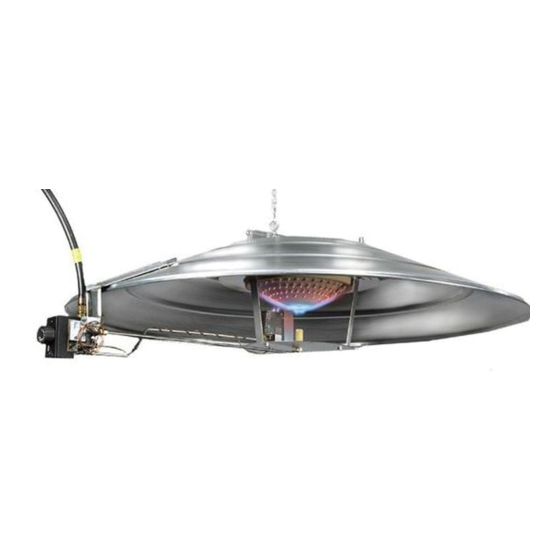
COMPLETE BROODER ASSEMBLY (Pilot Models Shown) FIGURE 7 WARNING: ONCE THE BROODER IS ASSEMBLED AND BEFORE IT IS FIRST FIRED, YOU MUST CHECK FOR GAS LEAKS! USE A SOAP AND WATER SOLUTION AND APPLY AT ORIFICE FITTING AND FIELD CONNECTION AT THE GAS VALVE. -
Page 13: Brooder Installation
BROODER INSTALLATION 1. Locate brooders approximately 25’ to 40’ (8m to 12m) apart, in a row, as needed for bird comfort and building heat loss. If more than one row is desired, stagger rows for best heat distribution. 2. Suspend the brooder at the desired height above the floor (litter) level, normally 34” (864mm) minimum. For brooders connected to a winch (to allow for adjustment of brooder height), connect each brooder using a chain or cable suitable for the weight of each brooder. -
Page 14: Gas Connections
WARNING FIRE HAZARD A safety chain must be connected from the hanging bracket to a fixed part of the building structure directly above the brooder. The safety chain will prevent the brooder from falling to the floor in the event that the main suspension system fails Failure to follow these instructions may result in death, serious injury or property damage GAS CONNECTIONS... - Page 15 Item Number Part Number Description 30285000 VALVE,MANUAL BALL 1/2" 30241000 MALE FTG 45FLARE 3/8TUBEx3/8MPT 30241010 MALE FTG 45FLARE 3/8TUBEx1/2MPT 30523060 HOSE,3/8IDx6FT with 3/8"F SWIVEL FITTINGS 30523100 HOSE,3/8IDx10FT with 3/8"F SWIVEL FITTINGS Make sure connection is secure before turning on the gas. See section 7a for procedures to test for gas leaks before putting the brooders into operation.
- Page 16 7. It is strongly recommended that a field installed manual shut-off valve be installed in the gas piping to each brooder. This will allow service of individual brooders without having to shut down the entire gas supply system. When installing the gas line, it is recommended to connect a sediment trap (shown below) in the gas line at a point before the gas line enters the house.
- Page 17 NOTE: Do not expose final stage piping to excessive heat or direct sunshine during the leak test. Pressure build-up in the line due to heat may compensate for pressure loss due to leaks. This will prevent the gauge reading from indicating system leaks. WARNING: Gas Pressure Testing is to be performed only by qualified personnel.
- Page 18 FIGURE 9b *CHECK GAS OUTLET (MANIFOLD) PRESSURE: 1. Be sure that the valve is in the “OFF” position before removing the pressure tap plug at the valve. With the main burner operating, check the manifold pressure using a lower-pressure test set connected to the 1/8”...
- Page 19 PRESSURE READINGS CONTROL NUMBERS 3 AND 9 ONLY: 1. INLET PRESSURE can be checked by turning the captured screw (see Figure 9a) counter clockwise or 3 turns and then placing the tubing from the gauge over the test point. 2.
- Page 20 STEP 3. At the Tee, calculate the total distance to the secondary regulator. In this example, that equals 20’. Using Table 1, look up the row for 20’ and select the smallest pipe size that has the capacity for the flow of all the brooders connected to the pipe system (720,000).
-
Page 21: Electrical Connections
ELECTRICAL CONNECTIONS (Model No. 2A and 2B) ZONE CONTROL PILOT IGNITION 1. All electrical wiring shall conform to the latest edition of the National Electrical Code (ANSI/NFPA No. 70), or the code legally authorized in the locality where the installation is made. DO NOT use phone cable for electric supply wiring. - Page 22 3. The brooders with the No. 3 and No. 9 control options do not require any electrical supply because they generate their own electricity and operate thermostatically off this power. 4. Each brooder with the No. 2A and 2B control option requires a 24 volt-power supply via a 24 volt transformer.
- Page 23 DSI Wire Connection Diagram FIGURE 11a Terminal Designations Thermostat Input System Ground Valve Power Valve Ground Flame Current - Flame Current + High Voltage Cable 1, 2 Main Gas Valve 3. Each brooder with the No. 5B and 5D control option requires a 24 volt-power supply via a 24 volt transformer.
-
Page 24: Lighting And Shutdown Instructions
SCHEMATIC FIGURE 11c LIGHTING AND SHUTDOWN INSTRUCTIONS NO. 2A CONTROL (#VR8200M VALVE) and NO. 2B CONTROL (#7000ERLC VALVE) 1. Turn gas control knob counterclockwise to “PILOT”. 2. Push and hold down the red reset button on the 2A controls or black knob on 2B controls while you light the pilot. - Page 25 NO. 3 and NO. 9 CONTROLS (#0630501 and #0630566 VALVES) 1. Turn the gas cock dial on the control valve to the “PILOT” position. Depress the dial and light the pilot burner. 2. Hold the dial in for one (1) minute after the pilot is lit. Release the dial. If pilot flame fails to light, wait five (5) minutes before trying to relight.
- Page 26 CONSIGNES D'ALLUMAGE ET D'EXTINCTION COMMANDE N° 2A - (ROBINET N° VR8200M ET N° 2B - (ROBINET N° 7000ERLC 1. Tourner le bouton de commande de gaz dans le sens inverse des aiguilles d’une montre () sur « PILOT » (VEILLEUSE). 2.
-
Page 27: Ventilation
6. Pour démonter la couveuse afin de procéder à son entretien ou à son inspection, tourner le robinet à bille de MARCHE/ARRÊT (ON/OFF) installé sur le flexible de kit de connexion (le cas échéant) sur « OFF » (ARRÊT) et débrancher le tuyau de l'alimentation du robinet de commande. COMMANDE S°... -
Page 28: Maintenance
WARNING: Carbon Monoxide is an odorless and poisonous gas. Extended exposure to carbon monoxide may lead to death. Early signs of carbon monoxide poisoning resemble the flu, including headaches, dizziness and/or nausea. If you experience these signs, GE T FRE SH AIR IM M E D IATE LY. Have the brooders serviced as soon as possible and check the ventilation in the house. -
Page 29: Troubleshooting
TROUBLESHOOTING (PILOT MODELS 2A, 2B, 3 AND 9 ONLY) TROUBLE POSSIBLE CAUSE SOLUTIONS There is air in the gas line. Bleed the air out or continue to ignite the brooder until Pilot will not all the air is purged. - Page 30 C) TROUBLESHOOTING CHART (DSI MODELS 5B AND 5D ONLY) TROUBLE POSSIBLE CAUSE SOLUTIONS The supply gas pressure is too Check the manifold gas pressure and adjust if low. necessary. Improper size of gas piping. If you are not sure of the performance, use the NFPA Brooder is not 54 gas pipe sizing table in these instructions.
- Page 31 ADDITIONAL TROUBLESHOOTING (DSI MODELS 5B AND 5D ONLY) Form No. 43539049 –30– Oct 2013...
-
Page 32: Replacement Parts Guide
REPLACEMENT PARTS GUIDE Item# Part# Description SSJ30-2B SSJ30-9 SSJ30-3 SSJ30-2A SSJ30-5B SSJ30-5D 02129090 Washer, Flat ¼ 02336010 O-Ring Retainer – – – – 02140060 HHCS, ¼-20 x ½” 02167010 Locknut, Keps ¼-20 02167020 Locknut, Keps #10-24 02167040 – – Locknut, Keps #8-32 02168010 PHMS, #10-24 x 3/8”... - Page 33 Item# Part# Description SSJ30-2B SSJ30-9 SSJ30-3 SSJ30-2A SSJ30-5B SSJ30-5D 43999000 Plate, Canopy Support 43539049 Instruction Manual (not shown) 43991020 Burner Pan 43991030 Ceramic Holder Ring 43991040 Ceramic Heat Shield 43992040 Hanger, Center 43992050 Hanger, End 43993060 Brace, Support 43994000 Single Jet Burner Tube, LPG 43994010 Single Jet Burner Tube, Nat Gas 43995010...
- Page 34 PILOT MODELS SSJ30-2A, SSJ30-2B, SSJ30-3 and SSJ30-9 Form No. 43539049 Oct 2013 –33–...
- Page 35 DSI MODELS SSJ30-5B and SSJ30-5D Form No. 43539049 –34– Oct 2013...
- Page 36 No Representative is authorized to assume for the manufacturer, any liability except as set forth above. For the name of your nearest distributor in case of claim under this warranty, contact: Space-Ray Poultry Heating Products / Gas-Fired Products, Inc. / 305 Doggett St., P.O. Box 36485 / Charlotte, NC 28236 / Phone: (704) 372- 3488 / Fax: (704) 332-5843 / email: info@spaceray.com.
- Page 37 FOR YOUR RECORDS: Space-Ray Brooder Model Number: ______________________________ Date Installed: ____________ Serial Numbers: _____________________________________________________________________ For replacement parts, please contact your local distributor or: SPACE-RAY 305 Doggett Street Charlotte, NC 28203-4923 Phone (704) 372-3485 Fax (704) 332-5843 info@spaceray.com Form No.
Need help?
Do you have a question about the SSJ30-N2B and is the answer not in the manual?
Questions and answers