Table of Contents
Advertisement
Quick Links
Introduction:
ECCO's Reversing Camera System is designed to provide visual cues to help drivers avoid collisions
when backing up. A driver using a properly installed and maintained rear view system can be alerted
to potential safety hazards and thus take the appropriate action to prevent an accident. This manual
provides information about installation, function, safety, maintenance, replacement parts, and warranty.
!
WARNING!
Failure to install or use this product according to manufacturers recommendations may result in property
damage, serious bodily/personal injury, and/or death to you and those you are seeking to protect!
Do not install and/or operate this safety product unless you have read and understand the
safety information contained in this manual.
1. Proper installation combined with operator training in the use, care, and maintenance of vehicle camera systems
are essential to ensure the safety of you and those you are trying to protect.
2. Exercise caution when working with live electrical connections.
3. This product must be properly grounded. Inadequate grounding and/or shorting of electrical connections can cause high
current arcing, which can cause personal injury and/or severe vehicle damage, including fire.
4. Proper placement and installation are vital to the performance of this device. Install this product so that output
performance of the system is maximized and the controls are placed within convenient reach of the operator so that
s/he can operate the system without losing eye contact with the roadway.
5. It is the responsibility of the vehicle operator to ensure during use that all features of this product work correctly. In use,
the vehicle operator should ensure the projection of the signal is not blocked by vehicle components (i.e., open
trunks or compartment doors), people, vehicles, or other obstructions.
!
WARNING!
1. High voltage is present within the monitor. The opening of the case should be by professionals.
2. Do not watch the video while driving unless you are monitoring the rear view camera display.
IMPORTANT!
Occasionally, a few highlights or dark spots may occur on the LCD screen. This is a very
common phenomenon in active matrix display technology, and doesn't necessarily indicate any defects or
faults. Never try to repair this device by yourself. In case of any problems, please turn off the display at once
and notify our company or authorized dealer. The monitor is a complex device. Any disassembly or modification
may lead to damage and void the warranty.
Installation Instructions
Reversing Camera/Monitor System
Advertisement
Table of Contents

Related Manuals for Ecco EC4200-K


Summary of Contents for Ecco EC4200-K
-
Page 1: Installation Instructions
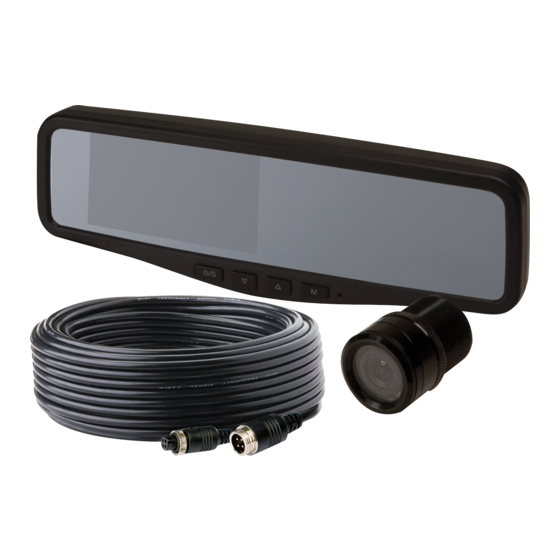
Reversing Camera/Monitor System Introduction: ECCO’s Reversing Camera System is designed to provide visual cues to help drivers avoid collisions when backing up. A driver using a properly installed and maintained rear view system can be alerted to potential safety hazards and thus take the appropriate action to prevent an accident. This manual provides information about installation, function, safety, maintenance, replacement parts, and warranty. - Page 2 CAMERA EC2015-C-Flush Mount MONITOR EC4204-M - 4.3” RV Mirror Image Color CMOS Image 4.3” LCD Color, 4:3 NTSC: 580*540 Controller Internal/2 camera PAL: 580*492 Voltage 12-24V Voltage Requirement 12V +/-1V Power Consumption Power Consumption < 1w Mirror Imaging Yes (via menu of mirror) Lens Split Screen Feature Lens Angle...
- Page 3 Accessories: 1. AV and power supply cable. 2. Center mount bracket. Parts Identification: Color LCD Screen Press to show menus or to Long press 3S to turn on/o select the lower setting the monitor. Short press to select Brightness decrease CAM channels.
- Page 4 Menu: Press MENU to display the following options and settings: 1.Picture 2. Option 1. Picture: BRIGHT, CONTRAST, COLOR, AUTO DIM and SCALE ADJUST options will display on the screen as illustrated below: • Press M to select BRIGHT PICTURE BRIGHT CONTRAST COLOR AUTO DIM...
- Page 5 Troubleshooting: The symptoms described below do not necessarily mean a failure within the display. Please check the following items before you initiate request for repair. Symptoms Possible Causes/Solutions Improper connection of automobile adapter. Use of un-authorized power supply. Power switch No picture, no sound is on OFF position.
Need help?
Do you have a question about the EC4200-K and is the answer not in the manual?
Questions and answers