Centrometal PelTec 12 Technical Instructions
Hide thumbs
Also See for PelTec 12:
- Technical instructions (37 pages) ,
- Technical instructions (80 pages) ,
- Technical instructions (86 pages)
Table of Contents
Advertisement
Centrometal d.o.o. - Glavna 12, 40306 Macinec, Hrvatska, tel: +385 40 372 600, fax: +385 40 372 61 1
TECHNICAL INSTRUCTIONS
for installation, use and maintenance
of hot water boiler
and installation of additional equipment
THE FIRST START-UP MUST BE DONE BY AUTHORIZED PERSON
OTHERWISE PRODUCT WARRANTY IS NOT VALID
HEATING TECHNIQUE
PelTec-lambda 12-48
PelTec 12-48
Advertisement
Table of Contents

Related Manuals for Centrometal PelTec 12


Summary of Contents for Centrometal PelTec 12
- Page 1 HEATING TECHNIQUE Centrometal d.o.o. - Glavna 12, 40306 Macinec, Hrvatska, tel: +385 40 372 600, fax: +385 40 372 61 1 TECHNICAL INSTRUCTIONS for installation, use and maintenance of hot water boiler and installation of additional equipment THE FIRST START-UP MUST BE DONE BY AUTHORIZED PERSON...
-
Page 2: Technical Data
Technical data TECHNICAL INFORMATION PelTec / PeTec / PelTec / PelTec / PelTec / PelTec-lambda PelTec-lambda PelTec-lambda PelTec-lambda PelTec-lambda Nominal heat output (kW) Heat output range (kW) 3,6-12 5,4-18 7,2-24 10,8-36 14,4-48 Boiler class Required chimney underpressure (mbar) 0,05 0,05 0,05 0,05 0,05... -
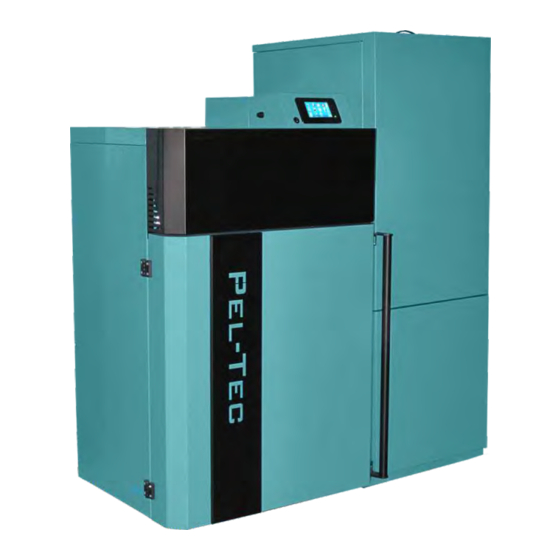
Page 3: Front View
Dimensions and basic parts of the boiler PLV - Boiler flow RP - Pellet level sensor PVV - Boiler return SG* - Safety ventilation group (not included in delivery) PP - Charge / Discharge PG - Pump group DP - Flue gas tube PE - Connection for expansion vessel VE - Fan FC - Flexible PVC tube... -
Page 4: Additional Equipment
Basic parts and sensors 1 - Boiler sensor ( 7 - Fan speed sensor sensor ( tube bimetal sensor 3 - Presostat 9 - Pellet level in the tank 4 - Photocell 10 - Flow sensor ( 5 - Electric heater 11 - Return sensor ( 6 - Flue gas sensor (Pt 1000) 12 - Lambda probe... -
Page 5: Boiler Description
Introduction, boiler description, safety precautions, important informations 1.0. INTRODUCTION The PelTec / PelTec-lambda has a modern construction and design and is made out of the controlled materials of high quality, welded with most modern technology and is approved and tested under EN 303 - 5 norm and fulfil all special request for the connection on the installation of a central heating system. -
Page 6: Status Of Delivery
Status of delivery 1.4. STATUS OF DELIVERY Equipment is delivered seperately: 1. Boiler with planking and thermal insulation 2. Pellet tank in a cardboard box (the parts need to be mounted, see instructions for mounting the pellet tank) 3. Feeder screw with a flexible PVC tube (should be placed in the pellet tank) 4. -
Page 7: Mounting Parts
Mounting parts 1.5. MOUNTING COMPONENTS For ease of handling, transport and import of boiler, PelTec / PelTec-lambda is delivered in parts that need be mounted on the boiler when the boiler is in the boiler room. These parts need to be installed on the boiler: - mount on the back of boiler, is obligatory to use the flange gaskets fan, fastened using M8 bolts and nuts. -
Page 8: Pump Group
Positions of mounted components Pump group - mount pump group with 4-way mixing valve to the boiler so that the T-piece is in the upper side. On the upper connector of the T-piece incorporate safety ventilation group. On the back of boiler were prepared two holenders for mounting connection tubes (connection tubes with 4- way mixing valve). -
Page 9: Pellet Tank
Positions of mounted components Pellet level in the tank sensor - mount this sensor on the back side inside of the pellet tank. First set the plastic glass distance for sensor. After that, put the sensor on this glass. Attach the sensor and the plastic distance with 4 screws supplied. - Page 10 Grate cleaning 1.5.1 MOUNTING MECHANISM FOR GRATE CLEANING 1. Remove the two screws (A), from cover (B) of the grate cleaning mechanism and remove cover carefully . 2. Remove the two screws (C) and just slightly loosen screws (D) as shown in picture below . Carefully attach grate cleaning mechanism to loose screws (D), then fasten with screws (C) and tighten the screws (D).
- Page 11 Grate cleaning 3. Set the screw (E) into the jagged track (F), set the nut on the screw and tighten. Free space (G) is required for the proper functioning of the mechanism. 4. Connect the connectors (H) so they have a good contact. Carefully set the cover and tighten with the screws (A).
- Page 12 Setting photocell on the work position 1.5.3 SETTING PHOTOCELL TO THE WORK POSITION Before first startup, be sure to set the photocell to the position as on Figure 3, otherwise the boiler will not work properly! The photocell should not be set too deep or too shallow in the box. So, limiter determines the proper depth of photocell position.
-
Page 13: Safety Elements
Safety elements, fuel 1.6. SAFETY ELEMENTS Boiler have a few safety elements: - Bimetal thermostat built on the burner pellet feeding tube. If the bimetal set temperature (80°C) is exceeded, pellet feeding is stopped, the burner shuts down and the error E3 appears on the control unit (LED diode switches on). -
Page 14: Boiler Positioning
Boiler positioning 2.0. BOILER POSITIONING AND ASSEMBLY Boiler positioning, assembly and building in must be performed by a qualified person. We recommend that boiler is placed on a concrete base with height of 50 to 100 mm above the floor. Boiler room must be frost- proof and well ventilated. -
Page 15: Connection To The Chimney
Connection to the chimney 3.0. CONNECTION TO THE CHIMNEY IProperly dimensioned and built chimney is the main condition for safe and economical functioning of the boiler. The thermal insulation of the chimney has to be done properly, it has to be absolutely gas-proof and smooth. On its lower part there has to be built in the opening for cleaning with the door. -
Page 16: Installation
Installation, connection to central heating system 4.0. INSTALLATION All local regulations, including those referring to national and European standards need to be complied with when installing the appliance. 4.1. CONNECTION TO CENTRAL HEATING SYSTEM All installation work must be made in accordance with valid national and European standards. Boiler PelTec / PelTec-lambda can be built in closed and open central heating systems. - Page 17 Configuration DHW, DHC Scheme 1. Configuration DHW Required sensors: - return flow temp. sensor - DHW sensor 1 - Boiler PelTec / PelTec-lambda 5 - Return flow sensor 2 - Air self-venting group 2,5 bar 6 - DHW tank 3 - Motor 4-ways mixing valve 7 - DHW sensor 4 - Closed type expansion vessel Required sensors: - return flow temp.
- Page 18 Configuration DHC || DHW, BUF Required sensors: - return flow temp. sensor Scheme 3. Configuration DHC || DHW - flow temperature sensor - DHW sensor 1 - Boiler PelTec / PelTec-lambda 6 - Flow sensor 2 - Air self-venting group 2,5 bar 7 - DHW tank 3 - Motor 4-ways mixing valve 8 - DHW tank sensor...
- Page 19 Configuration DHW || BUF, BUF -- IHC Required sensors: - return flow temp. sensor Scheme 5. Configuration DHW || BUF - DHW tank sensor - accumulation tank sensor (upper) - accumulation tank sensor (lower) 1 - Boiler PelTec / PelTec-lambda 7 - DHW tank sensor 2 - Air self-venting group 2,5 bar 8 - Accumulation tank CAS...
- Page 20 Configuration DHW || BUF -- IHC, BUF -- DHW Required sensors: - return flow temp. sensor Scheme 7. Configuration DHW || BUF -- IHC - DHW tank sensor - accumulation tank sensor (upper) - accumulation tank sensor (lower) 1 - Boiler PelTec / PelTec-lambda 8 - Accumulation tank CAS 2 - Air self-venting group 2,5 bar 9 - Accumulation tank sensor CAS 1 (upper)
- Page 21 Configuration BUF -- IHC || DHW, CRO Required sensors: - return flow temp. sensor Scheme 9. Configuration BUF -- IHC || DHW - DHW tank sensor - accumulation tank sensor (upper) - accumulation tank sensor (lower) 1 - Boiler PelTec / PelTec-lambda 8 - Accumulation tank sensor CAS 2 (lower) 2 - Air self-venting group 2,5 bar 9 - DHV tank...
- Page 22 Configuration CRO / BUF, IHC || DHW (2) NOTE: USED ONLY IN CASCADES AND EXTERNAL CONTROL Scheme 11. Configuration CRO / BUF Version 1: (display shows 1 temperature, eg hidraulic crossover) Version 2: (Display shows 2 temperatures (eg. accumulation tank) 1 - Boiler PelTec / PelTec-lambda 6a - Hydraulic crossover 2 - Air self-venting group 2,5 bar...
- Page 23 Configuration DHC 2X, BUF--IHC 2X Scheme 13. Configuration DHC 2X 2.krug grijanja 1.krug grijanja Required sensors: - return flow temp. sensor - main flow temperature sensor 1 - Boiler PelTec / PelTec-lambda 8 - 3-way manual mixing valve 1.circuit 2 - Air self-venting group 2,5 bar 9 - Heating circuit 2 3 - Motor 4-ways mixing valve 10 - 3-way manual mixing valve 2.circuit...
- Page 24 Configuration CRO / DHW Scheme 15. Configuration CRO -- DHW Required sensors: - return flow temp. sensor - DHW tank sensor - hydraulic crossover sensor 1 - Boiler PelTec / PelTec-lambda 6 - Hydraulic crossover 2 - Air self-venting group 2,5 bar 7 - Hydraulic crossover sensor 3 - Motor 4-ways mixing valve 8 - DHW tank...
-
Page 25: Electrical Connections
Electrical connections 5.0. ELECTRICAL CONNECTIONS All electrical works must be performed by a certified professional in accordance with valid national and European standards. If the supply cord is damaged, it must be replaced by the manufacturer, its service agent or similarly qualified persons in order to avoid a hazard. A device for switching of all power supply poles must be installed in electrical installation in accordance with the national regulations on electrical installations. - Page 26 Fuses 5.1. FUSES Lambda board Main Board (only PelTec-lambda) PelTec / PelTec-lambda Mark: F3 Mark: F1 Mark: F2 Mark: F1 Medium slow Fast acting fuse 500mA Fast acting fuse 3,15A Fast acting fuse 3,15A fuse 3,15 A MAIN BOARD MARK FUSE DEVICES - all pumps...
- Page 27 Electrical scheme (PelTec) 5.2.a ELECTRICAL SCHEME OUTPUTS 1 (PelTec) TO 5 1 2 3 Technical instructions PelTec / PelTec-lambda...
- Page 28 Electrical scheme (Peltec) 5.3.a ELECTRICAL SCHEME OUTPUTS 2 (PelTec) Technical instructions PelTec / PelTec-lambda...
- Page 29 Electrical scheme (PelTec) 5.4.a ELECTRICAL SCHEME INPUTS (PelTec) Technical instructions PelTec / PelTec-lambda...
- Page 30 Electrical scheme (PelTec) 5.5.a ELECTRICAL SCHEME SENSORS (PelTec) Technical instructions PelTec / PelTec-lambda...
- Page 31 Electrical scheme (PelTec) 5.6.a ELECTRICAL SHEME preparation for lambda probe (PelTec) Technical instructions PelTec / PelTec-lambda...
- Page 32 Electrical scheme (PelTec-lambda) 5.2.b ELECTRICAL SCHEME OUTPUTS 1 (PelTec-lambda) TO 5 1 2 3 Technical instructions PelTec / PelTec-lambda...
- Page 33 Electrical scheme (PelTec-lambda) 5.3.b ELECTRICAL SCHEME OUTPUTS 2 (PelTec-lambda) Technical instructions PelTec / PelTec-lambda...
- Page 34 Electrical scheme (PelTec-lambda) 5.4.b ELECTRICAL SCHEME INPUTS (PelTec-lambda) Technical instructions PelTec / PelTec-lambda...
- Page 35 Electrical scheme (PelTec-lambda) 5.5.b ELECTRICAL SCHEME SENSORS (PelTec-lambda) Technical instructions PelTec / PelTec-lambda...
- Page 36 Elektrical sheme (PelTec-lambda) 5.6.b ELECTRICAL SHEME LAMBDA PROBE (PelTec-lambda) Technical instructions PelTec / PelTec-lambda...
-
Page 37: Operating The System
Operating the system, safety, startup 6.0. OPERATING THE SYSTEM Boiler must not be used in flammable and explosive environment. It must not be used by children or disabled persons (either physically or mentally), as well as by person without knowledge or experience, unless they are under control or trained by s person responsible for their safety. -
Page 38: Boiler Use
Boiler use 6.3. BOILER USE Boiler must not be used in flammable and explosive environment. It must not be used by children or disabled persons (either physically or mentally), as well as by person without knowledge or experience, unless they are under control or trained by s person responsible for their safety. -
Page 39: Cleaning And Maintenance
Cleaning and maintenance 7.0. CLEANING AND MAINTENANCE Every millimeter of soot on the exchange surfaces and in the flues means about 5 % more fuel consumption. A clean boiler saves fuel and protects the environment. Save fuel – always clean the boiler in good time! PROTECTIVE GLOVES ARE OBLIGATORY!! Boiler type Description... -
Page 40: Cleaning Intervals
Cleaning intervals Cleaning interval Boiler type Description At least once per year Cleaning of exchanging surfaces (This procedure is very simple and is 12-48 kW (above the burner) recommends even more often) Claning of exchanging surfaces (above the burner) 1. Maintenance Man. - Page 41 Cleaning intervals Cleaning interval Boiler type Description Cleaning of exchanging surfaces At least once per year 12 kW (around the entire boiler) 1. Maintenance Man. Boiler Cleaning Man. Boiler Cleaning 2000 Filling feeder screw Airvent Weighing Metal tube 1. Press ''Maintenance'' on the regulation and then ''Cleaning the boiler''. 2.
- Page 42 Cleaning intervals Boiler type Description Cleaning interval At least once a year (or if you have problems 18-48 kW Photocell cleaning with the ignition) Dirty photocell which can result Valid photocell error in ignition or flame dissapear error Carefully remove the photocell from the box and then gently with a cotton swab clean the body and lens of photocell.
- Page 43 Cleaning and maintenance 7.1. EXTRACTION OF TURBULATORS 6.a i 6.b Samo u slučaju da nije moguće odjednom izvaditi sve turbulatore (korak 6) 1 - Remove the casing cover. 2 - Unscrew the 4 srews and remove the flue ducts door. 3,4 - Unscrew the 2 srews and lift turbulators (first pass) with bracket as shown in picture.
- Page 44 Extraction of helical metal plate from second pass turbulators 7.2. EXTRACTION OF HELICAL METAL PLATE FROM SECOND PASS TURBULATORS For extracting of helical metal plate from turbulators is neccessary to unscrew nut and pull out helical metal plate from the bottom. With this action the flue gas temperature (in boiler work) will be increased but if there si no other solution for chimney condensation prevention (reduction to acceptable level) that procedure is neccessary.
- Page 45 Replacement of the electric heater 7.3 REPLACEMENT OF THE ELECTRIC HEATER 7.3.1 REPLACEMENT OF THE EL.HEATER WITH NEW EL. HEATER DIAMETER Ø35mm Heater clamp for heater diameter Ø35mm The heater holder (Heater holder is identical with heaters diameter Ø20mm and Ø35mm) Electric heater with a diameter of Ø...
- Page 46 Replacement of the electric heater 3. Unscrew the two screws and remove the heater clamp. Insert the new el. heater, turn it so that the shaft at the front part of the el heater is turned vertically (see detail C) and gently attach it to the heater holder (Still not fully tightened).
- Page 47 Replacement of the electric heater 7.3.2 REPLACEMENT OF THE EL.HEATER WITH NEW EL. HEATER DIAMETER Ø20mm The upper part of the heater clamp diameter Ø20mm The lower part of the heater clamp diameter Ø20mm The heater holder (Heater holder is identical with heaters diameter Ø20mm and Ø35mm) Electric heater with a diameter of Ø...
- Page 48 Replacement of the electric heater 3. Unscrew the two screws and remove the heater clamp. Insert the new el. heater, turn it so that the shafts at the front part of the el heater are turned vertically (see detail C) and gently attach it to the heater holder (Still not fully tightened).
- Page 49 Technical instructions PelTec / PelTec-lambda...
- Page 50 Company assumes no responsibility for possible inaccuracies in this book originated typographical errors or rewriting, all the pictures and diagrams are principal and it is necessary to adjust each actual situation on the field, in any case the company reserves the right to enter their own products such modifications as considered necessary. Centrometal d.o.o. Glavna 12, 40306 Macinec, Croatia central tel: +385 40 372 600, fax: +385 40 372 611 service tel: +385 40 372 622, fax: +385 40 372 621 www.centrometal.hr...
Need help?
Do you have a question about the PelTec 12 and is the answer not in the manual?
Questions and answers