Table of Contents
Advertisement
Quick Links
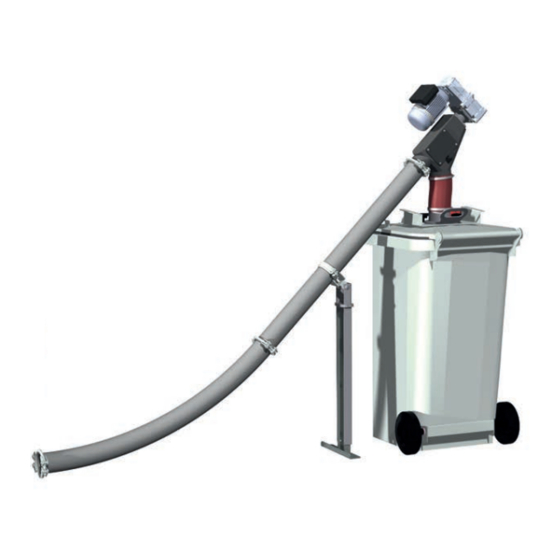
Installation and Operating Instructions
Ash discharge into a standard dustbin
for T4 / TX / P4 Pellet
Translation of the original German operating and installation instructions for technicians and operators
Read and follow the instructions and safety information!
Technical changes, typographical errors and omissions reserved!
M1590214_en | Edition 05/02/2015
Fröling GesmbH | A-4710 Grieskirchen, Industriestraße 12 | www.froeling.com
Advertisement
Table of Contents

Related Manuals for Froling T4


Summary of Contents for Froling T4
-
Page 1: Installation And Operating Instructions
Installation and Operating Instructions Ash discharge into a standard dustbin for T4 / TX / P4 Pellet Translation of the original German operating and installation instructions for technicians and operators Read and follow the instructions and safety information! Technical changes, typographical errors and omissions reserved! M1590214_en | Edition 05/02/2015 Fröling GesmbH | A-4710 Grieskirchen, Industriestraße 12 | www.froeling.com... -
Page 2: Table Of Contents
Assembling the ash discharge system 4.6.1 Modifying the ash transfer box for P4 Pellet (where required) 4.6.2 Modifying the ash transfer box for T4 / TX (where required) 4.6.3 Removing the boiler ash container 4.6.4 Assembling the ash transfer box on the T4 / TX 4.6.5... - Page 3 Table of Contents 4.7.3 Connecting the ash discharge system to the T4 4.7.4 Connecting the safety switch on the standard dustbin to the T4 4.7.5 Connecting the ash discharge system to the P4 Pellet 4.7.6 Connecting the safety switch on the standard dustbin to the P4 Pellet...
- Page 4 General 1 General Thank you for choosing a quality product from Froling. The product features a state-of- the-art design and conforms to all currently applicable standards and testing guidelines. Please read and observe the documentation provided and always keep it close to the system for reference.
-
Page 5: General Product Overview
General Product overview 1.1 Product overview Ash transfer box for T4 / TX Ash transfer box for P4 Pellet Cladding for P4 Pellet (mounted onto the boiler instead of the insulated doors) Discharge pipe with coreless screw for transporting ash to the gravity shaft... -
Page 6: Safety
Safety Hazard levels of warnings 2 Safety 2.1 Hazard levels of warnings This documentation uses warnings with the following hazard levels to indicate direct hazards and important safety instructions: DANGER The dangerous situation is imminent and if measures are not observed it will lead to serious injury or death. -
Page 7: Permitted Uses
Froling’s ash discharge system is only applicable to the removal of combustion residue in the form of ash from the Froling boilers detailed in the section entitled “Area of Application”. The ash will be discharged into the provided standard dustbin or any other suitable recipient. -
Page 8: Qualification Of Staff
Assembly, installation, initial startup and servicing must always be carried out by qualified personnel: - Heating technician / building technician - Electrical installation technician - Froling customer services The assembly staff must have read and understood the instructions in the documentation. 2.4.2 Personal protective equipment for assembly staff You must ensure that staff have the protective equipment specified by accident prevention regulations. -
Page 9: Protective Equipment For Operating Staff
Safety Qualification of staff 2.4.4 Protective equipment for operating staff You must ensure that staff have the protective equipment specified by accident prevention regulations. ▪ For operation, inspection and cleaning: - suitable work wear - protective gloves - sturdy shoes 2.5 Design information Carrying out modifications to the system and changing or deactivating safety equipment is prohibited. -
Page 10: Technology
Technology Dimensions of ash transfer box for T4 / TX 3 Technology 3.1 Dimensions of ash transfer box for T4 / TX Dimensi Description Unit Ash discharge system for Total height of ash discharge system 1,725 Height of standard dustbin... -
Page 11: Dimensions Of Ash Transfer Box For P4 Pellet
Technology Dimensions of ash transfer box for P4 Pellet 3.2 Dimensions of ash transfer box for P4 Pellet Dimensi Description Unit Ash transfer box for P4 Pellet 45-60 70-105 Total height of ash discharge system 1,725 Height of standard dustbin 1,040 Height of drive unit and gravity shaft (excluding high-temperature hose) -
Page 12: Technical Specifications
Technology Technical specifications 3.3 Technical specifications Ash discharge system Description Unit Ash discharge system P4 Pellet Power supply to geared motor 230 V/50 Hz Power consumption of geared motor Speed of coreless screw Weight of ash transfer box Weight of gravity shaft with motor Weight of hoses with screw Standard dustbin Description... -
Page 13: Assembly
Assembly 4 Assembly CAUTION Assembly and installation by unqualified persons: Risk of personal injury and damage to property During assembly and installation: ❒ Observe the instructions and information in the manuals ❒ Only allow appropriately qualified personnel to work on the system WARNING Working on a system which is operational/hot: Risk of serious injuries from automatic start-up of the system and severe burns... -
Page 14: Materials Supplied
Assembly Materials supplied 4.1 Materials supplied P4 Pellet Ash transfer box incl. flange for T4 Coreless screw Ash transfer box incl. flange for TX Tension rings Cladding for P4 Pellet 1 pipe bend, 1 straight pipe Ash transfer box incl. flange... -
Page 15: Temporary Storage
▪ The door opening at the installation site should be large enough to let the dustbin pass easily ⇨ See "Dimensions of ash transfer box for T4 / TX" [page 10] ⇨ See "Dimensions of ash transfer box for P4 Pellet" [page 11] ▪... -
Page 16: Assembly Overview
Assembly Assembly overview 4.5 Assembly overview 4.5.1 Ash transfer box for T4 / TX Item Description Item Description [units] [units] Complete ash transfer box Cover, complete Welded-assembly ash transfer Silicone foam seal (left) Silicone foam seal Silicone foam seal (centre) -
Page 17: Ash Transfer Box For P4 Pellet
Assembly Assembly overview 4.5.2 Ash transfer box for P4 Pellet Item Description Item Description [units] [units] Complete ash transfer box Silicone foam seal Welded-assembly ash transfer Sticker, “Warning! Hot surface!” Locking plate Countersunk bolt Pressure spring Cladding (underneath, complete) Flat-headed screw Grip recess Tension ring Double ball catch... -
Page 18: Hose With Screw, Supporting Post And Gravity Shaft
Assembly Assembly overview 4.5.3 Hose with screw, supporting post and gravity shaft Item Description Item Description [units] [units] Hose with screw and supporting Coreless screw post Ring seal Gravity shaft unit, complete Tension ring Gravity shaft bracket Pipe bend Silicone foam seal Straight pipe with flange Inspection cover Pipe clamp... -
Page 19: Standard Dustbin
Assembly Assembly overview 4.5.4 Standard dustbin Item Description Item Description [units] [units] Standard dustbin with Silicone foam seal attachments 240 l standard dustbin Locking plate Rubber seal for profile Star knob Silicone foam seal Bracket Flange bracket M6x9 flat-headed screw Spacer plate Clamping plate Key plate... -
Page 20: Assembling The Ash Discharge System
Assembly Assembling the ash discharge system 4.6 Assembling the ash discharge system WARNING Working on a system which is operational/hot: Risk of serious injuries from automatic start-up of the system and severe burns from hot parts and the flue gas pipe! When working on the system: ❒... -
Page 21: Modifying The Ash Transfer Box For T4 / Tx (Where Required)
Assembly Assembling the ash discharge system 4.6.2 Modifying the ash transfer box for T4 / TX (where required) When delivered, the connection flange is mounted to the right-hand side of the ash transfer box (so that the ash discharge system can be mounted to the right of the boiler). -
Page 22: Assembling The Ash Transfer Box On The P4 Pellet
Assembly Assembling the ash discharge system 4.6.5 Assembling the ash transfer box on the P4 Pellet ❒ Remove the insulating cover ❒ Remove the two screws and contact washers from the flaps of the controller cover ➥ Caution: do not lose the contact washers! ❒... -
Page 23: Assembling The Discharge Pipe And Supporting Post
Assembly Assembling the ash discharge system ❒ Replace the ash container with the ash transfer box ❒ Push the lever down to lock the ash transfer box in place ❒ Secure 2 double ball catches to the left and right of the boiler insulation using blind rivets in the pre-drilled holes. -
Page 24: Assembling The Coreless Screw And Drive Unit With Gravity Shaft
Assembly Assembling the ash discharge system 4.6.7 Assembling the coreless screw and drive unit with gravity shaft ❒ Remove the screw, spacer washer and key from the end of the screw ❒ Grease the stub shaft ❒ Push the screw through the pipe from the top ❒... - Page 25 Assembling the ash discharge system ❒ Attach the high-temperature hose and connection flange to the gravity shaft using the hose clamp T4/TX: P4 Pellet: ❒ Push the screw with the hose and drive unit as far as it will go into the ash transfer box flange and then fix it in place using a tension ring.
-
Page 26: Aligning The Ash Discharge System
Assembly Assembling the ash discharge system 4.6.8 Aligning the ash discharge system For the T4 / TX: ❒ Straighten up the ash transfer box ➥ Adjust the supporting posts as required ❒ Loosen the screws on the supporting post bracket ➥... -
Page 27: Assembling The Standard Dustbin
Assembly Assembling the ash discharge system 4.6.9 Assembling the standard dustbin ❒ Loosen the star shaped screws and remove the locking plate ➥ Store the locking plate in a suitable location - it will be needed when disposing of the ash Tip: hang the locking plate on the hook of the gravity shaft bracket inspection cover ❒... -
Page 28: Connecting The System
Assembly Connecting the system If the flexible tube on the gravity shaft is too long: ❒ Loosen the hose clamps at the top and bottom and remove the hose ❒ Cut to the required length ❒ Reattach the tube using the hose clamps 4.7 Connecting the system 4.7.1 Connecting the ash discharge system to the TX ❒... -
Page 29: Connecting The Ash Discharge System To The T4
❒ Insert the cables from the drive unit into the boiler controller ❒ Connect the cables to the free “Ash screw (10 / 11)” output on the wood chip module 4.7.4 Connecting the safety switch on the standard dustbin to the T4 Kernmodul (FRKEM 25) Boiler ... -
Page 30: Connecting The Ash Discharge System To The P4 Pellet
Assembly Connecting the system 4.7.5 Connecting the ash discharge system to the P4 Pellet ❒ Insert the cables from the drive unit into the boiler controller ❒ Connect a cable additionally to the “EOS drive M4 (2)” output on the pellet module ➥... -
Page 31: Servicing
Servicing Inspection and cleaning 5 Servicing 5.1 Inspection and cleaning WARNING Incorrect inspection and cleaning: Incorrect or insufficient inspection and cleaning of the boiler can cause serious faults in combustion (e.g. spontaneous combustion of carbonisation gases / flash fires) and this can lead to serious accidents and damage! Take the following precautions: ❒... -
Page 32: Checking The Ash Level In The Dustbin
Servicing Inspection and cleaning NOTICE! The frequency at which the following work is carried out depends on energy requirements, fuel quality and number of operating hours. 5.1.1 Checking the ash level in the dustbin NOTICE Exceeding the dustbin’s maximum load may result in damage to the dustbin and serious difficulties in emptying it. -
Page 33: Emptying The Dustbin
Servicing Inspection and cleaning 5.1.2 Emptying the dustbin 1. Remove the key plate from the safety switch 2. Loosen the star shaped screws 1. Remove the dustbin from the connection flange 2. Hang the flange on the hook of the gravity shaft bracket inspection cover 3. -
Page 34: Checking The Geared Motors
Heating Plant Regulations (Feuerungsanlagen-Verordnung). 5.1.5 Replacement parts With Froling original replacement parts in your boiler, you are using parts that match perfectly. As the parts fit together so well, installation times are shortened and a long service life is maintained. -
Page 35: Disposal Information
Servicing Inspection and cleaning 5.1.6 Disposal information Disposal of the ash ❒ dispose of ash in accordance with the Waste Management Act (AWG) Austria: ❒ dispose of ash in accordance with local regulations Other countries: Disposal of system components ❒ Ensure that they are disposed of in an environmentally friendly way in accordance with waste management regulations in the country (e.g. -
Page 36: Troubleshooting
❒ once all of the tasks have been completed, turn the main switch back on and switch the boiler on in the desired mode 6.1 Blockage in ash discharge on the T4/TX An error message is displayed on the boiler when the ash discharge system is blocked and the ash transfer box is full. - Page 37 Troubleshooting Blockage in ash discharge on the T4/TX 1. Remove the key plate from the boiler safety switch 2. Push the lever to the side on the boiler up 3. Remove the ash transfer box from the boiler 1. Loosen the tension ring between the pipe bend and the ash transfer box 2.
-
Page 38: Blockage In Ash Discharge On The P4 Pellet
Troubleshooting Blockage in ash discharge on the P4 Pellet 6.2 Blockage in ash discharge on the P4 Pellet 1. Shut down the system 2. Remove the dustbin ⇨ See "Emptying the dustbin" [page 33] 1. Loosen the screws on the supporting post bracket (A) –... - Page 39 Troubleshooting Blockage in ash discharge on the P4 Pellet 1. Loosen the tension ring between the pipe bend and the ash transfer box 2. Remove the ash transfer box from the coreless screw 3. Empty the ash transfer box and reassemble the components in reverse order 4.
-
Page 40: Appendix
Appendix Addresses 7 Appendix 7.1 Addresses 7.1.1 Address of manufacturer FRÖLING Heizkessel- und Behälterbau GesmbH Industriestraße 12 A-4710 Grieskirchen AUSTRIA TEL 0043 (0)7248 606 0 FAX 0043 (0)7248 606 600 INTERNET www.froeling.com 7.1.2 Address of the installer Stamp Fröling GesmbH | A-4710 Grieskirchen, Industriestraße 12 | www.froeling.com...
Need help?
Do you have a question about the T4 and is the answer not in the manual?
Questions and answers