
Related Manuals for Melitta Cafina XT8


Summary of Contents for Melitta Cafina XT8
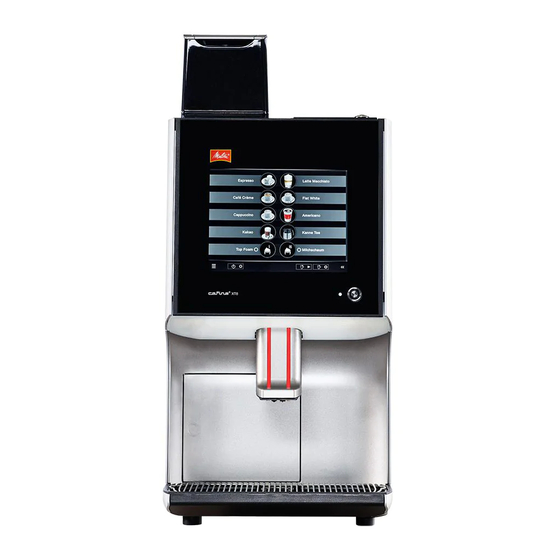
- Page 1 Operating Instructions Melitta Cafina ® ® Melitta Professional Coffee Solutions...
-
Page 2: Table Of Contents
Contents Dispensing quick start products ....... General ������������������������������������������������������������� Dispensing multiplicator products ....Manufacturer information ......... 6.10 Multiple dispensing of a single product ... About these instructions ........6.11 Batch mode ............Explanation of symbols ........6.12 Preparing coffee from ground coffee ....Description ............ - Page 3 Chapter overview General Safety Technical data Installation Operation Dispensing products Settings Cleaning Maintenance Translation of the original operating instructions Recycling and disposal 28514 • 20170301...
-
Page 4: General
This machine is a fully automatic coffee machine. 1�1 Manufacturer information Depending on the machine equipment level, the following products can be dispensed: Melitta Professional Coffee Solutions GmbH & Co. KG ͵ Coffee, coffee and milk, and milk products Zechenstr. 60 32429 Minden ͵ Instant products Germany ͵... -
Page 5: Accessories
• Stationary installation within dry, enclosed rooms ͵ 1 microfiber cloth ͵ 1 tin of Melitta Cafina Multi-Tabs (art. no. 31547) This machine is not intended for the following uses: ͵ 10 bags of Melitta Cafina AMC cleaner (art. no. -
Page 6: Safety Information
• must be supervised by trained personnel. Repairs and maintenance work may only • be carried out by Melitta customer service or by specialist personnel authorized by the manufacturer. Incorrectly performed repair work can result in considerable risk to the user. -
Page 7: Technical Data
Technical data Do not hold any body parts under the Technical data • outlets when hot liquids or steam are being dispensed. This occurs in the Machine specifications following situations: Dimensions (W x D x H) 350 x 580 x 765 mm After switching on ͵... -
Page 8: Installation
Installation Installation 4�1�3 Installation location The machine is only to be installed and used in enclosed, The machine is set up, installed, and handed over ready dry areas; it must not be operated outdoors. for use by customer service. Due to the associated The effects of humidity and temperature may adversely hazards, modifications to the installation or setup must affect the function and safety of the equipment. -
Page 9: Canister Operation (Option)
Installation 4�2 Canister operation (option) In daily operation, the fresh water canister must be filled with sufficient water and the waste water canister must If your machine cannot be permanently connected to be drained when necessary. the fresh water and waste water system, you can also operate it with two canisters. -
Page 10: Operation
Operation Operation 5�1�4 Logging in with a chip key Initial commissioning is carried out by customer service. If you want to put the machine back into operation following standstill, clean the machine as described (see chapter 8 on page 30). 5�1 Chip keys Included with the machine are two green user chip keys... -
Page 11: Stand-By Operation
Operation 5�2�2 Stand-by operation 5�2�3 Switching off In daily operation, it is sufficient to switch the machine Note on and off via the display only (stand-by operation): For hygiene reasons, the machine must be switched off only in a cleaned state. 1. -
Page 12: Filling
Operation For an extended standstill To simplify filling, the relevant container can be removed. If the machine will not be used for an extended period, turn off the water supply and switch off the main switch. Note For hygiene reasons, the machine must be switched off only in a cleaned state. -
Page 13: Filling The Instant Powder (Option)
Operation 5�3�2 Filling the instant powder (option) 9. Turn the powder chute downwards to direct it into the mixer housing. ATTENTION 10. Flap down the instant container cover. Damage to the instant container cover! 11. Close the machine door. The lid on the instant container cover cannot be removed. Trying to remove the lid could damage the cover. -
Page 14: Confirming Filling Levels
Operation 5�4 Confirming filling levels Filling levels The filling level must be confirmed at the machine each time a supply container is filled. Filling levels Limit value Designation Cocoa Bean container 1 Bean container 2 Instant container 1 Instant container 2 Cancel Apply Fig. -
Page 15: Locking Product Dispensing
Operation 5�7 System messages 5�7�1 Messages in self-service operation In self-service operation, system messages are indicated by a notice symbol. Espresso Café Crème Fig. 14: Emptying the coffee grounds drawer 1. Swivel the wand (2) (if present) forwards. Cappuccino 2. Pull the beverage outlet (1) fully upwards. 3. -
Page 16: Dispensing Products
Dispensing products Dispensing products You can select dispensing products sorted into groups by opening the specified group via touch and accessing the required product for dispensing. After a product from a Note group has been dispensed, use the "←" symbol (4) (top Before dispensing products, all supply con- left in self-service operation) to return to the start screen, tainers must be inserted and filled as otherwise... -
Page 17: Dispensing Coffee, Coffee And Milk, And Milk Products
Dispensing products 6�3 Dispensing coffee, coffee and milk, and milk 2. On the display, press the button for dispensing hot products water. 9 The product is dispensed. 6�5 Dispensing steam (option) Depending on the equipment provided, the steam wand may be one of the following: ͵... -
Page 18: Steam Wand With Steam Control Plus
Dispensing products 4. Position the steam wand over the drip grid. 4. Position the steam wand over the drip grid. 5. Then press the button for steam dispensing again to 5. Confirm the request with "Start" to blow out the blow out the steam line. -
Page 19: Dispensing A Double Product
Dispensing products 6�7 Dispensing a double product 6�8 Dispensing quick start products If this function is enabled by customer service, you can Depending on the preset in the manager menu (see request two portions of a coffee/milk product and fill two chapter 7.1 on page 22), you can use the quick start cups simultaneously. -
Page 20: Dispensing Multiplicator Products
Dispensing products 6�9 Dispensing multiplicator products 6�11 Batch mode Under product settings (see chapter 7.5 on page 25), If this function is enabled by customer service, you can you can set up products as multiplicator products. With preselect several products with the batch mode and this you can issue multiple portions of a product in suc- dispense them in sequence. -
Page 21: Preparing Coffee From Ground Coffee
Dispensing products Products which are not already in the batch can be added. 4. Press the "" button (1) to continue dispensing the products. 1. Select one of the following options: ͵ Once all products from the batch have been dis- •... -
Page 22: Settings
Settings Settings 7�2 Carrying out inputs The machine allows you to enter designations and quan- The machine is preset to ensure that it is ready for tities via a screen keyboard. immediate use for normal operation. When the screen keyboard appears on the display, you The functions described here are only accessible if can use the following functions: enabled by customer service. -
Page 23: Menu Option "Selection
Settings 7�4 Menu option "Selection" Name selection Here you can select which pre-programmed products are Language selection displayed for dispensing. Name line 1 Name line 2 Category models Category models Group name Group name Waiter operation Self-service operation Quick start Milk Milk Cappuccino... -
Page 24: Adding Dispensing Products
Settings 7�4�3 Adding dispensing products 7�4�5 Editing the dispensing view Self-service and waiter operation 1. Press the required product group or product button. 2. Select one of the following options to edit the display 1. If you wish to add a dispensing product to a product of a product group or dispensing product: group, open the required product group by pressing the symbol twice. -
Page 25: Menu Option "Product
Settings 7�5 Menu option "Product" 7�5�2 Duplicating a product Here you can change the values for product components, You can duplicate an existing product and then use it as a if enabled by customer service. basis for a new product. 1. -
Page 26: Menu Option "Unit
Settings 7�6 Menu option "Unit" If the filling level for a consumable drops below a set value while a product is being dispensed, a warning will Here you have the option of adjusting the filling levels, appear on the display. cleaning the machine, or switching it off. -
Page 27: Menu Option "Operation
Settings 2. Carry out the required option: 7�7 Menu option "Operation" Here you can read off the consumption and product Note statistics and adjust settings for the machine. For hygiene reasons, the machine must be switched off only in a cleaned state. 7�7�1 Opening usage statistics The "Switch off"... -
Page 28: Machine Settings
Settings 7�7�3 Machine settings 2. Use the "" and "" buttons to move the list to display all the programmed products. 3. Press the "Filter" button (1) to display products Settings according to various criteria. Current language Standard language Configure language selection and location 9 The product statistics are opened. -
Page 29: Logging
Settings 7�7�4 Logging Summer time Choose between the settings "Automatic" and "No". 1. Press the "Logging" button (2) (see Fig. 41) to display important events or error messages on the machine. Cleaning time Set the 1st and 2nd cleaning ͵ You can use the filter to display events according time for the automatic cleaning to various criteria. -
Page 30: Cleaning
Cleaning Cleaning 8�2 Cleaning intervals Interval Which parts? How to clean Clean the coffee machine carefully in accordance with After every use Steam wand Emit steam for the following specifications to maintain the value and approx. 2 seconds. hygiene of the machine. Then clean with a clean, damp cloth. -
Page 31: Cleaning Agent
• Melitta Cafina Multi-Tabs (art. no. 31547) • Melitta Cafina AMC cleaner (art. no. 25363) 1. Empty the coffee grounds drawer as described in chapter 5.5 on page 14. -
Page 32: Starting The Cleaning Program
Cleaning 3. Clean the coffee grounds drawer as described in chapter 8.6 on page 31. If prompted to clean the instant system first, complete this process first (see chapter 8.8 on page 35) and then confirm that it has been fully re-installed. 4. - Page 33 Cleaning 8�7�3�2 Cleaning with AMC cleaner (systems without The prompt "Cleaning agent milk system" is then shown top foam) on the display again. If the system has indicated that you should use AMC Cleaning cleaner, clean the machine as described in chapter 8.7.3.1 Start of cleaning End of cleaning on page 32;...
-
Page 34: Cleaning The Brewing System
Cleaning Cleaning Start of cleaning End of cleaning Time still Time Cleaning agent milk system Please add the cleaning agent for the milk system to the relevant cleaning container. Fig. 48: Blue cleaning container with milk tube Fig. 46: Adding the cleaning agent 6. -
Page 35: Final Activities
Cleaning 8�8 Cleaning the instant system Fig. 51: Opening the instant container cover Fig. 50: Cleaning tablet 1. Open the machine door using the key (2). 3. Insert a cleaning tablet (1) into the tab holder. 2. Lift the instant container cover (1) upwards carefully. 4. - Page 36 Cleaning 3. Remove the powder chute (2). Assembling the mixer unit 4. Repeat stages 1 to 3 for the second instant container Assembly is carried out by reversing the order of the if necessary. removal process. 5. Remove the tube (6) on the mixer housing and on the beverage outlet.
-
Page 37: Cleaning The Bean Container
Cleaning 4. Turn the mixer flange (5) clockwise until the arrow is 8�10 Cleaning the instant container pointing to the "closed lock" symbol. 5. Fit the tube (6) fully onto the nozzle of the mixer unit and the beverage outlet. ͵... -
Page 38: Cleaning The Touch Screen
Cleaning 8�11 Cleaning the touch screen 8�12 External cleaning Cleaning is required if there is any visible dirt. Note Do not use any abrasive agents or sharp 1. On the display, press the menu symbol "≡" (2) and objects. then "Cleaning". •... -
Page 39: Maintenance
This machine has been designed and manufactured to nance, or disposal, please contact your official dealer. allow environmentally friendly disposal. Repairs and maintenance may only be carried out by Melitta customer service or by specialist personnel authorized by the manufacturer. 10�1 Waste disposal The waste produced during brewing is purely organic and 9�1... - Page 40 Melitta macht Kaffee zum Genuss ® Melitta Professional Coffee Solutions GmbH & Co. KG • Zechenstr. 60 • 32429 Minden • GERMANY Phone: +49 571 5049-0 • Fax: +49 571 5049-233 • professional@melitta.de • www.melitta-professional.de...
Need help?
Do you have a question about the Cafina XT8 and is the answer not in the manual?
Questions and answers