Melitta Cafina XT6 Operating Instructions Manual
Hide thumbs
Also See for Cafina XT6:
- Operating instructions manual (36 pages) ,
- Manual (2 pages) ,
- Operating instructions manual (36 pages)
Table of Contents
Advertisement
Advertisement
Table of Contents

Related Manuals for Melitta Cafina XT6


Summary of Contents for Melitta Cafina XT6
- Page 1 Operating Instructions Melitta Cafina ® ® Melitta SystemService...
-
Page 2: Table Of Contents
Content 10.6 “Operation” menu item ........17 1. Description ............3 a) Consumption and product statistics ....17 2. Intended Use ............. 3 b) Machine settings ..........17 3. Technical data ........... 3 c) Event display ............17 a) Unit data ............... 3 d) Exiting the Manager menu ......... -
Page 3: Description
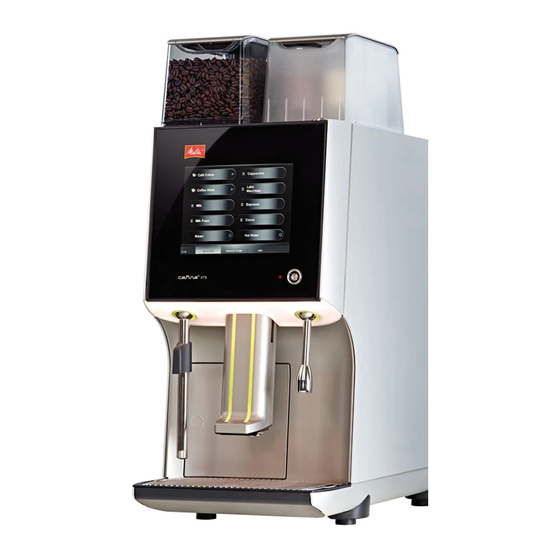
1. Description 3. Technical data This machine is an automatic coffee machine for Unit data dispensing coffee and coffee/milk products for high Dimensions (WxDxH) ... : 300 x 580 x 715 mm daily consumption in the catering industry. Weight ........: 54 kg Depending on the configuration of the machine, the following can be dispensed:... -
Page 4: Accessories Supplied
1 extraction tool or if the fuse for the circuit of the machine trips 1 microfibre cloth repeatedly, 1 Melitta Cafina Combi tablet ® ® if water escapes from the machine,... -
Page 5: Installation
cause of their physical, sensory or mental abilities or 6. Installation their lack of experience or subject knowledge. Customer service will install and commission the coffee machine ready for operation. Due to the d) Requirements on the installation location associated hazards, changes to the installation or The machine must only be installed and used in setup of the coffee machine should only be complet- closed dry rooms, it must not be operated outdoors! -
Page 6: Chip Keys
7. Chip keys The machine is supplied with two green user chip keys and one yellow manager chip key. The green user chip keys allow you to: switch the machine on/off (see 8.2), change the filling levels (see 8.4), carry out a complete cleaning programme on the machine (see chapter 11) and ... -
Page 7: Preparation
8. Preparation Initial commissioning is carried out by customer ser- vice. If you wish to put the machine back into opera- tion yourself after a period of inactivity ... carry out a cleaning programme as described in chapter 11. 8.1 Filling Check first if the water tap has been opened. -
Page 8: Switching On
8.2 Switching On Once switched on, the machine will heat up and begin a components test. It takes a few minutes for Open the grounds waste door as described the machine to be ready to dispense products. under 8.5. The machine signals that it has heated up with a red The machine can be completely switched off LED next to the chip key contact area. -
Page 9: Confirming Filling Levels
8.4 Confirming filling levels is 75% filled, this is just enough for a few brew- ing processes, Each complete filling of a provision container must be is 100% full, only those products that do not pro- confirmed via the basic menu. duce any grounds can now be dispensed. -
Page 10: Dispensing Products
9. Dispensing products As soon as the machine is heated up, the products that can be currently dispensed are shown in the display. If products are unavailable (because they have run out, for example) they are greyed out. 9.3 Dispensing a product in Waiter operation To dispense a coffee/milk product or hot water, touch the product shown on the display. -
Page 11: A) Cancelling Dispensing A Product
As soon as a product has been dispensed from the batch, remove it and place a suitable vessel for the next product under the appropriate nozzle. Cancelling dispensing a product (12) Touch the “X ” button to continue dispensing (10) Depending on the product presetting, you can the product. -
Page 12: Dispensing Products Via Product Filters
9.4 Dispensing products via product filters of coffee powder in the chute and ... Dispensing a product via product filters involves se- lecting the desired product using various selection criteria. You may choose from the following criteria: (13) Size: You can set the preselectable size of por- tion. -
Page 13: Settings
(4) toggle between upper and lower case using the 10. Settings “Case” key, (5) cancel what you have entered using the “Can- The machine is preset so that it can be used immedi- cel” key. ately in the normal operating mode. The functions described here can only be accessed if they have been enabled by customer service. -
Page 14: C) Deleting Product Groups
wise it will not be displayed on the dispensing Adding products to be dispensed user interface. Note: If you have only entered one product to a product group, only this product will be displayed during dispensing and not the product group. Deleting product groups Select the product group which you wish to You can delete displayed product groups, including... -
Page 15: Product Filter" Menu Item
10.3 “Product filter” menu item If you wish to delete a main criterion (e.g. coffee) from the selection ... You can specify which selection criteria should be (2) select the criterion to be deleted in the selection available for filtering products to be dispensed in and ... -
Page 16: A) Duplicating A Product
10.5 “Unit” menu item This menu item can be used to clean the machine and adjust the filling levels. Changing filling levels to intermediate values In addition to the option described under 8.4 for con- firming the coffee bean containers as full, you can also set intermediate values for the filling levels: (2) Select the “Filling”... -
Page 17: B) "Maintenance" Menu Item
b) “Maintenance” menu item b) Machine settings This menu item can be used to clean the machine (8) Select the “Settings” symbol to display and edit the machine's basic settings. (see chapter 11), switch it off and see when the last Drag the list with the S T buttons to display all cleaning programme was carried out, the time to the next clean and the time the next cleaning reminder... -
Page 18: Cleaning
Before switching off, we recommend that you If you are using the agents recommended by clean all the systems you have used. Melitta this information is enclosed with each of the solutions. Cleaning request Keep cleaning solutions out of the reach of children. -
Page 19: Daily Cleaning
b) Start the cleaning programme Warning! The machine's cleaning programme runs largely au- When performing the cleaning activities, make tomatically. sure that the machine … (1) Replace the milk container with an empty is never subjected to pouring water and cleaning container. - Page 20 If you are prompted to first clean the instant system, (5) remove the tablet retainer by turning it a quar- ter of a turn anti-clockwise. carry this out (see 11.5) and then confirm that the system has been fully reassembled by touching “In- stant system has been cleaned”...
-
Page 21: Cleaning The Instant System
Once cleaning g has bee en comple eted, the machine switch hes itself off again n or retur ns to sta ndby for dis- pensi ng – dep pending o on the sel lection. f you wish h to conti inue to o perate th he machin... -
Page 22: Cleaning The Coffee Bean Containers
(5) Replace the cover of the mixer housing. 11.7 Cleaning the instant coffee containers (4) Insert the mixer housing. Open the cover of the instant coffee containers (3) Turn the mixer flange clockwise (the arrow as described under 8.1 b) and ... points to the “closed lock”... -
Page 23: Preventive Maintenance
12. Preventive maintenance 13. Disposal Due to the associated dangers, repairs and pre- The machine has been designed and manufactured to facilitate environmentally friendly disposal. ventive maintenance activities must only be per- formed by customer service or professionals au- thorized by the manufacturer for this purpose. Waste disposal The waste generated by brewing is purely organic 12.1 Intervals... - Page 24 SERVICE-Scheckheft SERVICE Confirmations Wartungsvertrag abgeschlossen Service contract existing ja / yes nein / no Maschinen Nr. / machine-no.: 1. Inspektion / Wartung 1th Service / Maintenance Unterschrift und Stempel Kundendienst Signature and stamp Service Technician Date Datum der Erstinstallation / date of first installation INSPEKTION / WARTUNG Arbeiten durchgeführt bei: Nächste Inspektion / Wartung bei:...
- Page 25 SERVICE-Scheckheft SERVICE Confirmations Wartungsvertrag abgeschlossen Service contract existing ja / yes nein / no Maschinen Nr. / machine-no.: 1. Inspektion / Wartung 1th Service / Maintenance Unterschrift und Stempel Kundendienst Signature and stamp Service Technician Date Datum der Erstinstallation / date of first installation INSPEKTION / WARTUNG Arbeiten durchgeführt bei: Nächste Inspektion / Wartung bei:...
- Page 26 SERVICE-Scheckheft SERVICE Confirmations Wartungsvertrag abgeschlossen Service contract existing ja / yes nein / no Maschinen Nr. / machine-no.: 1. Inspektion / Wartung 1th Service / Maintenance Unterschrift und Stempel Kundendienst Signature and stamp Service Technician Date Datum der Erstinstallation / date of first installation INSPEKTION / WARTUNG Arbeiten durchgeführt bei: Nächste Inspektion / Wartung bei:...
- Page 27 SERVICE-Scheckheft SERVICE Confirmations Wartungsvertrag abgeschlossen Service contract existing ja / yes nein / no Maschinen Nr. / machine-no.: 1. Inspektion / Wartung 1th Service / Maintenance Unterschrift und Stempel Kundendienst Signature and stamp Service Technician Date Datum der Erstinstallation / date of first installation INSPEKTION / WARTUNG Arbeiten durchgeführt bei: Nächste Inspektion / Wartung bei:...
- Page 28 Melitta macht Kaffee zum Genuss ® Melitta SystemService GmbH & Co KG • Postfach 13 26 • D-32373 Minden • Telefon 05 71 / 50 49 – 0 • Fax: 05 71 / 50 49 233 • E-Mail: info@mss.melitta.de • www.melittasystemservice.de...
Need help?
Do you have a question about the Cafina XT6 and is the answer not in the manual?
Questions and answers