
Related Manuals for Audionet HEISENBERG


Summary of Contents for Audionet HEISENBERG
- Page 1 HEISENBERG Ultimate Linear Mono Power Amplifier HANDMADE IN BERLIN, GERMANY User’s Manual...
-
Page 3: Table Of Contents
5.1 Inputs 5.2 Speaker terminals 5.3 Bi-Wiring 5.4 Audionet Link Operating 6.1 Powering up 6.2 Switching on and off 6.3 Using Audionet Link 6.4 Auto Power Off function 6.5 Operation indicator Protection system Setup 8.1 Input Select 8.2 Auto Power Off... -
Page 4: Preface
Even if you're an experienced aficionado of ultra-highend components, please start listening to your new Audionet HEISENBERG by reading this manual care- fully before you plug it in. This will ensure you'll enjoy all functions of this unit... -
Page 5: Included Items
• Always use the provided cloth bag to prevent scratches on the casing. • Please allow the HEISENBERG to adapt to the climatic conditions in your listening room before you switch the unit on for the first time after the... -
Page 6: Overview Front Panel
Overview front panel power operation indicator... -
Page 7: Overview Back Panel
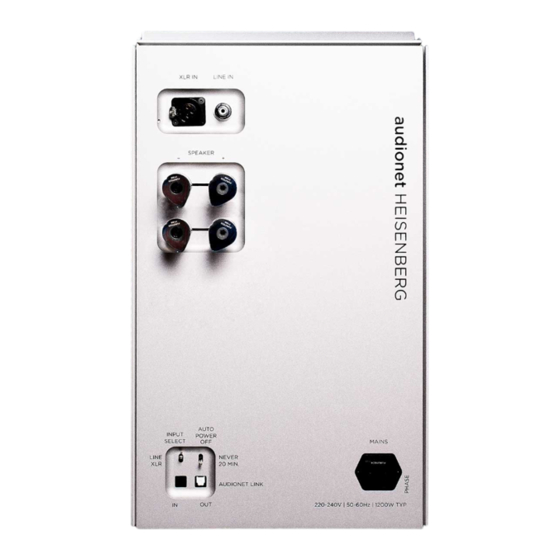
Overview back panel ‘Auto Power Off’ switch balanced (XLR) input line (cinch/RCA) input ‘Audionet Link’ input 10 ‘Audionet Link’ output speakers output 1 11 mains input speakers output 2 12 ‘mains phase’ marking input switch... -
Page 8: Installation And Power Supply
• Please find a place for your Audionet HEISENBERG that is sufficiently venti- lated to allow the heat to dissipate. • Do not expose the unit to direct sunlight. • Do not place the HEISENBERG in close range to heat sources like radiators. • Do not cover the ventilation slots. -
Page 9: Mains Connection
• The electrical specifications of your home country must meet the electrical specifications printed onto the back panel. • The HEISENBERG is a Class I unit and must be earthed. Please ensure a stable earth connection. The phase ('hot' pin) is marked on the back panel (PHASE) •... -
Page 10: Orientation Of Mains Plug
4.3 Orientation of mains plug The correct polarization of mains is important for reasons of audio clarity and stability. Please connect the power cord so that the hot pin of the wall outlet is connected to the pin of the mains input marked with 'PHASE'... -
Page 11: Inputs And Outputs
5.2 Speaker terminals Connect your speakers to the rhodium plated terminals on the back panel of the HEISENBERG. You may use both banana plugs or spades as well as simple cable ends. HEISENBERG features two electrically identical speaker terminals , which you may use alternatively. In case you would like to bi-wire your speakers, please refer to section 'Bi-Wiring' on page 12. -
Page 12: Bi-Wiring
Note • Look out for the correct connection of your speaker cables. Usually, the ter- minals of your speakers are marked '+' and '-'. The HEISENBERG uses the same marks. • Wrong speaker polarization will result in severe loss of sound quality! Important •... - Page 13 'Toslink' cable. Note • The 'switch on' signal is issued to all further Audionet units daisy chained to the 'Audionet Link' output of your HEISENBERG with a little delay to avoid all units switching on at the same time – which could cause an overload of...
-
Page 14: Operating
(refer to sections 'Installation and power supply' on page 8 and 'Inputs and outputs' on page 11). The HEISENBERG is a stand-by unit. Please insert the power cord into the mains input socket on the back panel. The operation indicator (light ring around key on the front panel) flashes white - red - white once. -
Page 15: Using Audionet Link
– which could otherwise cause an overload of your mains fuse. • You may of course switch your HEISENBERG on or off at any time by using on the front panel independently from the 'Audionet Link' in- terface. -
Page 16: Operation Indicator
HEISENBERGs in your setup will switch off at a different point of time ac- cording to each input signal. • Operate the HEISENBERG as usual. Of course, you are still able to switch on/off the unit manually. 6.5 Operation indicator... -
Page 17: Protection System
Protection system The Audionet HEISENBERG as well as the loudspeakers are protected by a com- plex protection circuitry. In case of a malfunction the operation indicator will flash the number of the error in red, i.e. you simply have to count the number of red flashes to determine the error number. - Page 18 Important • As soon as an error is detected by the protection system, HEISENBERG pow- ers down. The operation indicator shows short red pulses while the power supply is discharged – in contrast to the normal discharging, indicated by short white flashes.
-
Page 19: Setup
Setup You are able to adjust the HEISENBERG to your preferences by using the two switches on the back panel of the unit (see section 'Overview back panel' on page 7). List of settings to be adjusted according to your preferences: •... -
Page 20: Auto Power Off
8.2 Auto Power Off The HEISENBERG will power down automatically (Auto Power Off function) when no input signal is detected on the selected input for a period of 20 minutes. NEVER Select this option if you would like to deactivate the Auto Power Off function. -
Page 21: Technical Information
• Air Flow Design circuit boards for an optimum of cooling and stable quiescent currents. • Galvanic separation of all analog circuits by opto couplers. • Audionet ULA technology (Ultra Linear Amplifier) for real-time linearization of distortions. • Rhodium cinch jacks and rhodium torque speaker terminals by Furutech. - Page 22 • Low impedance-optimized power capacitors with a total capacitance of 200,000 µF. • Microprocessor controlled protection circuit with separate power supply, detecting high frequency, DC, overload and overheating. • Rhodium fuse for mains and secondary side. • Rhodium mains connector by Furutech.
-
Page 23: Security Advice
• Use a dry cloth for cleaning! We do wish you many exciting listening experiences with your new Audionet device. If you still have any questions, do not hesitate to ask your Audionet retailer or contact us directly. -
Page 24: Technical Data
200,000 µF capacitance Inputs 1 cinch (RCA) line, Rhodium plated, Teflon insulated (Furutech) 1 XLR balanced, gold plated (Neutrik) 1 Audionet Link, optical (TosLink) Input impedance Line input: 50 kΩ, 33 pF XLR input: 7 kΩ, 66 pF (line to line) - Page 25 Dimensions width: 270 mm height: 500 mm depth: 490 mm Weight 70 kg Finish plates: aluminum, 9 mm, pearl blasted, silver or black, text and icons printed black or white chassis: brushed aluminum, black anodized Errors and omissions excepted. Specifications and design are subject to changes without prior notice.
- Page 26 Idektron GmbH & Co KG Engineered and produced by: Idektron GmbH & Co. KG, Alboinstrasse 36-42, 12103 Berlin, Germany en.audionet.de contact@audionet.de...
Need help?
Do you have a question about the HEISENBERG and is the answer not in the manual?
Questions and answers