Table of Contents
Advertisement
Quick Links
Advertisement
Table of Contents

Related Manuals for Avocent Emerge ECMS2000U


Summary of Contents for Avocent Emerge ECMS2000U
- Page 1 Emerge ECMS2000U Digital Workstation Extender Installer/User Guide...
- Page 2 USA Notification Warning: Changes or modifications to this unit not expressly approved by the party responsible for compliance could void the user’s authority to operate the equipment. Note: This equipment has been tested and found to comply with the limits for a Class A digital device, pursuant to Part 15 of the FCC Rules.
- Page 3 ΤΜ Avocent Emerge ECMS2000U Digital Workstation Extender Installer/User Guide Avocent, the Avocent logo and Emerge are registered trademarks of Avocent Corporation. All other marks are the property of their respective owners. © 2006 Avocent Corporation. All rights reserved. 590-704-501A...
- Page 4 Power On This symbol indicates the principal on/off switch is in the on position. Power Off This symbol indicates the principal on/off switch is in the off position.
-
Page 6: Table Of Contents
Features and Benefits ... 1 Safety Precautions ... 4 Chapter 2: Installation ... 5 Getting Started ... 5 Needed to install the Avocent Emerge ECMS2000U Extender ... 5 Needed for non-standard installations ... 5 Mounting Option... 5 Installation Options ... 6 Point-to-point installation ... - Page 7 Avocent Emerge ECMS2000U Extender Installer/User Guide Appendix A: Technical Specifications ... 41 Appendix B: Factory Default Settings ... 46 Appendix C: Technical Support ... 47 Appendix D: Troubleshooting... 48...
-
Page 8: List Of Figures
L IS T O F F IG URE S List of Figures Figure 1.1: Avocent Emerge ECMS2000U Extender - Basic System... 1 Figure 2.1: Point-to-point Installation ... 6 Figure 2.2: Computer Access Node ... 8 Figure 2.3: User Access Node and Computer Access Node Installation ... 9 Figure 2.4: Networked Installation ... - Page 9 List of Figures Figure 3.28: Transmitter Console Settings Menu ... 39 Figure 3.29: Transmitter Audio Performance Menu... 39 Figure 3.30: Receiver Console Settings Menu ... 40 Figure 3.31: Receiver Audio Performance Menu... 40...
-
Page 10: List Of Tables
Table 2.2: Default network settings ... 10 Table 3.1: RJ-45 Connector LEDs ... 13 Table A.1: User Access Node Product Specifications ... 41 Table A.2: Computer Access Node Product Specifications ... 44 Table B.1: Avocent Emerge ECMS2000U Extender ... 46... - Page 11 Avocent Emerge ECMS2000U Extender Installer/User Guide...
-
Page 12: Chapter 1: Product Overview
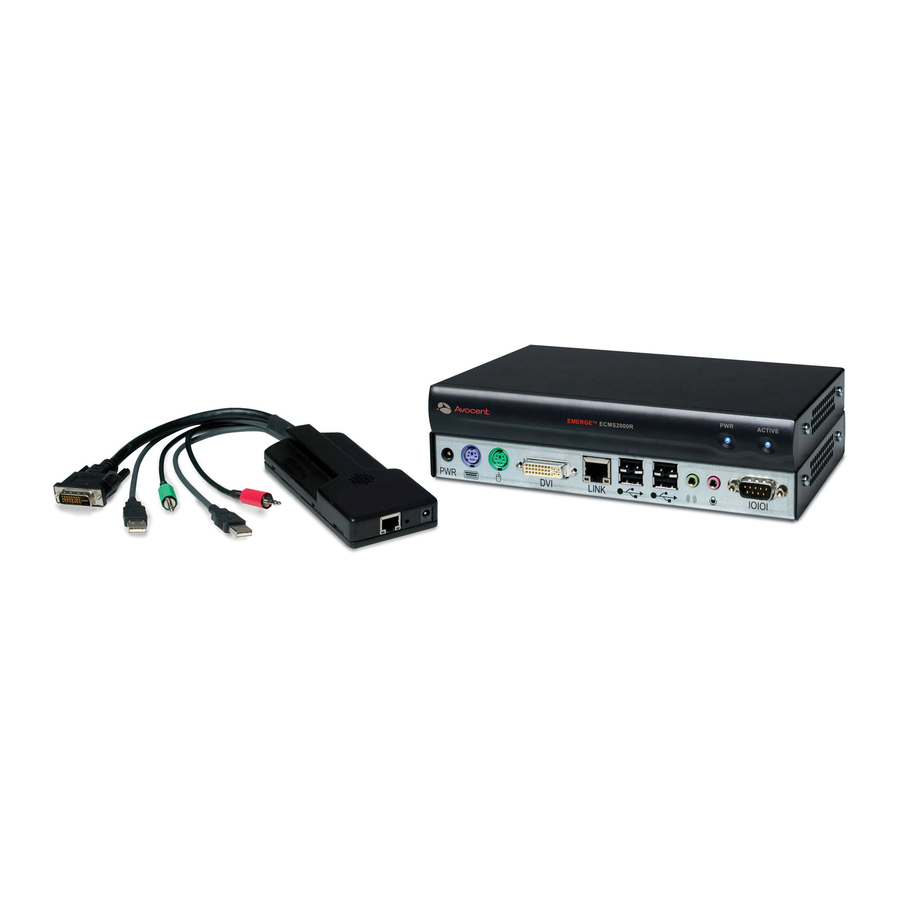
The Computer Access Node that connects externally to the remote computer • The User Access Node that is located at the user’s desk Figure 1.1: Avocent Emerge ECMS2000U Extender - Basic System ECMS2000U Extender provides users with a full computer desktop... - Page 13 The Avocent Emerge ECMS2000U Extender can operate on a network connection of 100 Mbps or 1 Gbps. For optimum performance a 1 Gbps connection is recommended.
- Page 14 Emerge Digital Workstation Extender on page 28. Support for keyboards and mice USB and PS/2 keyboards and mice are fully supported by the Avocent Emerge ECMS2000U Extender. The system also allows for mix and match of USB and PS/2 peripherals. For example, it is possible to use a USB keyboard in conjunction with a PS/2 mouse.
-
Page 15: Safety Precautions
Video Video of 24-bit color depth up to a resolution of 1280 x 1024 at 60 Hz is supported by the Avocent Emerge ECMS2000U Extender. Both CRT and flat-panel LCD monitors are supported, and can be connected to the Avocent Emerge ECMS2000U Extender via a DVI-I video connector. VGA monitors can be attached to the system by using a DVI to VGA adaptor. -
Page 16: Chapter 2: Installation
To power the Computer Access Node if a remote computer does not have two available USB ports: • An EMCS2000-PSU power supply (not supplied) Mounting Option The User Access Node features the following mounting option that allows you to adapt easily to most work environments: ECMS2000U Extender, refer to the list below to ensure... -
Page 17: Installation Options
CAUTION:To reduce the risk of electric shock or damage to your equipment, power up the remote computer and the User Access Node in the order described in the following procedures. You can install the Avocent Emerge ECMS2000U Extender in one of two ways: Point-to-point... - Page 18 Before connecting the Computer Access Node to the remote computer, ensure that the resolution and the refresh rate of the remote computer are supported by the Avocent Emerge ECMS2000U Extender system. Set the screen resolution and refresh rate of the remote computer according to Table A.1.
-
Page 19: Figure 2.2: Computer Access Node
Avocent Emerge ECMS2000U Extender Installer/User Guide Figure 2.2: Computer Access Node To connect the User Access Node: Connect your keyboard, monitor, mouse and other peripherals cables to the appropriately labeled ports on the back of the User Access Node. Connect the UTP cable to the RJ-45 port on the back of the User Access Node. -
Page 20: Connecting Power
The User Access Node features an external power supply. A DC power jack is located on the rear of the User Access Node. NOTE: Use only the power supply provided by Avocent. To connect power to the User Access Node: Plug the external power supply’s 2.5mm connector into the DC power jack on the rear of the... -
Page 21: Networked Installation
The Avocent Emerge ECMS2000U Extender has been pre-configured with factory-default network settings. If you install only one Avocent Emerge ECMS2000U Extender on a subnet, you do not need to change these default network settings. If you install multiple units on the same subnet, you will need to assign a unique IP address to each unit. - Page 22 To install the Avocent Emerge ECMS2000U Extender on a network: Connect the Computer Access Node to the remote computer as described previously in Point- to-point installation on page 6. Connect one end of the UTP cable to the Computer Access Node’s RJ-45 connector.
- Page 23 Avocent Emerge ECMS2000U Extender Installer/User Guide...
-
Page 24: Table 3.1: Rj-45 Connector Leds
When you power up the User Access Node, a connection is automatically established with the computer. While the default settings of your Avocent Emerge ECMS2000U Extender will work with most systems, you may choose to change settings to better fit your system. Internal settings such as connection settings can be configured via the serial menu. -
Page 25: Accessing The System
Avocent Emerge ECMS2000U Extender Installer/User Guide Table 3.1: RJ-45 Connector LEDs (Continued) LED 2 Accessing the System When the User Access Node is powered up, it will automatically initiate a connection with the remote computer. To access the remote computer: Power up the User Access Node. -
Page 26: Figure 3.1: Com1 Properties
By default, two passwords are required to access the Avocent Emerge ECMS2000U Extender via the Receiver (User Access Node). One password controls access to the Receiver, the other password controls access to the Transmitter (Computer Access Node). In both cases, the default password is “password”. -
Page 27: Navigating The Serial Menu
Configuring Network Settings The Avocent Emerge ECMS2000U Extender is shipped with default network settings pre- configured for your Receiver and Transmitter. For more information see Networked Installation on page 10. You can change the network settings (from the default values) for your system using the serial menu. -
Page 28: Figure 3.4: Network Configuration Menu
To configure network settings for the Transmitter: Activate the serial menu as described in Accessing the serial menu on page 14. Choose option 2 to access the Transmitter menu. If the password option is enabled, you will be prompted for a password. See Authentication on page 24. Type the password and press Figure 3.3: Transmitter Main Menu NOTE: The Reset option in the Transmitter Main Menu applies only to network settings. -
Page 29: Figure 3.5: Transmitter Network Configuration Menu
Avocent Emerge ECMS2000U Extender Installer/User Guide Choose Transmitter Network Config. The Transmitter Network Configuration Menu will appear. Figure 3.5: Transmitter Network Configuration Menu Choose Transmitter IP Address. Type a valid IP address. Press Choose Transmitter Netmask. Type a valid Transmitter Netmask. Press Configuration Menu. -
Page 30: Figure 3.7: Network Configuration Menu
Chapter 3: Operations 17. Type the password and press . The Receiver Main Menu will appear. Enter Figure 3.6: Receiver Main Menu 18. Choose Network Configuration. The Network Configuration Menu will appear. Figure 3.7: Network Configuration Menu... -
Page 31: Figure 3.8: Transmitter Configuration Menu On The Receiver
Avocent Emerge ECMS2000U Extender Installer/User Guide 19. Choose Transmitter IP Config. The Transmitter IP Config menu will appear. The old Transmitter IP address is displayed beside menu option 1. Figure 3.8: Transmitter Configuration Menu on the Receiver 20. Choose Transmitter IP Address. Type the new IP address for the Transmitter. Press return to the Transmitter IP Configuration Menu. -
Page 32: Figure 3.10: Network Configuration Menu
Type the password and press Figure 3.9: Receiver Main Menu Choose Network Configuration. The Network Configuration Menu will appear. Figure 3.10: Network Configuration Menu . The Receiver Main Menu will appear. Enter Chapter 3: Operations... -
Page 33: Figure 3.11: Receiver Network Configuration Menu
Avocent Emerge ECMS2000U Extender Installer/User Guide Choose Receiver Network Config. The Receiver Network Configuration Menu will appear. The current network settings are visible here. Figure 3.11: Receiver Network Configuration Menu NOTE: The Reset option in the Receiver Network Configuration Menu applies only to network settings. -
Page 34: Detecting A Transmitter Ip Address
Detecting a Transmitter IP Address In the event that you forget the IP address of a Transmitter, you can use the serial menu to detect the IP address of a Transmitter that is connected to the Receiver. To detect the IP address of a connected Transmitter: Power down the down the remote computer to which the Transmitter is attached. -
Page 35: Authentication
Configuration Menu. Authentication By default, two passwords are required to access the Avocent Emerge ECMS2000U Extender via the serial menu. One password is for access to the serial menus that control the Receiver. The other password is for access to the serial menus that control the Transmitter. In both cases, the default password is “password”. -
Page 36: Figure 3.15: The Receiver Security Configuration Menu
Choose Security Configuration. The Security Configuration Menu will appear. Figure 3.15: The Receiver Security Configuration Menu To disable or enable the Receiver password: Choose Console Password on the Security Configuration Menu and press had been enabled, this action will disable the password. If a password had been disabled, you will be prompted to enter a password. -
Page 37: Figure 3.16: Password Reset Mode
Key. Figure 3.16: Password Reset Mode Contact Avocent Technical Support to obtain the Key. The Technical Support Specialist will ask you for the 16 character hex code. Read out the code exactly as it appears on the serial menu. -
Page 38: Figure 3.17: Transmitter Security Configuration Menu
Choose Security Configuration. The Security Configuration Menu will appear. Figure 3.17: Transmitter Security Configuration Menu To disable or enable the Transmitter password: Choose Console Password on the Security Configuration Menu and press has been enabled, this action will disable the password. If a password has been disabled, you will be prompted to enter a password. -
Page 39: Flash Upgrading Your Emerge Digital Workstation Extender
For details on how to change your password see Authentication for the Transmitter on page 26. Flash Upgrading your Emerge Digital Workstation Extender You can Flash upgrade your Receiver and Transmitter. You can Flash upgrade your Avocent Emerge ECMS2000U Extender using either XMODEM or HTTP. The Receiver and Transmitter are upgraded separately using individual upgrade files. -
Page 40: Figure 3.18: Transmitter Firmware Management Menu
A message displays indicating that the upgrade has failed. To Flash upgrade your Transmitter using HTTP: Download the Transmitter upgrade file from Avocent. Activate the serial menu as described in Accessing the serial menu on page 14. -
Page 41: Figure 3.19: Transmitter Firmware Management Menu
Avocent Emerge ECMS2000U Extender Installer/User Guide Choose Firmware Management. The Firmware Management Menu will appear. Figure 3.19: Transmitter Firmware Management Menu Choose Transmitter Flash Upgrade Via HTTP. You will be prompted to enter the URL for the upgrade file. Enter the URL for the upgrade file using the following syntax: http://<server ip address>[:server port]/<upgrade file path>... -
Page 42: Figure 3.20: Receiver Firmware Management Menu
A message will display indicating that the firmware upgrade has failed. To Flash upgrade your Receiver using HTTP: Download the Receiver upgrade file from Avocent. Activate the serial menu as described in Accessing the serial menu on page 14. -
Page 43: Figure 3.21: Receiver Firmware Management Menu
Avocent Emerge ECMS2000U Extender Installer/User Guide Choose Firmware Management. The Firmware Management Menu will appear. Figure 3.21: Receiver Firmware Management Menu Choose Receiver Flash Upgrade Via HTTP. You will be prompted to enter the URL for the upgrade file. Enter the URL for the upgrade file using the following syntax: http://<server ip address>[:server port]/<upgrade file path>... -
Page 44: Restoring Factory Default Settings
Transmitter is lost”. You will be returned to the Appliance Selection Menu screen. The connection to the Receiver will be restored. Resetting the Avocent Emerge ECMS2000U Extender To reset the Receiver: Activate the serial menu as described in Accessing the serial menu on page 14. -
Page 45: Viewing System Information
Avocent Emerge ECMS2000U Extender Installer/User Guide Choose Reset Appliance. The Reset Appliance Menu will appear. Figure 3.22: Receiver Reset Appliance Menu Choose Receiver Reset to initiate the reset. A message will be displayed on the serial menu that states “Resetting appliance...”. During reset the connection to the Transmitter is dropped. -
Page 46: Figure 3.24: Receiver Appliance Information Menu
Choose Appliance Information. The Appliance Information Menu will appear. Figure 3.23: Appliance Information Menu Choose Receiver Appliance Information. The Receiver Appliance Information Menu will appear. The Receiver Appliance Information Menu screen contains the following information: Receiver name; EID number; release version; application; boot and FPGA firmware version numbers; and the manufacturing part number. -
Page 47: Configuring Video Input Settings
All values are read-only. Configuring Video Input Settings The Avocent Emerge ECMS2000U Extender system is capable of transmitting either digital (DVI) or analog video (VGA) from the remote computer to your monitor. To enable the system to transmit the appropriate video signal for your monitor, you must first configure the video input settings for the Transmitter. -
Page 48: Session Retry Settings
The unit resets after you press Session Retry Settings The Avocent Emerge ECMS2000U Extender is designed to automatically establish a connection between the Receiver and the remote computer. By default, if the Receiver cannot immediately establish a connection with the remote computer it will retry once per second until a connection is successfully established. -
Page 49: Audio Performance Settings
Avocent Emerge ECMS2000U Extender Installer/User Guide Choose Session Retry. The Session Retry Menu will appear. Figure 3.27: Session Retry Menu To change the retry settings: Access the Session Retry Menu via the serial menu as described above. To change the time interval between retry attempts, choose Session Retry Timeout Seconds. -
Page 50: Figure 3.29: Transmitter Audio Performance Menu
Choose Console Settings. The Console Settings Menu will appear. The current audio performance setting is displayed beside menu item 2. Audio Performance. Figure 3.28: Transmitter Console Settings Menu Choose Audio Performance. The Audio Performance Menu will appear.This menu shows you the audio settings that you can choose from. -
Page 51: Figure 3.31: Receiver Audio Performance Menu
Avocent Emerge ECMS2000U Extender Installer/User Guide To change the audio performance setting for the Receiver: Activate the serial menu as described in Accessing the serial menu on page 14. Choose option 1 to access the Receiver menu. If the password option is enabled, you will be prompted for a password. -
Page 52: Table A.1: User Access Node Product Specifications
A P P EN D IC ES Appendices Appendix A: Technical Specifications During the course of this product’s lifetime, modifications might be made to its hardware or firmware that could cause these specifications to change without notice. Table A.1: User Access Node Product Specifications Network Ethernet Standard IP Port Usage... - Page 53 Avocent Emerge ECMS2000U Extender Installer/User Guide Table A.1: User Access Node Product Specifications (Continued) Dimensions H x W x D Weight Environmental Heat Dissipation Power Consumption AC-input power AC-input current rating AC-frequency Operating Temperature Storage Temperature Transit Temperature Operating Humidity...
- Page 54 1024 x 768 @ 85 Hz 1152 x 864 @ 75 Hz 1280 x 960 @ 60 Hz 1280 x 1024 @ 60 Hz Check www.avocent.com for the latest list of supported video resolutions and refresh rates. Video Standard DDC version 2B...
-
Page 55: Table A.2: Computer Access Node Product Specifications
Avocent Emerge ECMS2000U Extender Installer/User Guide Table A.2: Computer Access Node Product Specifications Network Ethernet Standard Extension Ports Number Connectors Console Ports Number Type Connectors Encryption Type Dimensions H x W x D Weight Environmental Heat Dissipation Power Consumption AC-input power... - Page 56 Table A.2: Computer Access Node Product Specifications (Continued) Supported Hardware CRT 1280 x 1024 @ 60 Hz Video Resolution LCD 1280 x 1024 @ 60 Hz Video Standard DDC version 2B Color Depth 24 Bit Audio Standard PC99 Audio Sampling 44.1 kHz over a single channel at a resolution of 16 bits Target Sync Types Separate horizontal and vertical...
-
Page 57: Table B.1: Avocent Emerge Ecms2000U Extender
Avocent Emerge ECMS2000U Extender Installer/User Guide Appendix B: Factory Default Settings Table B.1: Avocent Emerge ECMS2000U Extender User Access Node Name IP Address Default Gateway Netmask OSD Hotkey Sequence PRINT SCREEN OSD Inactivity Timer OSD Inactivity Check Session Inactivity Timer 00 hours 10 minutes... -
Page 58: Appendix C: Technical Support
Appendix C: Technical Support Our Technical Support staff is ready to assist you with any installation or operating issues you encounter with your Avocent product. If an issue should develop, follow the steps below for the fastest possible service. To resolve an issue: Check the pertinent section of this manual to see if the issue can be resolved by following the procedures outlined. -
Page 59: Appendix D: Troubleshooting
If the Computer Access Node cannot draw sufficient power from the remote computer you will need to obtain an external power supply unit for the Computer Access Node from Avocent. If connected through a USB hub, ensure that the hub can supply enough power. •... - Page 60 • If the Computer Access Node has been power cycled (by unplugging the USB cables), ensure that all other cables are disconnected before reconnecting the Computer Access Node. Ensure that you connect the USB cables first. No mouse or keyboard operation from peripherals attached to User Access Node •...
- Page 61 Reset the Computer Access Node. See Resetting the Avocent Emerge ECMS2000U Extender on page 33. • Reset the User Access Node. See Resetting the Avocent Emerge ECMS2000U Extender on page 33. • Verify that the Ethernet network is fully operational.
- Page 62 YSOL YS Solutions Co., Ltd. YS Solutions Co.,Ltd. TOKYO Kouji-machi Tsuruya Hachiman Blug.6F, 2-4,Koujimachi, Chiyoda-ku, Tokyo 102-0083 Japan Tel:+81-3-5212-3521 Fax:+81-3-5212-3524 OSAKA Nishi-Nakajima Shin-Osaka Blug.611, 5-10-5,NIshi-Nakajima, Yodogawa-ku, Osaka 532-0011 Japan Tel:+81-6-4806-7088 Fax:+81-6-6300-0122 E-mail:info@ysol.co.jp URL:http://www.ysol.co.jp 590-386-001A...
Need help?
Do you have a question about the Emerge ECMS2000U and is the answer not in the manual?
Questions and answers