Advertisement
Quick Links
Advertisement

Related Manuals for pitsco Clearly Solar Car


Summary of Contents for pitsco Clearly Solar Car
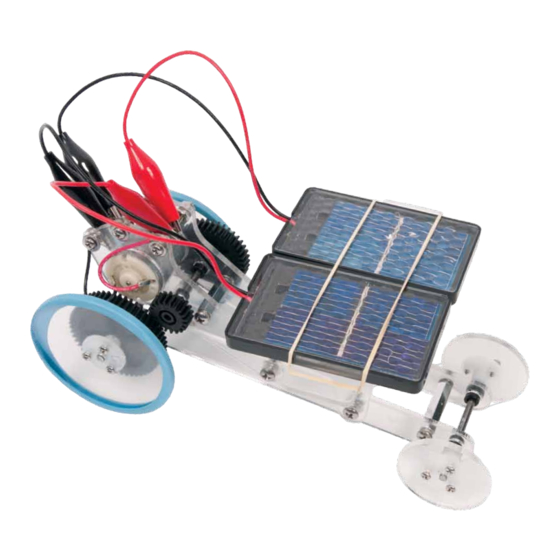
- Page 1 Clearly Solar Car User Guide 60024 V0413...
-
Page 2: How It Works
We can determine the number of times the smaller gear hits the surface of this crystalline structure, the energy will rotate by using a gear ratio. The gear ratio is the ratio within the light puts free electrons in motion. This is of the number of teeth on one gear to the number of another way to describe electricity – the energy from the teeth on a second gear. If a 20-tooth gear is turning a light has created electricity. 10-tooth gear, the gear ratio is 20/10 or 2/1. This means the 10-tooth gear will rotate twice as fast as the 20-tooth Series & Parallel Circuits gear. The terms series circuit and parallel circuit refer to the way Gears not only can increase the speed of rotation but that a circuit is connected. A series circuit is a series of also can decrease the speed of rotation. Suppose the components hooked together along a single path. The 10-tooth gear was connected to a motor spinning at 30 current that flows through the first component will be revolutions per minute. If it is connected to the 20-tooth the same current that flows through each component. gear then the 20-tooth gear will spin half as fast – or 15 Traditionally, this was how holiday lights were strung. revolutions per minute. That’s why the entire strand went off when one lightbulb quit working. That one bad lightbulb created an open Clearly Solar Car User Guide 60024 V0413... -
Page 3: Materials Included
(17) • 6 – #6 x 3/8" screws • 3 axles (1-3/4", 2-1/2", and 2-3/4") (8) • 4 – #6 x 1/2" screws (18) • 4 wheel hubs (9) • 3 – #4 x 1-1/4" screws (19) • 2 – 1" stand-off posts (10) • 2 – #4 x 5/8" screws (20) Items Required (not included) • Small Phillips screwdriver • Hobby knife (optional) • Regular Phillips screwdriver • Transparent tape OR cool-melt glue gun with glue slugs* • Sandpaper • Small pliers or needle-nose pliers *Either will work, but if you plan to take apart the solar car and reuse it, use the transparent tape. Clearly Solar Car User Guide 60024 V0413... - Page 4 #6 x 3/8" screw on the screw and insert it into the middle hole at the wide end of a Part B. Before pushing the screw through the other side, place a nut on the end and turn it a few times. Then, place a second nut on the end and thread it on the screw a few turns. 6. Now, push the screw through the other Part B. Place the third nut 3/4" stand-off on the screw end. Using the pliers, hold the first nut while you post tighten the screw. Spin the second nut toward Part B until snug; hold the screw still while tightening the nut with the pliers. Finally, #6 x 3/8" tighten the third nut. screw 7. From the gear font, remove the 40- and 20-tooth gears with the Nuts Steps 5-6 large axle hole. Also remove the wide 10-tooth gear with a small axle hole. Use a hobby knife or sandpaper to remove any burrs from the gears. Also gather two axle bushings, two spacers, and the 1-3/4" axle. Washer #4 x 1-1/4" screw Clearly Solar Car User Guide 60024 V0413...
- Page 5 5. Place a spacer on the 2-1/2" wheel-and-axle assembly and insert it through the front end of the chassis; the front is the #2 x 3/8" end closer to the middle holes on Parts A. screws 6. Place another spacer Step 7 Steps 4-6 Bushings on the end of the axle. Press the second front wheel onto the axle. 2-3/4" axle 7. Push the gear on the Spacer end of the longer axle 50-tooth gear so 1/2" comes out one side of the gear. Bushings Spacer 2-1/2" axle Clearly Solar Car User Guide 60024 V0413...
-
Page 6: Putting It All Together
Nuts Steps 3-4 and turn it a few times. Add a second nut and turn it a few times. Push the screw through the other side of the assembly and place the third nut on the end, but do not Washers tighten it yet. 4. Repeat Step 3 for the remaining hole at the top of the motor mount. #4 x 1-1/4" 5. Twist the motor’s wire ends. screws 6. Wrap a piece of tape around the motor. Note: If you are not going to take apart and reuse the car, you can use cool-melt glue after the motor is in the mount. The glue or tape hold the motor in place. Step 7 Step 5 7. Insert the motor in the motor mount so the pinion gear is on the same side as the 40-tooth gear. Clearly Solar Car User Guide 60024 V0413... - Page 7 Operating the Car There are several ways to operate the car. The solar panel bracket can be adjusted to an angle that best fits the Sun’s position each time you run the car. You can also attach the solar panels in a series circuit or a parallel circuit. Make sure the motor mount is pushed in a position where the pinion gear engages with a gear on the car. Series Series Circuit 1. Place the black lead from one solar panel and the red lead from the second panel and connect them to the center post. 2. Connect the red lead from the first panel to the front post, and the black lead from the second panel to the back post. Set the car in the sunshine or under a bright incandescent lamp and it will move forward. 3. To run the car backward, switch the leads on the front and back posts. Parallel Parallel Circuit 1. Connect the red lead from each solar panel to the front post. 2. Connect the black lead from each solar panel to the back post. Set the car in the sunshine or under a bright incandescent lamp and it will move forward. 3. To run the car backward, switch the red leads to the back and the black leads to the front. Clearly Solar Car User Guide 60024 V0413...
- Page 8 Activity: Series vs Parallel Circuits 1. Outdoors on a sunny day, measure and mark a distance of 10 feet (3.05 meters) in which to test the car. Arrange the solar panel connections on the car for a series circuit. 2. Place the car at the starting line and let it go. Using a stopwatch, time how long it takes the car to travel the distance. 3. Now switch the connections to a parallel circuit. Again, place the car at the starting line and time how long it takes to travel the distance. Looking at the results, which type of circuit works better for speed? Considering the information on page 2, discuss why this is true. Then, discuss what advantages there might be for the other connection if it isn’t faster. 4. Set up a 20-foot (6.10 m) course and redo the experiment. Did a longer track make a difference in the overall performance of either circuit? 5. Calculate the ratio between the performance (in terms of speed) of the series and parallel circuit tests, first for the 10-foot test (3.05 m) and then for the 20-foot test (6.10 m). 6. Set up an inclined lane and redo the experiment. Explain the results. For more activity ideas for this kit, visit shop.pitsco.com, search for the Clearly Solar Car Kit, and click the Activity tab. P.O. Box 1708 • Pittsburg, KS 66762 shop.pitsco.com Toll-Free Orders 800-835-0686 Clearly Solar Car User Guide 60024 V0413...
Need help?
Do you have a question about the Clearly Solar Car and is the answer not in the manual?
Questions and answers