Sierra QuadraTherm 640i Series Instruction Manual
Insertion and in-line mass flow meters
Hide thumbs
Also See for QuadraTherm 640i Series:
- Instruction manual (132 pages) ,
- Quick start manual (4 pages) ,
- Instruction manual (34 pages)

Related Manuals for Sierra QuadraTherm 640i Series


Summary of Contents for Sierra QuadraTherm 640i Series
- Page 1 QuadraTherm 640i/780i Series ® Insertion and In-Line Mass Flow Meters Preliminary Instruction Manual Part Number: IM-640i/780i Rev.v1 November 2012...
- Page 2 Phone: + 8621 5879 8521 Fax: +8621 5879 8586 IMPORTANT CUSTOMER NOTICE- OXYGEN SERVICE Sierra Instruments, Inc. is not liable for any damage or personal injury, whatsoever, resulting from the use of Sierra Instruments standard mass flow meters for oxygen gas. You are responsible for determining if this mass flow meter is appropriate for your oxygen application.
-
Page 3: Table Of Contents
Table of Contents Chapter 1: Introduction & Product Description ..................5 Product Description ..........................5 Technical Assistance ........................7 Principle of Operation ........................8 iTherm™ Electronics Features ......................9 Enclosure Options ........................... 10 Chapter 2: Installation & Wiring ......................11 Installation Overview ........................ -
Page 4: Warnings And Cautions
Warnings and Cautions Warning! Agency approval for hazardous location installations varies between flow meter models. Consult the flow meter nameplate for specific flow meter approvals before any hazardous location installation. Warning! Hot tapping must be performed by a trained professional. U.S. regulations often require a hot tap permit. -
Page 5: Chapter 1: Introduction & Product Description
Chapter 1: Introduction & Product Description From Sierra’s beginning over forty years ago, Founder Dr. John G. Olin was driven by the vision of supplying industrial customers with the world’s most accurate thermal mass flow meter. And, he knew it was a “sensor” game. - Page 6 Features and Benefits Accuracy (air) +/- 0.5% of reading from 50% to 100% of full scale +/-0.5% of reading plus 0.5% of full scale from 0% to 50% of full scale Patented vastly improved thermal sensor element for high accuracy ...
-
Page 7: Technical Assistance
If the problem persists after following the troubleshooting procedures outlined in Chapter 4, contact Sierra Instruments by fax or by E-mail (see inside front cover). For urgent phone support you may call (800) 866-0200 or (831) 373- 0200 between 8:00 a.m. -
Page 8: Principle Of Operation
Principle of Operation Watch a principal of operation video at www.sierrainstruments.com/thermalprincipal Sierra’s unique QuadraTherm™ sensor probe is responsible for the unsurpassed accuracy, ruggedness, and reliability of Sierra industrial flow meters. The immersible sensor consists of four sensing elements–a velocity sensor, a temperature sensor, and two stem conduction sensors that measure heat lost to the outside. -
Page 9: Itherm™ Electronics Features
iTherm™ Electronics Features iTherm™ Dial-A-Gas™ Technology Select gas to be measured iTherm™ Dial-A-Pipe™ Technology Set-up pipe dimensions Units Select units for mass flow, temperature, and pressure User Full Scale Flow Rate Field-configure from 50% to 100% of the factory full scale setting Alarms Program high &... -
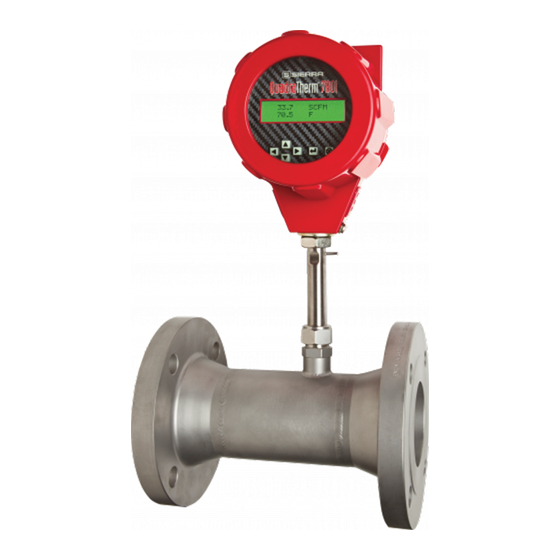
Page 10: Enclosure Options
View Communications Protocol Parameters View communications settings: 38,400 Baud rate, no parity, 8 data bits, and 1 stop Bit ValidCal™ Diagnostics Review minimum, maximum flow, temperature and pressure and other diagnostics Enclosure Options Flow meter electronics are available mounted directly to the flow body, or remotely mounted up to 200 feet (60 meters) away. -
Page 11: Chapter 2: Installation & Wiring
Chapter 2: Installation & Wiring Installation Overview The 640i and 780i are easy to set up in the field. The flow meter should be inserted to the centerline of the pipe. When selecting an installation site, make sure that: 1. Line pressure and temperature will not exceed the flow meter rating. - Page 12 Unobstructed Flow Requirements Select an installation site that will minimize possible distortion in the flow profile. Valves, elbows, control valves and other piping components may cause flow disturbances. Check your specific piping condition against the examples shown below. In order to achieve accurate and repeatable performance install the flow meter using the recommended number of straight run pipe diameters upstream and downstream of the sensor.
-
Page 13: Installing The Flow Meter
Installing the Flow Meter When positioning the flow meter, refer to the flow direction indicator at- tached to the probe. For proper operation, install the meter with the flow direction indicator pointing downstream in the direction of flow. Installing the meter opposite this direction will result in inaccurate flow measurement Cold Tap Installation 1. -
Page 14: Hot Tap Installation
Hot Tap Installation When positioning the flow meter, refer to the flow direction indicator at- tached to the probe. For proper operation, install the meter with the flow direction indicator pointing downstream in the direction of flow. Install- Warning! Hot tapping must be ing the meter opposite this direction will result in inaccurate flow meas- performed by a trained urement. - Page 15 Calculating Insertion Depth for a Low Pressure Tap Variables L = Nominal probe length D = D u c t O . D . C = D u c t I . D . T = Height of “Threadolet” or customer provided “Weldolet” Formula L ≥...
- Page 16 Formulas 1) P = D/2 + S + 6.75 (minimum probe length–use next longer whole number length probe) 2) T = D/2 + 0. 54 3) R = 28.2 – [actual probe length – S – (D/2)] (must be greater than or equal to T) 4) IN = (actual probe length + 2) –...
-
Page 17: Wiring Connections
Wiring Connections Use the terminal blocks located inside the cap of the flow meter enclosure for all wiring connections. Make sure to observe all CE compliance requirements for AC wiring connections given on the next Warning! page. To avoid potential electric shock, follow National Elec- tric Code safety practices or your local code when wiring... -
Page 18: Input Power Wiring
Input Power Wiring AC Power Wiring The AC power wire size must be 26 to 16 AWG with the wire stripped 1/4 Warning! inch (6 mm). Connect 100 to 240 VAC (0.4 Amps RMS at 230 VAC) to the All wiring procedures must Neutral and Line terminals on the terminal block. - Page 19 DC Power Wiring The DC power wire size must be 26 to 16 AWG with the wire stripped 1/4 inch (6 mm). Connect 24 VDC +/- 10% (1.04A load, maximum) to the Warning! terminals marked on the terminal block. Connect the Earth ground wire to All wiring procedures must the safety ground log.
- Page 20 Output Signal Wiring Output signal cable should be completely screened with a 100% shield. You must use metal cable glands that provide cable screen clamping. The Warning! cable screen should be connected to the gland and shielded at both ends Do not externally power over 360 degrees.
-
Page 21: Alarm Output Wiring
Alarm Output Wiring One alarm output contact is included on the flow meter terminal block. The alarm output is driven by an optical relay that is normally-open single-pole. The relay is isolated and requires a separate power supply (isolated) the voltage of the alarm output is the same as the voltage supplied to the circuit. -
Page 22: Pulse Output
RS-232 Wiring RS-232 provides serial communication. Wire per figure 2-10. Figure 2-10: RS-232 Communication Pulse Output QuadraTherm provides an adjustable pulse output with a maximum of 1 Hz. Wire per figure 2-11 below. Figure 2-11:Pulse Output... - Page 23 USB Output If supplied, plug your USB adapter into J1, per figure 2-12 (USB pending). Figure 2-12: USB Output (pending)
-
Page 24: Remote Sensor Wiring
When connecting more than one meter, do not intermix the sensor probes and electronics. The elec- tronics, sensor probes and interconnecting cables supplied by Sierra In- struments are calibrated as a complete precision mass flow circuit. -
Page 25: Chapter 3: Operation & Programming
Chapter 3: Operation & Programming General Navigation In general terms, the menu system consists of a main menu, the set-up menu, a sub- menu to program each item in the set-up menu, and a series of data entry or pull- down screens with to enter set-up data for each parameter. -
Page 26: Start-Up Routine
Start-up Routine Then the meter is first powered up, it will cycle through set-up data. See an example below of the type of screens you will see. 1. Product Name and Firmware Version. Left is main PCA / right is display PCA 640i/780i V1.0.X 2. - Page 27 Once set-up data is displayed, the meter will display the flow variables. The instrument will Auto Scroll through each flow variable. You can turn OFF the Auto Scroll feature by hitting down arrow. Auto Scroll Turn Auto Scroll back ON again by hitting the up arrow.
-
Page 28: Level 2: Sub-Menu (Password Protected)
6. iTherm Dial-A-Gas (Gas Type) Dial-A-Gas Carbon Dioxide 7. iTherm Dial-A-Pipe Dial-A-Pipe 8. Reference Conditions Ref: Standard 14.695949 / 70.0 9. Serial Serial 1234XXXX 10. Tag 1234XXXX And finally complete the cycle back to the flow and temperature screen. Level 2: Sub-Menu (Password Protected) At this point, you can access various other menus .To enter the next level press the enter key. -
Page 29: Calibration (Sub-Menu)
Table 3-2: Level 2 Sub-Menu Calibration (Sub-Menu) Table 3-3 below Navigate to the Calibration Sub Menu, use for guidance if necessary. The calibration menu allows you to set up the meter to match the application. Calibration (Sub-Menu) To start, move down to the next level by pressing the enter key (). From this level, you can set up Dial-A-Gas and Dial-A-Pipe, as well as flow and temperature units (pressure is optional and has its own set-up menu to be covered later). -
Page 30: Calibration (Sub-Menu): Gas Type -"Itherm Dial-A Gas
Use the up and down keys to scroll through the available iTherm Dial-A-Gas menu. The meter can be pre-configured with four gases from Sierra’s iTherm Gas Library. There are eighteen gases and gas mixes available from the Sierra iTherm Gas Library. Sierra will continually update the library as more gases and mixtures become available. - Page 31 Navigate to the “Dial-A-Pipe ID” screen. Use Step 1(Dial-A-Pipe): Table 3-3: Calibration Sub-Menu for guidance if necessary. The display will show pipe inner diameter in the units selected. In the example below the inside diameter of the pipe is 6.065000 inches. Dial-A-Pipe ID 6.065000 / In Press enter ...
-
Page 32: Calibration (Sub-Menu): Flow Units
cs-smooth cs-normal cs-rough c-fiber cast-iron concrete Glass ss-UHP where: ss = stainless steel cs = carbon steel c-fiber = carbon fiber UHP = ultra-high purity (5 – 10 Ra finish) Again, use the up and down keys to select. Choice will flash until the enter key is pressed. -
Page 33: Calibration (Sub-Menu): Temperature Unit
SFPS, SFPM, SFPH, SFPD, SFPY: Standard Feet per Second, Minute, Day, Hour or Year. Note this is a point VELOCITY. SMPS, SMPM, SMPH, SMPD, SMPY: Standard Meters per Second, Minute, Day, Hour or Year. Note this is a point VELOCITY. You can press the exit ... -
Page 34: Calibration (Sub-Menu): Low Flow Cut Off
You can press the exit several times to climb back up to the main menu level or press to proceed to the next Calibration Sub-Menu called Low Flow Cut Off. Calibration (Sub-Menu): Low Flow Cut Off The Low Flow Cut Off value forces both the digital display and the analog output values to zero/4 mA at a percentage of full scale from 0 to 10% of the full scale value. -
Page 35: Calibration (Sub-Menu): Full Scale Flow
Sierra recommends recalibration as required by your metrology policy or when the meter validation routine found in the Smart Interface Program software detects a problem. See Meter Validation in XXXXXX). You can press the exit several times to climb back up to the main menu level or press to proceed to the next Calibration Sub-Menu called Full Scale. -
Page 36: Process Pressure (Sub-Menu): Pressure Units
Process Pressure (Sub-Menu): Pressure Units Use this menu to enter the units for pressure. Use the enter key () to drill down to Pressure Units selection. Press enter and the units will begin flashing. Use the buttons to enter the desired information, and the enter key () to save the value. -
Page 37: Totalizer (Sub-Menu)
Totalizer (Sub-Menu) The Totalizer Sub Menu controls all aspects of the totalizer function. Totalizers are used to monitor accumulated flow, often for billing and cost allocation purposes. The totalizer sub- menu is used to turn the totalizer ON or OFF, to reset, and to tell the meter when to send out a totalizer pulse and what that pulse should look like Table 3-5: Totalizer Sub-Menu Totalizer (Sub-Menu): Reset Totalizer... - Page 38 To reset this to zero, press enter () and a “YES” will appear and flash. Reset Pulse Cnt. Press enter () again and the pulse counter will be reset. In addition, from the screen above you can press the down button to a flashing “NO”. Pressing enter () will return back to the Reset Pulse Count screen.
-
Page 39: Totalizer (Sub-Menu): Units Per Pulse
Totalizer (Sub-Menu): Units Per Pulse Table Use this menu to select the units per pulse. Navigate to the Units Per Pulse screen 3-5 above for guidance if necessary. Note the maximum frequency at which the totalizer can count is 1 pulse per second, or 1 Hz. This puts a limit on the units per pulse and makes resolution dependent on flow rate. - Page 40 Totalizer set up in now complete. This concludes our review of the Totalizer (Sub-Menu). Press exit to climb back up to the main menu. Alarm (Sub-Menu) The alarm sub menu controls all aspects of the 640i and 780i Alarm feature. The instrument can be set to alarm on one of the following variables: Flow, Pressure, Temperature or Totalizer.
- Page 41 NOTE: Only one alarm can be active at any one time. The alarm relay is a normally open isolated contact. The alarm is tripped when the relay closes. You can press the exit several times to climb back up to the main menu level or press to proceed to the next Sub-Menu called Alarm Mode.
-
Page 42: Output Adjust (Sub-Menu): Flow, Pressure And Temperature
We will set a low flow alarm to demonstrate the Alarms function. Navigate to the Flow Alarms Table 3-6.1 (Sub Menu) screen above for guidance if necessary. Assume that you already set the Active Alarm to “Flow” and the alarm condition is set to go off on a “Low” flow. The Flow Alarms (Sub Menu) allows you to set the actual alarm setpoint along with hysteresis. - Page 43 correspond to 4 and 20mA. Zero flow always corresponds to 4mA and full scale flow always corresponds to 20mA. All values in the output menu have been calibrated and set at the factory. You only need to enter these screens if you wish to view, adjust, or test any of the values. Setting Up: 4-20 mA Outputs We will set Flow 4-20 mA to demonstrate this function.
- Page 44 desired, until you achieve the desired result. Flow 20 mA 56643 - Testing NOTE: The engineering units are as set in the Calibration (Sub Menu). Go to that section for more detailed information. In the example above, assume full scale flow is 100 SCFM. As a result, a 20 mA output equals 100 SCFM and 4 mA output equals 0.00000 SCFM.
-
Page 45: Reference Conditions (Sub-Menu): Standard And Normal
the left right up and down keys to modify this value if desired and then press the enter key () to accept. Press the right key to continue to the temperature high value that corresponds to the 20mA output. Temperature High 212.00 In the example above, if your temperature units are °F then 212.00 °F would correspond to the temperature 20mA output. - Page 46 Table 3-8: Reference Conditions (Sub Menu) For example, SCFM (Standard Cubic Feet per Minute) is commonly used in the United States. The S = Standard in SCFM and is referenced to 70°F (21.1°C) and 14.696 Psia (or 1 atmosphere). In Europe, Nm3/hr (Normal Cubic Meters per Hour) is commonly used. The N = Normal and is generally referenced to 0°C and 101.32 KPa A(or 1 atmosphere).
- Page 47 Table 3-9: Diagnostics (Sub Menu) Change Password (Sub-Menu) Use this menu to set or change a password. Navigate to the Change Password (Sub Menu) Table 3-9 above for guidance if necessary. A password is required to access the set-up sub menu’s. Press enter () and the four digit password units will begin flashing.
-
Page 48: Restore Factory
Restore Factory (Sub-Menu): Use this menu to restore all parameters to the original factory conditions. This will undo any changes you have made. Table 3-9 above Navigate to the Box Car (Sub Menu) for guidance if necessary. Press enter () and the YES will begin flashing. As in previous examples, use the buttons to enter YES or NO, and press the enter key () to save. -
Page 49: Chapter 4: Troubleshooting & Repair
Chapter 4: Troubleshooting & Repair Troubleshooting the Flow Meter Begin hardware troubleshooting by verifying the following facilities is- sues are correct. These areas impact system operation and must be corrected prior to performing any flow meter inspections. Verify the incoming power to the flow meter is present and of the correct voltage and polarity. - Page 50 Problem Possible Cause Solution Velocity measurement is Very erratic or non-uniform flow Follow installation requirements shown erratic or fluctuating in Chapter 2 Flow meter installed with less than Follow installation requirements shown required minimum pipe diameters in Chapter 2 upstream and downstream of the sensor Sensor probe must be mounted se- Insertion sensor probe not mounted...
-
Page 51: Returning Equipment To Factory
Factory Calibration—All Models Sierra Instruments maintains a fully-equipped calibration laboratory. All measuring and test equipment used in the calibration of Sierra transducers are traceable to NIST Standards. Sierra is ISO-9001 registered and conforms to the requirements of ANSI/NCSL-Z540 and ISO/IEC Guide 25. -
Page 52: Appendix A: Product Specifications
Appendix A: Product Specifications... -
Page 61: Appendix B: Smart Interface Installation
Operation System: Windows QuadraTherm 640i & 780i Sierra Interface Program (SIP): Click on the file (640i & 780i Sierra Interface Program). This file is self-extracting. Follow instructions for installing the files. Process takes about 1-10 minutes total depending on speed of your computer. - Page 62 Program Start-up The smart interface program allows the user to configure the unit and view all unit parameters. NOTE: The current version of the program. You may obtain the latest version from www.sierrainstruments.com. Make sure your meter is powered up and the meter is connected via the serial or USB port to the computer running this SIP program.
-
Page 63: Meter Display
Meter Data The meter data shows the basic identifying data of the meter hardware, firmware and manufacture date. The calibration date represents the last time the meter was factory calibrated. Latest PCA and Firmware revisions are posted at www.sierrainstruments.com. The iTherm™ math model is continuously evolving, with new gases added to the library periodically, so check the firmware revision periodically in order to take advantage of these refinements. - Page 64 In this example: The gas being measured is air The calibrated full scale (FS) is 1440.40 SCFM The inside diameter of the pipe is 4.0260 Inches The meter is currently reading 0.0000 SCFM (there in no flow in the pipe) ...
- Page 65 Quick Keys: Dial-A-Pipe The Dial-A-Pipe feature makes field configuration very convenient. You must know the type of pipe and either the pipe schedule or the inside diameter. If inside diameter is known, select the units from the diameter units menu and type in the number in the Inside diameter field.
- Page 66 Selecting iTherm Gas Library from the Dial-A-Gas pull down menu allows users to access Sierra’s unique Dial-A-Gas library. Our library is continually growing and expanding. As Sierra calibrates more and more gases with the 640i, we are able to improve the accuracy of our current iTherm gases and add new ones.
- Page 67 All Gas Files saved on your computer are displayed in the ‘Local Gases’ window. These are not necessarily the gas files in your meter, but ones you have downloaded from the Sierra Server previously. If you have never done so, this area will be blank.
- Page 68 Download Gas File (Arrow Button) To download a remote gas file, the file is selected in the Remote Gas window and the arrow button is clicked. Once the download is completed, the gas file will appear in the Local Gases window and will no longer appear as red in the Remote gases window.
- Page 69 Quick Keys: Alarm Setpoint Pressing the Alarm Setpoint Quick Key brings up the following details about the alarms: Only one alarm can be active at any time. Use the Active pull down menu to select the active alarm or to turn off the alarm function entirely. Once you have selected the active alarm, use the Mode pull down menu to select whether the meter should alarm on low, high or to set an alarm window.
- Page 70 It must be performed under no flow conditions. The meter must be removed from the pipe if possible, and the Sierra end cap placed over the sensor. The test may be performed in the pipe provided these same conditions are met while the probe tip is inside the...
- Page 71 If any of the tests fail, follow the troubleshooting tips below and the more general ones contained in chapter four of this manual. 4-20 mA Output Validations The 4-20 mA output validation allows users to force a 4 or 20 mA output on all three analog outputs.
- Page 72 Press Test 4 mA and enter the value from your DVM (should be around 4.000 mA) The program will show passed provided the reading is within tolerance. If it shows failed, please contact the factory for assistance. Repeat this procedure for all remaining 4- 20 mA tests. The most common failure is that the 4- 20 mA wires have become loose or that the DVM is incorrectly set up (must be set up for measuring direct DC current in the mA range).
- Page 73 This routine checks the QuadriTherm gas temperature sensors (T2, T3 and T4). Select Validate Temperature, then Enter the temperature in the pipe as read by another device (not the Sierra flow meter) in the pop-up window. The readings should be roughly the same. Note it can take up to 20 minutes for the probe tip to cool to the surrounding temperature once it has been removed from the pipe.
- Page 74 This routine validates the gas pressure sensor. Select validate pressure, then enter the pressure in the pipe or test area as read by another device (not the Sierra flow meter) in the pop-up window. The readings should be roughly the same. If there is no pressure transducer, the Screen will appear as below.
- Page 75 Use the pull down menu to select relay Open and close and use your DVM to check the relay. Test Totalizer Relay Hook up DVM s shown: Open and close the relay and use your DVM to check the relay.
- Page 76 Low/High FTP Pressing the Low/High FTP button (located at the bottom left of the main ValiCal screen brings up the following data screen. It shows the lowest and highest flow, temperature and pressure the meter has experienced since the last reset. This information is valuable in documenting events that might have caused meter damage, such as blowing out the pressure transducer or severely overheating the sensor.
- Page 77 Quick Keys: Exit Exit will immediately close the program. Any unsaved data will be lost. Function Selector The function selector does all of the same things the quick keys do, while giving deeper access to some functions. To operate the selector, pick the desired function from the drop-down menu and hit enter or left click.
- Page 78 Dial-A-Pipe See Dial-A-Pipe Quick Key Description Dial-A-Gas and Units See Dial-A-Gas Quick Key Description iTherm Gas Library See iTherm Gas Library information on page 65 Alarm Setpoint See Alarm Setpoint Quick Key Description ValidCal Diagnostics See ValidCal Quick Key Description MeterTune (Span Adjust) See MeterTune Quick Key Description Reference Conditions...
- Page 79 This function allows the user to enter the normal and standard temperatures and pressures to which gas MASS flows are referenced. Typically this is 70°F and 1 atmosphere in the USA (f.i. standard conditions as used in scfm: standard cubic feet per minute) or 0°C and 1 atmosphere in Europe (f.i.
- Page 80 Low Flow Cut Off Value Due to thermal gradients, movement of gas molecules in the pipe can occur even with all valves shut. The Zero Cut Off forces both analog and digital outputs to zero at a percentage of the full scale.
- Page 81 select 20 mA to equal any value up to the calibrated full scale. Full scale is the maximum flow rate for which the meter was calibrated. Exceeding it will not damage the meter, but flow readings will not be accurate. The calibrated full scale is found in the calibration menu. Note the meter will still read digital flow values up to the calibrated full scale, but analog outputs will be scaled per the user settings Pressure and temperature may be scaled as the user desires.
- Page 82 Save/Restore Data This screen allows users to: Save any new data Restore the meter to factory default (undoing any changes) Reboot (restart) the meter Meter Information User information allows you to view data about the meter and to customize some aspects of it.
- Page 83 You must be hooked up to the internet so you can download these files from the Sierra Server. If the language file is a newer version than a corresponding local file or is not present locally, then it appears in red. Files that are already saved locally are black.
- Page 84 Load Language Three language slots are available. To upload a new language to the meter, select the language you want to replace from the drop down menu, then select the language to upload from the local languages list, then press load Language. The language is uploaded to the meter and is available for use.
Need help?
Do you have a question about the QuadraTherm 640i Series and is the answer not in the manual?
Questions and answers