Table of Contents
Advertisement
Quick Links
CBM3 Instruction Manual
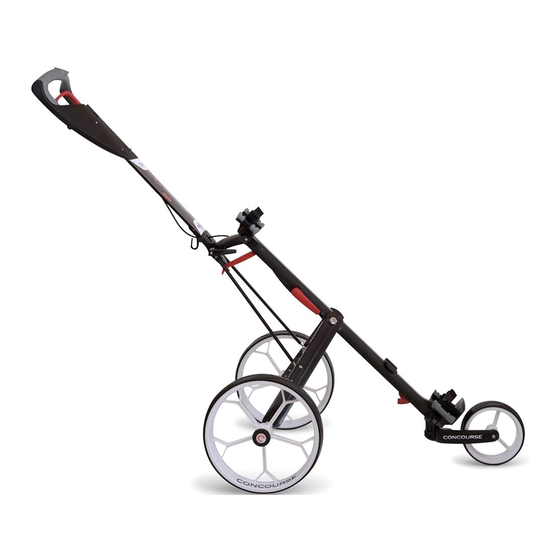
Congratulations on the purchase of your CBM3 Concourse Golf Buggy
To assist you in setting up and using your new CBM3 Golf Buggy we have prepared detailed
instructions to guide you through the process, but if at any time you require any further assistance
Simply call us Toll Free on Australia: 1300 650 059 and one of our friendly team will assist
you. Picture of the Buggy on the cover
Step 1: Opening The Box: When you first open the box this is what you will see as per Figs 1 & 2
Below
Step2: Remove all the contents from the box and it will contain the following components as per
Figure No 3 below.
1 x CBM3 Mobilser with mounting straps
2 x Rear Wheels
1 x Front Wheel
1 x Wheel Bag
Advertisement
Table of Contents

Related Manuals for Concourse CBM3


Summary of Contents for Concourse CBM3
- Page 1 CBM3 Instruction Manual Congratulations on the purchase of your CBM3 Concourse Golf Buggy To assist you in setting up and using your new CBM3 Golf Buggy we have prepared detailed instructions to guide you through the process, but if at any time you require any further assistance Simply call us Toll Free on Australia: 1300 650 059 and one of our friendly team will assist you. Picture of the Buggy on the cover Step 1: Opening The Box: When you first open the box this is what you will see as per Figs 1 & 2 Below Step2: Remove all the contents from the box and it will contain the following components as per Figure No 3 below. 1 x CBM3 Mobilser with mounting straps 2 x Rear Wheels 1 x Front Wheel 1 x Wheel Bag...
- Page 2 Step 3: Read the information on the yellow sticker situated on the Top Handle and then slowly remove the sticker as per Figure No’s 4 &5 below. Step 4: Lay the buggy assembly on a bench or table and unwind the traps as per Figs 5 &6 below Point out the upper and lower bag supports and strap assemblies for the next step and make buggies face the same way. Step 5: Remove the lower bag support and strap from the buggy assembly and place on the base at the rear of the golf bag with the strap passing through the plastic buckle as per 7 & 8 below. Step 6: Now rotate the golf bag into the position as per Fg 9 below and pull the strap as tight as possible and while holding tension on the strap then lock the velcro strap into place. Note: It is vitally important that the lower bag support (once tightened) is perfectly central on the bag base as per fig 10 below. It may take a couple of attempts to make sure the lower bag support id perfectly central on the bage base...
- Page 3 Step 7: Once the lower bag support and strap have been fitted as per step 6 then stand up the buggy with the top strap hanging loose as per Fig 11 below Note: Please ensure that the Top Bag Support is central at the top of the bag as per Fig 11 below We will need to add some arrows and text on the image plus naming the top bag support & strap Step 9: Pass the Velcro strap through the plastic buckle on the top bag strap as per fig 12 below. Hold the bag securely and pull on the strap as tight as possible then lock the Velcro strap into place. Please Note- Once the top Bag strap is tightened, you must ensure that the Top Bag Support must still be centralised on the golf bag. We will need some arrows and text again on the image...
- Page 4 Step 9: Unfolding the buggy; While holding the buggy securely, press the Red Unlock Button situated on the Top Handle of the buggy as per fig 13 below and then lift the top handle upwards the buggy will begin to unfold as per fig 14 below Arrows and text required on images Step 10: Fully unlocked position: Carrying on from step 9, continue to lift the handle upwards until the buggy is fully unfolded as per fig 15 below and it will automatically lock into position with the upright locking pin locating itself in the red unlock arm as per fig16 below Arrows and text required on images – image on right to highlight the upright lick lever and pin...
- Page 5 Step 11: Fitting the front Wheel. While holding the buggy secure - Place the front wheel into the front wheel housing as per fig 17 below and push inwards as per fig 18 below until the front wheel is fully inserted into the front wheel housing as per fig 19 below Please Note – The front wheel is secured by magnets once fully installed. Step 13: Fitting the Rear wheels. While holding the buggy secure - Slide both rear wheels onto the axles until they fully click into place as per figs 20 & 21 below. Arrows and text to be added...
- Page 6 Step 13: Setting the front wheel 22 & 23 Now that all 3 wheels have been fitted as per fig 23 below, pull down on the handle and allow the buggy to sit on all 3 wheels as per fig 23 below – Add arrows for direction of pull Step 15: Locking the front wheel – 24 25 26 Located on the side of the main buggy frame is a Red Lever that positions and locks the front wheel. Begin by pushing down on the handle and lifting the front wheel just off the ground, the pull the Red Lever outwards to unlock the lever and begin to turn the lever towards the front of the buggy as per figs 24 & 25 and the front wheel will begin to move forwrads . Continue moving the lever until the lever is in the fully forward position and then lock the lever in position as per fig 26 – Arrows and text...
- Page 7 Step 16: Adjusting the Handle Height – 27 28 29 30 31 On the lower section of the Handle is the Handle Lock Lever. To adjust the handle height unlock the handle lock by pulling down on the lever as per figs 27 & 28 The handle has 3 different heights, as per figs 29 30 &31, when you have chosen your preferred handle height, push the handle lock lever upwards to lock the handle into position Please Note: You can leave the handle height to your desired height and the buggy will still fold up normally, there is no need to keep adjusting the handle each time you unfold and fold up the buggy. Arrows and text required Step 17: Using the Hand Brake. To apply the hand brake, simply pull upwards on the Red Handbrake Lever on the Handle as per fig 32, until the lever locks into the locked position as per fig 33. To unlock the brake simply pull upwards on the Lever and the hand brake will diddenage and the handle will return to the off position. - Arrows and Text ...
- Page 8 Step 18: Removing the Buggy Frame from the Golf Bag The CBM3 has the added advantage of being able to separate the buggy frame fron the Golf Bag without the need to remove the Straps. To carry out this process lift upwards on the mobiliser lock mechanism as per figs 34 & 35 Arrows and text Now Hold the buggy frame upright and still then push the bag golf bag away from the buggy frame and the bag will separate from the buggy as per fig 36 Once the bag has seperated from the buggy you will notice 2 silver pins which locate the mobiliser to the lower bag support. To refit the mobiliser to the bag, simply line up the 2 pins with the slots in the lower bag support (ref fig37) and then bring the mobiliser up to the bag and push down on the mobiliser lock lever to lock the 2 units togethter again. Arrows and Text...
Need help?
Do you have a question about the CBM3 and is the answer not in the manual?
Questions and answers