Advertisement
Quick Links
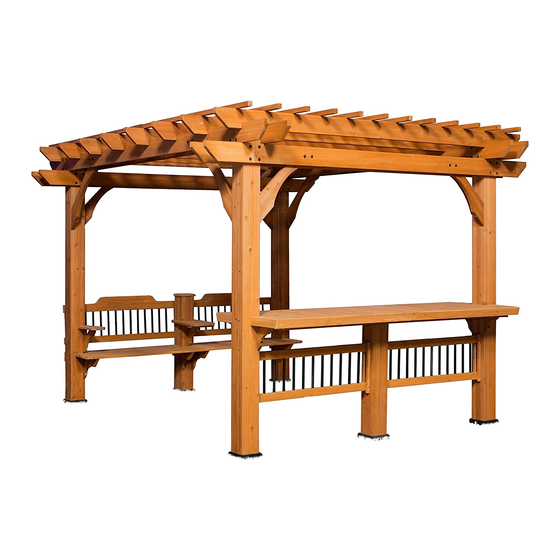
Backyard Discovery
3305 Airport Drive
Pittsburg, KS 66762
1-800-856-4445
• Owner's Manual
• Frequently Asked Questions
• Assembly Instructions
• Warranty Information
www.swingsetsonline.com (you will also find any updates on
assembly instructions and information to order replacement parts)
Features the
Save this assembly manual for future reference in the event that
INS-1606517-B-OASIS 12x10 PERGOLA-ENG-07-21-2016
12x10 PERGOLA
Register your new (Outdoor Product) on-line @
you need to order replacement parts.
OASIS
MODEL: #1606517
fastening system.
Made in China
Advertisement

Related Manuals for Backyard Discovery OASIS


Summary of Contents for Backyard Discovery OASIS
- Page 1 (you will also find any updates on assembly instructions and information to order replacement parts) Features the fastening system. Save this assembly manual for future reference in the event that you need to order replacement parts. Made in China INS-1606517-B-OASIS 12x10 PERGOLA-ENG-07-21-2016...
- Page 2 STOP Missing A Part? CALL US BEFORE GOING BACK TO THE STORE! The store where you made your purchase does not stock parts for this item. If you have assembly questions or if you need parts, whether they are missing or damaged Call Toll-Free Help Line or visit www.swingsetsonline.com 1-800-765-4138 PLEASE READ THIS BEFORE STARTING ASSEMBLY...
- Page 3 Owner’s Manual Outdoor Product Dear Customer: Please read entire booklet completely before beginning the assembly process. Structures are not intended for public use. The Company does not warranty any of its residential structures subjected to commercial use such as: Recreational Park, or any similar Commercial Application.
- Page 4 Owner’s Manual Outdoor Product Maintenance Instructions: 1. Check all nuts and bolts twice monthly during the usage season and tighten as required. (But not so tight that you crack the wood) It is particularly important that this procedure be followed at the beginning of each season. 2.
- Page 5 Outdoor Product Assembly Manual FAQs: 1. Is the wood treated with chemicals? Backyard Discovery uses 100% Chinese Cedar wood which is naturally bug resistant, decay and rot resistant. To help ensure your families safety, our wood is completely chemical free and we do not use pressure-treated wood.
-
Page 6: Tools Required For Installation
Tools Required for Installation: (These are the tools that are generally required for assembly of our outdoor products. These tools are not included with the outdoor product purchase.) (Square) (Level 24") (Tape Measure) (Phillips Screw Driver) (Rubber Mallet - Optional) (Drill Attachments: Phillips (An Adult w/ an Adult Helper) Head &... -
Page 7: General Information
Basic Setup Dimensions Place the set on level ground, not less than 6 ft [2 m] from any structure or obstruction such as a fence, garage, house, overhanging branches, laundry lines, or electrical wires. 6'-0" GENERAL INFORMATION: 10'-0" YOUR PERGOLA HAS BEEN DESIGNED 6'-0"... -
Page 8: Parts Identification
Parts Identification Wood Components (NOT TO SCALE) D1 - JOIST - W4L04585 1 3/8"x5 1/4"x114" (36x134x2896) D2 - JOIST - W4L04590 1 3/8"x5 1/4"x114" (36x134x2896) D3 - SLOTTED JOIST - W4L04586 1 3/8"x5 1/4"x114" (36x134x2896) D4 - JOIST - W4L04587 1 3/8"x5 1/4"x90"... - Page 9 Parts Identification Wood Components (NOT TO SCALE) G3 - ARMREST - W4L06013 1"x5 1/4"x18" (24x134x458) G4 - ARMREST - W4L06187 1"x5 1/4"x18" (24x134x458) H2 - SUPPORT BOARD - W4L06016 1"x3 3/8"x16 1/8" (24x86x410) H3 - BRACE - W4L06015 H5 - BRACE - W4L07083 1"x3 3/8"x12 1/4"...
- Page 10 Parts Identification Wood Components (NOT TO SCALE) WA1 - WALL ASSEMBLY - W2A01822 2 7/8"x15"x39 1/2" (72x382x1003) WA2 - WALL ASSEMBLY - W2A01824 1"x16 3/4"x95 1/2" (24x424x2426) WP1 - PERGOLA POST - W2A01819 51/2"x5 1/2"x37 1/8" (140x140x943) WP2 - PERGOLA POST - W2A01823 5 1/2"x5 1/2"x37 1/8"...
- Page 11 Parts Identification Wood Components (NOT TO SCALE) TT2 - TABLE TOP ASSEMBLY - W2A01866 1 5/8"x17 5/8"x27 7/8" (40x448x708) TT3 - TABLE TOP ASSEMBLY - W2A01867 1 5/8"x15 3/4"x27 7/8" (40x401x708)
- Page 12 Parts Identification Hardware - T-30 TORX WRENCH - H100114 - T-30 TORX BIT - H100147 - T-40 TORX BIT - A100042 - T-40 TORX WRENCH - A100041 (34) VP - BOLT WH 5/16x7-1/4 BLK - H100196 (17) VM - BOLT WH 5/16x2-1/2 BLK - H100194 (34) VL - NUT BARREL WH 5/16x1-1/2 BLK - H100193 - BOLT WH 5/16x1 1/2 BLK - H100407...
- Page 13 Parts Identification Hardware - SCREW PFH 8x3 BLK - H100362 (110) VU - SCREW PFH 8x2-1/2 BLK - H100201 (17) - SCREW PFH 8x2 1/4 BLK - H100483 (56) VS - WASHER LOCK EXT 12x19 BLK - H100199 (52) - SCREW PFH 8x2 BLK - H100391 (22) - SCREW PFH 8x1 3/4 BLK - H100382 (105)
- Page 14 Parts Identification Accessories (NOT TO SCALE) HT - FOOT 142 SQUARE POST - A100029 - 90° L-BRACKET - BLK - A4M00555 SR - "B" REVISION TAG - A100315 XR - BYD ID TAG (SMALL) WITHOUT AGES - A100241 (1) STAIN MARKER - MED BRN-2UV - A6P00171...
- Page 15 D4 - JOIST - W4L04587 1 3/8"x5 1/4"x90" (36x134x2286) D9 - SHORT ANGLE BRACE - W4L04594 1 3/8"x5 1/4"x29 3/4" (36x134x755) STEP 1 REPEAT PROCESS FOR OPPOSITE SIDE. WASHER ***HAND TIGHTEN ONLY AT THIS TIME*** LOCK EXT 12x19 BLK WASHER LOCK EXT 8x19 BLK BOLT WH...
- Page 16 D1 - JOIST - W4L04585 1 3/8"x5 1/4"x114" (36x134x2896) D8 - LONG ANGLE BRACE - W4L04593 1 3/8"x5 1/4"x37 1/8" (36x134x942) STEP 2 REPEAT PROCESS FOR OPPOSITE SIDE. WASHER ***HAND TIGHTEN ONLY AT THIS TIME*** LOCK EXT 12x19 BLK WASHER LOCK EXT 8x19 BLK BOLT WH...
- Page 17 D5 - JOIST - W4L04591 1 3/8"x5 1/4"x90" (36x134x2286) WP4 - PERGOLA POST - W2A01821 5 1/2"x5 1/2"x89 1/2" (140x140x2273) STEP 3 NUT BARREL WH 5/16x1-1/2 BLK (4 PLCS) WASHER WASHER LOCK EXT 12x19 BLK LOCK EXT 12x19 BLK (4 PLCS) WASHER LOCK EXT 8x19 BLK (4 PLCS) BOLT WH 5/16x7-1/4 BLK...
- Page 18 D5 - JOIST - W4L04591 1 3/8"x5 1/4"x90" (36x134x2286) WP3 - PERGOLA POST - W2A01820 5 1/2"x5 1/2"x89 1/2" (140x140x2273) STEP 4 NUT BARREL WH 5/16x1-1/2 BLK (4 PLCS) WASHER LOCK EXT 12x19 BLK (4 PLCS) BARREL WH WASHER LOCK EXT 8x19 BLK 5/16x1-1/2 (4 PLCS) BOLT WH 5/16x7-1/4 BLK...
- Page 19 D2 - JOIST - W4L04590 1 3/8"x5 1/4"x114" (36x134x2896) STEP 5 BOLT WH 5/16x7-1/4 BLK WASHER (8 PLCS) LOCK EXT 12x19 BLK WASHER LOCK EXT 8x19 BLK (8 PLCS) WASHER LOCK EXT 12x19 BLK (8 PLCS) WASHER NUT BARREL WH 5/16x1-1/2 BLK (12) LOCK EXT 8x19 BLK...
- Page 20 D6 - JOIST END - W4L04588 1 3/8"x5 1/4"x15" (36x134x381) STEP 6 BOLT WH 5/16x7-1/4 BLK (4 PLCS) WASHER LOCK EXT 8x19 BLK WASHER (4 PLCS) LOCK EXT 12x19 BLK BARREL WH 5/16x1-1/2 WASHER LOCK EXT 8x19 BLK NUT BARREL WH 5/16x1-1/2 BLK (4 PLCS) BOLT WH 5/16x7-1/4...
- Page 21 D6 - JOIST END - W4L04588 D7 - JOIST END - W4L04592 1 3/8"x5 1/4"x15" (36x134x381) 1 3/8"x5 1/4"x15" (36x134x381) STEP 7 BOLT WH 5/16x7-1/4 BLK (4 PLCS) WASHER LOCK EXT 8x19 BLK (4 PLCS) WASHER LOCK EXT NOTE HOLE 12x19 BLK WASHER LOCK EXT 12x19 BLK (4 PLCS)
- Page 22 D6 - JOIST END - W4L04588 1 3/8"x5 1/4"x15" (36x134x381) STEP 8 BOLT WH 5/16x7-1/4 BLK (4 PLCS) WASHER WASHER LOCK EXT 8x19 BLK LOCK EXT 12x19 BLK (4 PLCS) BARREL WH 5/16x1-1/2 NUT BARREL WH 5/16x1-1/2 BLK WASHER LOCK EXT (4 PLCS) 8x19 BLK WASHER LOCK EXT 12x19 BLK...
- Page 23 D6 - JOIST END - W4L04588 D7 - JOIST END - W4L04592 1 3/8"x5 1/4"x15" (36x134x381) 1 3/8"x5 1/4"x15" (36x134x381) STEP 9 BOLT WH 5/16x7-1/4 BLK (4 PLCS) WASHER WASHER LOCK EXT 8x19 BLK LOCK EXT (4 PLCS) 12x19 BLK WASHER LOCK EXT 12x19 BLK (4 PLCS) NUT BARREL WH 5/16x1-1/2 BLK...
- Page 24 D3 - SLOTTED JOIST - W4L04586 1 3/8"x5 1/4"x114" (36x134x2896) STEP 10 WASHER (16) LOCK EXT 8x19 BLK LAG SCREW (16) 8 PLCS LAG SCREW WH 5/16x5-1/2 BLK 5/16x5-1/2 (16 PLCS) WASHER LOCK EXT 8x19 BLK (16 PLCS)
- Page 25 P2 - SHORT PURLIN - W4L04595 1 3/8"x1 3/8"x59 1/4" (36x36x1504) P1 - LONG PURLIN - W4L04589 1 3/8"x1 3/8"x76 5/8" (36x36x1945) STEP 11 SCREW PFH 8x2-1/2 BLK (8 PLCS) SCREW PFH 8x2-1/2 BLK 6 1/8...
- Page 26 P2 - SHORT PURLIN - W4L04595 1 3/8"x1 3/8"x59 1/4" (36x36x1504) P1 - LONG PURLIN - W4L04589 1 3/8"x1 3/8"x76 5/8" (36x36x1945) STEP 12 SCREW PFH 8x2-1/2 BLK (8 PLCS) SCREW PFH 8x2-1/2 BLK 7 11/16...
- Page 27 P2 - SHORT PURLIN - W4L04595 (10) 1 3/8"x1 3/8"x59 1/4" (36x36x1504) P1 - LONG PURLIN - W4L04589 (10) 1 3/8"x1 3/8"x76 5/8" (36x36x1945) STEP 13 ASSEMBLE REMAINING 'P1' AND 'P2' PURLINS ALTERNATING LOCATIONS AS SHOWN IN STEPS 11 AND 12. SCREW PFH (80) 8x2-1/2 BLK...
- Page 28 HT - FOOT 142 SQUARE POST - A100029 STEP 14 DECIDE WHERE TO PLACE THE PERGOLA; GRASS, CONCRETE OR OTHER MATERIAL. PLACE THE PERGOLA EXACTLY WHERE IT WILL BE ANCHORED WHEN COMPLETED AND SLIDE A FOOT UNDER EACH POST. NOTE: IF NOT PLACING ON CONCRETE, PROCEED TO STEP 18.
- Page 29 STEP 15 USE CHALK TO TRACE AROUND THE EDGES OF EACH FOOT.
- Page 30 STEP 16 MOVE THE PERGOLA ASIDE. PLACE EACH FOOT INSIDE OF THE LINES DRAWN IN THE PREVIOUS STEP. USING A CONCRETE DRILL BIT, PILOT DRILL ATTACHMENT HOLES INTO THE CONCRETE PAD. NEXT, USE THE 1/4"x2" CONCRETE ANCHORS TO ATTACH EACH FOOT TO THE CONCRETE SURFACE.
- Page 31 STEP 17 SET THE PERGOLA BACK IN PLACE, SETTING EACH POST INSIDE A FOOT.
- Page 32 STEP 18 ATTACH FEET TO EACH POST. SCREW PFH (16) 8x1-1/2 BLK SCREW PFH 8x1-1/2 BLK (16 PLCS)
- Page 33 SR - "B" REVISION TAG - A100315 XR - BYD ID TAG (SMALL) WITHOUT AGES - A100241 STEP 19 IF YOU CHOOSE NOT TO INSTALL THE SEAT OR BAR, YOUR PERGOLA IS NOW COMPLETE. OTHERWISE, CONTINUE TO NEXT STEP. SCREW PWH 8x5/8 BLK SCREW PFH 8x1/2 BLK...
- Page 34 WP1 - PERGOLA POST - W2A01819 51/2"x5 1/2"x37 1/8" (140x140x943) WA1 - WALL ASSEMBLY - W2A01822 2 7/8"x15"x39 1/2" (72x382x1003) J5 - SUPPORT BOARD - W4L06176 1"x2 3/8"x24 1/8" (24x60x612) STEP 20 WASHER LOCK EXT 8x19 BLK SCREW PFH (12) 8x2 BLK LAG SCREW 5/16x2-1/2...
- Page 35 HT - FOOT 142 SQUARE POST - A100029 STEP 21 PLACE WALL/POST ASSEMBLY IN POSITION IN THE CENTER OF OUTER POSTS AS SHOWN. USE CHALK AND TRACE AROUND FOOT (NOT NECESSARY IF NOT PLACING ON CONCRETE). FOOT 142 SQUARE POST (1 PLC)
- Page 36 J4 - SUPPORT BOARD - W4L06175 1"x2 3/8"x26" (24x60x660) STEP 22 IF PLACING ON CONCRETE, MOVE WALL/POST ASSEMBLY ASIDE AND INSTALL CONCRETE ANCHORS USING THE SAME PROCEDURE USED PREVIOUSLY. WASHER LOCK EXT IF NOT PLACING ON CONCRETE, LEAVE WALL/POST ASSEMBLY IN PLACE. 8x19 BLK CONCRETE ANCHOR 1/4"...
- Page 37 J6 - SUPPORT BOARD - W4L06177 1"x2 3/8"x82 5/8" (24x60x2098) STEP 23 SCREW PFH 8x1-1/2 BLK SCREW PFH (12) 8x2 BLK SCREW PFH (16) 8x2 1/4 BLK HOLES TOWARD TOP SCREW PFH 8x2 1/4 BLK (16 PLCS) LEVEL AND CENTER ON POST SCREW PFH 8x1-1/2 BLK (4 PLCS)
- Page 38 TT1 - TABLE TOP ASSEMBLY - W2A01865 TT3 - TABLE TOP ASSEMBLY - W2A01867 1 5/8"x17 5/8"x27 7/8" (40x448x708) 1 5/8"x15 3/4"x27 7/8" (40x401x708) TT2 - TABLE TOP ASSEMBLY - W2A01866 1 5/8"x17 5/8"x27 7/8" (40x448x708) STEP 24 SCREW PFH (20) 8x1 3/4 BLK SCREW PFH 8x1 3/4 BLK...
- Page 39 J1 - TABLE TOP RAIL - W4L06007 1"x2 3/8"x86 3/8" (24x60x2194) STEP 25 CENTER J1. FLUSH WITH TOP SURFACE AND 15/16" OVERHANG EACH END. SCREW PFH (10) 8x2-1/2 BLK SCREW PFH 8x2-1/2 BLK (10 PLCS)
- Page 40 H5 - BRACE - W4L07083 1"x3 3/8"x12 1/4" (24x86x312) STEP 26 LAG SCREW WH 1/4x2-1/2 WASHER WASHER LOCK EXT 6x15 BLK LOCK EXT 6x15 BLK (4 PLCS) LAG SCREW WH 1/4x2-1/2 BLK (4 PLCS) 4 PLCS WASHER LOCK EXT 6x15 BLK (4 PLCS) LAG SCREW WH 1/4x2-1/2 BLK (4 PLCS)
- Page 41 J2 - TABLE TOP RAIL - W4L06008 1"x2 3/8"x11 1/8" (24x60x281) STEP 27 SCREW PFH 8x1-1/2 BLK SCREW PFH 8x1-1/2 BLK ( 8 PLCS) INSTALL FLUSH TO TOP...
- Page 42 WP2 - PERGOLA POST - W2A01823 HT - FOOT 142 SQUARE POST - A100029 5 1/2"x5 1/2"x37 1/8" (140x140x943) M1 - WALL RAIL - W4L06048 5/8"x3 3/8"x95 1/2" (16x86x2426) STEP 28 PLACE RAIL/POST ASSEMBLY IN POSITION AS SHOWN. USE CHALK AND TRACE AROUND FOOT (NOT NECESSARY IF NOT PLACING ON CONCRETE).
- Page 43 STEP 29 IF PLACING ON CONCRETE, MOVE RAIL/POST ASSEMBLY ASIDE AND INSTALL CONCRETE ANCHORS USING THE SAME PROCEDURE USED PREVIOUSLY. IF NOT PLACING ON CONCRETE, LEAVE RAIL/POST ASSEMBLY IN PLACE. CONCRETE ANCHOR 1/4" x 2" CONCRETE ANCHOR 1/4" x 2" (4 PLCS)
- Page 44 WA2 - WALL ASSEMBLY - W2A01824 1"x16 3/4"x95 1/2" (24x424x2426) D10 - SUPPORT BOARD - W4L06174 1 3/8"x5 1/4"x14 1/8" (36x134x360) STEP 30 WASHER LOCK EXT 8x19 BLK LAG SCREW 5/16x2-1/2 LAG SCREW WH 5/16x3 SCREW PFH 1/2 BLK 8x1-1/2 BLK 15 7/16 LAG SCREW WH 5/16x3 1/2 BLK (3 PLCS)
- Page 45 H2 - SUPPORT BOARD - W4L06016 1"x3 3/8"x16 1/8" (24x86x410) STEP 31 WASHER LOCK EXT 8x19 BLK LAG SCREW 5/16x2-1/2 LOCATE PILOT HOLES IN WP2. LAG SCREW WH 5/16x2-1/2 BLK (8 PLCS) WASHER LOCK EXT 8x19 BLK (8 PLCS)
- Page 46 H3 - BRACE - W4L06015 1"x3 3/8"x12 1/4" (24x86x312) STEP 32 BARREL WH 5/16x7/8 BLK BOLT WH 5/16x1 1/2 LAG SCREW WASHER WH 1/4x2-1/2 LOCK EXT 6x15 BLK WASHER LOCK EXT WASHER 8x19 BLK LOCK EXT 12x19 BLK NUT BARREL WH 5/16x7/8 BLK (4 PLCS) WASHER LOCK EXT 12x19 BLK (4 PLCS)
- Page 47 G2 - SEAT - W4L06017 1"x5 1/4"x39 1/2" (24x134x1002) STEP 33 SCREW PFH 8x2 BLK SCREW PFH 8x2 BLK (8 PLCS)
- Page 48 G1 - SEAT - W4L06047 1"x5 1/4"x92 7/8" (24x134x2360) STEP 34 SCREW PFH (12) 8x2 BLK SCREW PFH 8x2 BLK (12 PLCS)
- Page 49 H4 - BRACE - W4L06012 - 90° L-BRACKET - BLK - A4M00555 1"x3 3/8"x12 1/4" (24x86x312) G3 - ARMREST - W4L06013 1"x5 1/4"x18" (24x134x458) STEP 35 SCREW PWH 8x3/4 BLK WASHER LOCK EXT 9 1/8 6x15 BLK LAG SCREW SCREW PFH WH 1/4x2-1/2 8x3 BLK 7/16...
- Page 50 H4 - BRACE - W4L06012 - 90° L-BRACKET - BLK - A4M00555 1"x3 3/8"x12 1/4" (24x86x312) G4 - ARMREST - W4L06187 1"x5 1/4"x18" (24x134x458) STEP 36 SCREW PWH 8x3/4 BLK WASHER LOCK EXT 6x15 BLK LAG SCREW WH 1/4x2-1/2 SCREW PFH 8x3 BLK 90°...
- Page 51 N1 - CLEAT - W4L06014 N2 - CLEAT - W4L06188 5/8"x2 3/8"x8 7/8" (16x60x226) 5/8"x2 3/8"x10 3/8" (16x60x262) STEP 37 SCREW PFH 8x1-1/2 BLK SCREW PFH 8x1-1/2 BLK (8 PLCS)
- Page 52 FP1 - POST CAP - W2A01825 1 7/8"x6 1/2"x6 1/2" (48x164x164) STEP 38 SCREW PFH 8x2 BLK SCREW PFH 8x2 BLK (4 PLCS)
- Page 53 Limited Warranty. In addition, Backyard Discovery will replace any parts within the first 30 days from date of purchase found to be missing from or damaged in the original packaging.
Need help?
Do you have a question about the OASIS and is the answer not in the manual?
Questions and answers