Table of Contents
Advertisement
Quick Links
See also:
User Manual
Advertisement
Table of Contents

Related Manuals for Coffee Queen Princess


Summary of Contents for Coffee Queen Princess
- Page 1 A TASTE OF THE FUTURE Service manual COFFEE QUEEN Princess S / GB Your retail dealer ................Rev.070903 ................
- Page 2 1. Table (list) of contents. Table of contents sid. 2. Generally 3. Overview of components front 3. Overview of components mixing system SERVICE; Installation and start Locate the brewer Connectings: Electricity/Water Starting up machine Fylla behållare med ingredienser DRIFT Making coffee in a cup, chocolate,, Making coffee in a jug CLEANING Weekly cleaning...
-
Page 3: Generally
2. Generally. Princess We congratulate to your choice of a Coffee Queen coffee machine. Please read through this manual before you take the machine into operation for the first time. The manual contents important instructions for a safe and proper usage of the machine. -
Page 4: Overview Of Components Front
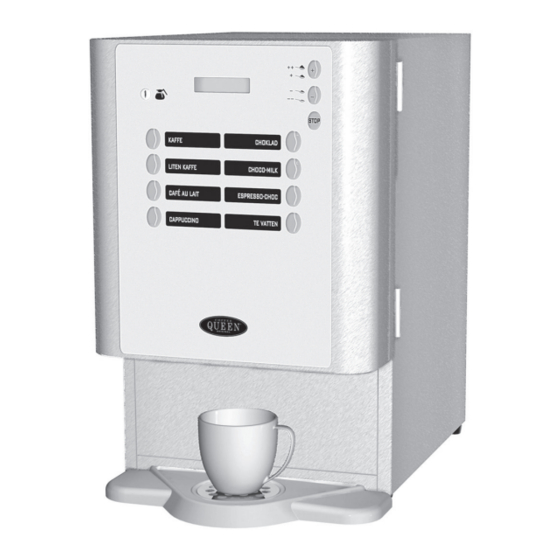
3. Overview of components , front Princess Key switch (cup and jug choice) Display Strenght of drinks ++ or - - 8 choices of drinks Outlet/ drinks Drip tray Drip tray insert Door lock Cupholder... - Page 5 Instant Coffee Instant Coffee Espresso Topping Chocolate Topping Princess III Instant Coffee Chocolate Topping Detail; Ingredients; Width; Height; Depth; Volum e/ L; Amount / unit i n Princess Canister; coffee Canister; coffee 1,15 Canister; espresso 1,15 Canister; choco 1,15 Canister; topping...
- Page 6 4. Service. Installation and start Princess Locate the brewer on a flat Connect the electrical plug to a separate level and waterproof surface. grounded wall socket Grounded wall socket 230V 10A NOTE! Make sure there is a space behind the machine for free flow of air.
- Page 7 4. Service. Installation and start Princess 6.3. Fill canisters with ingredients. Take out (this to avoid unnecessery spillage in the machine) ingredient canisters and fill them with ingredients. 6.2. 6.1. Turn up the chute. se picture 6.2. Lift up the ingredient canister and 6.1.
- Page 8 5. DRIFT; Making coffee in a cup Princess Making coffe in a jug. Making coffe in a cup. Chocolate etc. 1a. Place a jug in the centre of the cup holder.. 2a. Turn on the key with jug symbole clockwise.
- Page 9 6. CLEANING: Weekly cleaning Princess Dismantle : Mixer system Cleaning Loosen mixer bowl. Pull apart (C). 5. Clean with a wet rag and Loosen outlet hose (A) drought drily. turn lock knob (B) anti-clockwise. Wash these parts: A. Mixer bowl B.
- Page 10 6. CLEANING: Weekly cleaning Princess REASSEMBLE: Mixer system Make sure that the motor whippers plane side will be in accordance with the whippers plane Reassemble the assembly plate by turning side. see next (G) and picture (H). lock knob (F) clockwise. INSPECT gaskets.
- Page 11 7. CLEANING: Cleaning program: daily Princess Automatic cleaning of mixing bowls. The mixer bowls can easily be cleaned with the key switch in ”cup” (normal) position. Weekly automatic cleaning of mixing bowls. drink 5 1 drink Place a jug in the drip tray.
-
Page 12: Automatic Cleaning Of Mixing Bowl 1 Or 2
7. CLEANING: Cleaning program Princess Automatic cleaning of mixing bowl 1 or 2 The mixer bowls can easily be cleaned with the key switch in ”cup” (normal) position. drink 5 1 drink Place a jug in the drip tray. Turn the key slowly ninety degrees and back again. -
Page 13: Automatic Cleaning Of In/Outlet Valves
7. CLEANING: Cleaning program Princess Automatic cleaning of In/Outlet valves: The In/Outlet valves can easily be cleaned with the key switch in ”cup” (normal) position. drink 5 1 drink Place a jug in the drip tray. Turn the key slowly ninety degrees and back again. -
Page 14: Cup Counter
Cup counter -Easy Access Princess DRINK 5 DRINK Cup counter:: Easy Access: The machine has an in built cup counter which Water and ingredient amount can be adjusted is available to see and reset with the key with±15% with the key switch in ”cup” (normal) switch in ”cup”... -
Page 15: Safety Functions
9. Safety functions.. Princess The machine is equipped with following safety functions 1.Indication of door Door not closed The display shows; ”Door open” ”Door open” 2.When machine is not in use: The inlet valves are blocked. 10. Failure messages. Princess... -
Page 16: Dimension Sketch
12. DIMENSION SKETCH. Princess... -
Page 17: Circuit Diagram
13. Circuit diagram. -
Page 18: Spare Part List
14. Spare part list. PRINCESS Amount/unit Description: Art. no. Pos. no. Valid for page 21. Level sensor with gasket 120548 Gasket for sensor 150118-02 Heating element 2200W 230V 1601361 Gasket, water tank,lid 1206591 Motor gear 145 rpm, without axle 1604612... - Page 19 14. Spare part list. PRINCESS Amount/unit Description; Art. no. Pos. no. 2can. 3can. 4can. Valid for page 24. (Canister, Princess II) Ingredient canister compl. B137 x H156 1204879 1204955 Chute left (FB) 120489 Feed control, in plastic 1204712 Agitator + screw compl.
-
Page 20: Spare Part List
14. Spare part list. PRINCESS Amount/unit Description; Art. no. Pos. no. 2can. 3can. 4can. Valid for page 26. Fuse holder 1604351 Fuse 2 A slow 5x20 1604382 Connection block PA 80 160351 Gable (connection block) PA 80 160352 Transformer 5003111... -
Page 21: Exploded View
PRINCESS 15. Exploded View. Water tank... - Page 22 15. Exploded View. Mixer system II och III PRINCESS (( 2 canisters) (( 3 canisters)
- Page 23 15. Exploded View. Mixer system IV PRINCESS (( with 4 canisters)
- Page 24 15. Exploded View. Canisters PRINCESS Parts; canisters PRINCE II Parts; canisters PRINCE III...
- Page 25 15. Exploded View. Canisters PRINCESS Parts; Canisters PRINCE IV Parts; canisters Parts; canisters 67 x 156 coffee 137 x 156...
- Page 26 15. Exploded View. Parts in machine PRINCESS Säkring Fuse 2 Amp trög 5x20 Säkring Fuse 4 Amp trög 5x20...
-
Page 27: Exploded View
15. Exploded View. Door PRINCESS... - Page 28 COFFEE QUEEN Princess FOR SERVICE Please contact Your retail dealer ................................................COFFEE QUEEN AB, Box 960, 671 29 ARVIKA, besöksadress; Korpralsv 1B, Tel vxl; +46 (0)570-47700, Fax; +46 (0)570-47719 E-mail: info@coffeequeen.se www.coffeequeen.se Art. nr/Art. no. 1704353...
Need help?
Do you have a question about the Princess and is the answer not in the manual?
Questions and answers