Advertisement
SPN750 II Spin Bike
User Manual
[Revision 1.0 April 2017]
READ THIS MANUAL CAREFULLY BEFORE USE – FAILURE TO DO SO MAY RESULT IN INJURY, PROPERTY
DAMAGE AND MAY VOID WARRANTY. • KEEP THIS MANUAL FOR FUTURE REFERENCE. • Products covered by
this manual may vary in appearance, assembly, inclusions, specifications, description and packaging.
E&OE
©2017 Proflex
Advertisement
Table of Contents

Related Manuals for Proflex SPN750 II


Summary of Contents for Proflex SPN750 II
- Page 1 SPN750 II Spin Bike User Manual [Revision 1.0 April 2017] READ THIS MANUAL CAREFULLY BEFORE USE – FAILURE TO DO SO MAY RESULT IN INJURY, PROPERTY DAMAGE AND MAY VOID WARRANTY. • KEEP THIS MANUAL FOR FUTURE REFERENCE. • Products covered by this manual may vary in appearance, assembly, inclusions, specifications, description and packaging.
-
Page 2: Safety
SPN750 II Spin Bike Safety Basic precautions, including the following important safety instructions, should always be followed when using this equipment. Read all instructions before use. Before beginning any exercise program, consult your physician. This is especially important for people over 35 years of age or who have pre-existing health problems. Read all instructions before using any fitness equipment. - Page 3 SPN750 II Spin Bike Table of Contents Safety ..............................2 Parts Identification ..........................4 Assembly ............................5 Operation ............................8 Console and Functions ........................8 Adjusting Effort ..........................8 Adjusting the Handlebar ........................ 8 Adjusting Suspension ........................8 Adjusting the Seat ......................... 9 Maintenance and Troubleshooting ....................
-
Page 4: Parts Identification
SPN750 II Spin Bike Parts Identification The equipment comes partially assembled and includes the following parts. Ensure that all parts are included before assembly. Description Description Spin Bike (includes frame, flywheel etc) Seat Post Front Foot (includes wheels) Handlebar Post Shroud... -
Page 5: Assembly
SPN750 II Spin Bike Assembly Take all parts out of the carton and place them on a firm, flat surface. Remove all packing materials. Place the front foot (2) (with wheels facing outward) under the front of the frame (1), and place the rear foot (3) under the rear of the frame. - Page 6 SPN750 II Spin Bike Locate the handlebar (11) on the top of the handlebar post (remove the bolts first). Secure it using 4 M8x20 screws (12) and washers (13), and firmly tighten (rotate right) using the Allen key. Ensure the pulse sensor wires are not trapped or pinched between the handlebar and post during assembly.
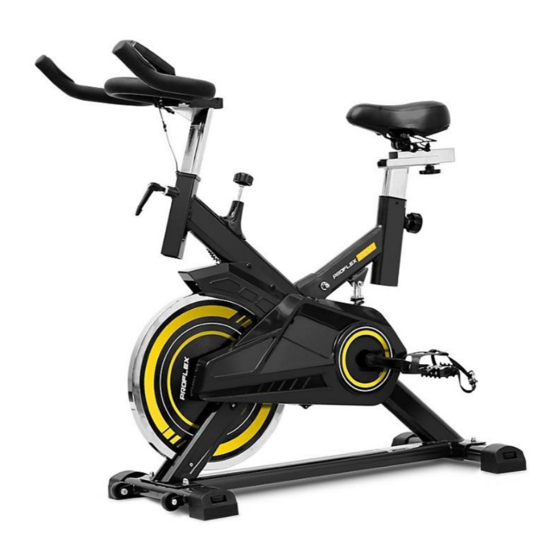
- Page 7 SPN750 II Spin Bike 13. Slide the console (20) onto the mounting tab (G) on the top of the handlebar post shroud. Join the "pulse" sensor connectors (from the handlebar) and the bike "sensor" connector to the corresponding console cables. The pulse connectors are different to the sensor connector, so they cannot be mixed The machine should resemble the image below and is ready for use.
-
Page 8: Operation
SPN750 II Spin Bike Operation Console and Functions The equipment features a display that provides you with workout information, such as duration, speed, distance travelled etc. Whenever the console is activated, a new "session" starts, with all values at "zero". If the equipment is not being used and the console is not touched (buttons pressed), it will automatically switch off after approximately 4 minutes. -
Page 9: Adjusting The Seat
SPN750 II Spin Bike Adjusting the Seat For a more comfortable "ride" and to suit riders of different sizes, the equipment features multiple seat adjustments, including height, angle and distance from the handlebar. • To adjust height, loosen (rotate left) the seat post knob (4) (but not out completely), then pull it out so that the pin in the knob disengages from the locating hole in the post. -
Page 10: Warm-Up And Cool-Down Routine
SPN750 II Spin Bike Warm-Up and Cool-Down Routine The warm-up routine is an important part of any workout. The purpose of warming up is to prepare your body for exercise and to minimize injuries. Warm up for two to five minutes before aerobic exercising. It should begin every session to prepare your body for more strenuous exercise by heating up and stretching your muscles, increasing your circulation and pulse rate, and delivering more oxygen to your muscles. - Page 11 ©2017 Proflex. All rights reserved. No part of this document, including descriptive content, concepts, ideas, diagrams or images may be reproduced or transmitted in any form or by any means, electronic or mechanical, including photocopying, scanning or recording, or any information storage and retrieval system, without express permission or consent from the publisher.
Need help?
Do you have a question about the SPN750 II and is the answer not in the manual?
Questions and answers
Peddles seem to have not place any resistance to spin main flywheel.. Belt seems tight enough so it doesn't slip when peddling but still no resistance levels in Spinning flywheel. . How do I get more resistance instead of free spinning.
You can increase the resistance on the PROFLEX SPN750 II spinning bike by using the flywheel resistance control. Adjusting this control allows you to customize the workout intensity to your preference.
This answer is automatically generated