Advertisement
a a ssembly instructions
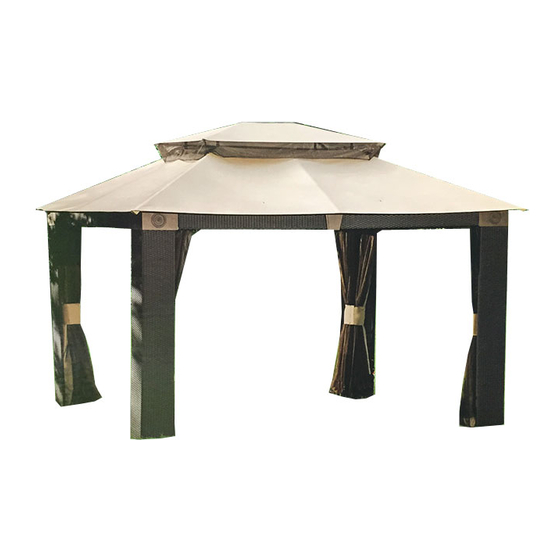
antigua wicker gazebo
SKU# 729427
Our clear, easy-to-follow, step-by-step instructions will guide you through the project from start to finish. The final
product will be a quality piece that will go together smoothly and give years of enjoyment.
IMPORTANT:
Please read instructions thoroughly before assembly. Familiarize yourself with the inventory of parts and the
accompanying illustrations to assure safe and proper assembly.
Periodically check all bolted connections on your gazebo to make sure they are tight and secure. Please keep the
instructions for future reference.
Advertisement
Table of Contents

Subscribe to Our Youtube Channel
Related Manuals for Berkley Jensen 729427


Summary of Contents for Berkley Jensen 729427
- Page 1 SKU# 729427 Our clear, easy-to-follow, step-by-step instructions will guide you through the project from start to finish. The final product will be a quality piece that will go together smoothly and give years of enjoyment.
- Page 2 All you will need is a step ladder (not included). Item Identification: For ease of identification, all parts are labeled to correspond to the Step number in which the part is used. WARNINGS: 1. Assembly Instructions must be followed. 2. Stakes supplied must be used to hold this gazebo in place when upright. 3.
- Page 3 PARTS LIST Wicker panel Crossbeam (long side) Crossbeam (short side) Slanting bar Middle beam Screw Corner connector (big top frame) Big top frame bar (long side) Big top frame bar (short side) Small top beam Small top slanting bar Center hook Crossbeam centerpiece Mosquito netting bar (long side)
- Page 4 ASSEMBLY INSTRUCTIONS: Fig.1: Spread the crossbeam (B & C) to straight till fix by the elastic buckling. Fig.2: Insert the crossbeam (B & C) into card slot of the wicker panel (A), fix them by screw (F). Fig.3: Connect the mosquito netting bar N (O) to the wicker panel (A) and the crossbeam B (C) by the screw (F).
- Page 5 Fig.5: Insert the big top frame bar (H & I) to the big top corner connector (G). Fig.6: Insert the slanting bar (D) to the big top corner connector (G). Fig.7: Insert another end of slanting bar (D) to the wicker panel (A). Fig.8: Insert the middle beam (E) to the big top frame bar (H or I).
- Page 6 Fig.11: Screw the center hook (L) to the middle of the small top beam (J). Fig.12: Attach the small canopy (P) to the small top along the small top slanting bar (K), aligning the corners and stretching it to fit. Fig.13: Place the big canopy (Q) to big top, do not spread here.
- Page 7 Fig.14: Spread the big canopy (Q) along the slanting bar (D), aligning the corners and stretching it to fit, then stick inner valance together. Fig.15: Hang the wall (S) on the outside of mosquito netting bar (N & O) by plastic ring (GG), and hang the mosquito netting (R) on the inside of mosquito netting bar.
Need help?
Do you have a question about the 729427 and is the answer not in the manual?
Questions and answers