Table of Contents
Advertisement
Freestanding 90cm Wide 179cm
High Fridge Freezer
with Water Dispenser
Instruction Manual
Model number:
RH90FF176(B)(R)(SS)(W)-WD
For Customer Services & Spare Parts please call 0345 208 8750
Opening times: Monday - Friday 8am – 8pm & Saturday 9am – 1pm
or visit us at www.productcare.co.uk
IMPORTANT:
RETAIN FOR FUTURE REFERENCE
Advertisement
Table of Contents
Troubleshooting

Related Manuals for Russell Hobbs RH90FF176-WD


Summary of Contents for Russell Hobbs RH90FF176-WD
- Page 1 Freestanding 90cm Wide 179cm High Fridge Freezer with Water Dispenser Instruction Manual Model number: RH90FF176(B)(R)(SS)(W)-WD For Customer Services & Spare Parts please call 0345 208 8750 Opening times: Monday - Friday 8am – 8pm & Saturday 9am – 1pm or visit us at www.productcare.co.uk IMPORTANT: RETAIN FOR FUTURE REFERENCE...
- Page 2 Contents Safety Instructions ………………………………………. Electrical Safety ………………………………………. Transportation & Handling ………………………………………. Installing & Switching on your Appliance ………………………………………. Before Switching On ………………………………………. Door Height Adjustment ………………………………………. Product Overview ………………………………………. Unit & Spare Parts ………………………………………. Usage ………………………………………. 9-14 Control Panel ………………………………………. Temperature Selection ……………………………………….
-
Page 3: Safety Instructions
Safety Instructions Important note: Please read this booklet before installing and switching on this appliance. The manufacturer assumes no responsibility for incorrect installation and usage as described in this booklet. • This model uses natural refrigerant gas as part of its cooling system. This gas is known as R600a (Isobutene) and is environmentally friendly but can be combustible. -
Page 4: Electrical Safety
• This appliance can be used by children aged from 8 years and above and persons with reduced physical, sensory or mental capabilities or lack of experience and knowledge if they have been given supervision or instruction concerning use of the appliance in a safe way and understand the hazards involved. -
Page 5: Transportation And Handling
Transportation and Handling For safe lifting, tilt the appliance backwards by no more than 45 degrees, hold the base and rear corners of cabinet. Lift the refrigerator carefully. Never use the door handles for lifting. To move the refrigerator on a flat level surface, tilt it slightly backwards and push backwards. -
Page 6: Before Switching On
• This appliance should only be placed on a flat, firm surface. • Choose a dry and well-ventilated space. • The appliance should be positioned so that the plug is easily accessible. • If you need help or are unsure how to install the unit, please contact Customer Services on 0345 208 8750 or visit www.productcare.co.uk. -
Page 7: Door Height Adjustment
Door Height Adjustment If the doors of the appliance are not aligned then the height of them can be adjusted, if required please follow the below steps. Note: The maximum height adjustment is 5mm Rotate the locking nut clockwise (as shown in the diagram below) with a wrench for 2 full rotations to loosen it. -
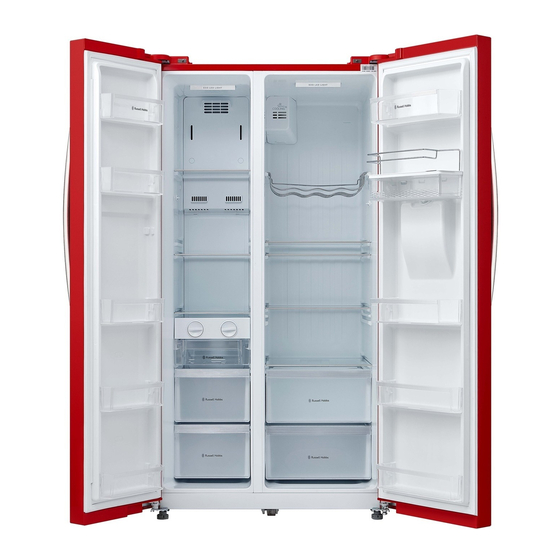
Page 8: Product Overview
Your Appliance and the Compartments Freezer light Fridge door rack Freezer door rack Wine Rack Glass shelf (freezer) Glass shelf (fridge) Ice cube drawer Water tank & dispenser Freezer drawer Fridge drawer / crisper Fridge light Unit Parts & Spare Parts Before installation, check that all parts detailed in the product overview are present. -
Page 9: Usage Information
Usage Information Control panel Display Freezer compartment temperature Quick freeze icon Fridge compartment temperature Quick cool icon Vacation icon Lock/unlock icon Button operation Freezer compartment temperature Mode function/setting adjustment Lock/unlock controls Fridge compartment temperature adjustment For Customer Services & Spare Parts please call 0345 208 8750 Opening times: Monday - Friday 8am –... -
Page 10: Temperature Setting
Usage Information Temperature setting Important note: The display will only be illuminated when a button is pressed or a compartment door opened, at all other times the display will be in a standby state. Important note: The control panel will automatically lock itself. Before adjusting the temperature or selecting any mode the panel must be unlocked by pressing and holding the lock button for 3 seconds until the lock symbol disappears from the display. -
Page 11: Mode Setting
Usage Information Freezer compartment temperature The freezer compartment temperature will be shown on the display when a compartment door is opened or a button is pressed. Fridge compartment temperature adjustment To change the temperature of the fridge compartment, press the fridge temperature adjustment button. - Page 12 Usage Information Vacation mode (holiday mode) This mode is designed to prevent your appliance from wasting energy during times when it’s not in regular use (when you are on vacation/holiday for example). By selecting this function the temperature of the freezer compartment will automatically be set to -18°C and the fridge compartment will be turned off.
- Page 13 Usage Information Quick freeze & cool This mode is designed for times when the refrigerator warms past the point of cooling, such as when the weather is extremely warm, the refrigerator doors are opened frequently, or a large batch of food is placed inside the refrigerator.
-
Page 14: Usage
Usage Information To use the quick cool mode you must press the mode button until the quick cool icon is lit on the display. To exit the quick cool mode press the mode button until no mode icon is lit on the display Lock/unlock To use the lock function you must press the lock button (the symbol on the display will be lit). - Page 15 Usage Information Shelving and rack adjustment Important note: all food and drink should be removed from all shelves and racks before adjusting or removing them You can adjust the shelving in the fridge compartment to your required configuration. To remove a shelf, lift it up slightly so the plastic stabilisers that on either side of the shelf are above the shelf rails and then pull it towards you.
-
Page 16: Water Dispenser
Water Dispenser Cleaning & Assembly Before using the water dispenser clean all parts of the water tank and the dispenser with hot soapy water. To clean the water tank you will need to remove it, to do this hold both sides of the water tank tightly and lift it carefully away from the door at a 45º... - Page 17 Water Dispenser Cleaning & Assembly Using a flat headed screwdriver, gently insert it between the raised edge(s) of the water valve and dispenser moulding. Then slowly and carefully raise the edges with screwdriver on either side of the water valve, the water valve should lift and be removed by hand at a 45º...
- Page 18 Water Dispenser Re-attaching the water valve, seal ring and water tank To re-install the water valve, ensure that nozzle of the water valve is pointing downwards and that the groove on the body of the water valve is aligned with the groove on the hole of the dispenser molding.
- Page 19 Water Dispenser Re-attaching the water valve, seal ring and water tank Refit the water tank back into the door. When fitting the water tank, ensure the seal ring is inserted into the water valve first, then hold both sides of the water tank tightly, align the slots on the water tank with those in the door and fit it on to the door at a 45º...
- Page 20 Water Dispenser Filling with water Note: • The maximum capacity of the water tank is 3 litres, do not exceed this maximum limit. • Do not touch other parts when filling water, which can cause water leakage. • Water must be left in the water tank with the appliance door closed for at least 4 hours to enable it to cool down.
-
Page 21: Water Dispenser
Water Dispenser Dispensing water Note: Water must be left in the water tank with the appliance door closed for at least 4 hours to enable it to cool down. Note: When the water tank/dispenser is empty, do not push the dispenser lever strongly as this can damage the mechanism. -
Page 22: Bulb Replacement
Bulb Replacement The fridge and freezer lights are energy efficient, long life LEDs. Therefore, they should not need replacing throughout the life of the product. The bulb is a direct current 12V LED module and in the unlikely event it does fail then it will need to be replaced by a qualified engineer. -
Page 23: Energy Saving Advice
Energy Saving Advice • Do not install the appliance close to sources of heat, such as a cooker, dishwasher or radiator. • Locate the appliance in a cool well-ventilated room and make sure that the air vents are clear. • Try to avoid keeping the doors open for a long time, as warm air will enter the cabinet and may cause a build-up of ice as well as affecting the energy consumption. -
Page 24: Power Failure
Power Failure If there is a power failure during the storage of frozen foods, keep the door closed. If the temperature within your freezer should rise, do not refreeze the food without checking it's condition. • Ice Cream: Once thawed should be discarded. •... -
Page 25: Internal Cleaning
Maintenance & Cleaning Disconnect the appliance from the power supply before cleaning. Internal Cleaning • Do not pour water over the appliance. • The cavity should be cleaned periodically using a solution of bicarbonate of soda and lukewarm water (5ml to 0.5 litre of water) •... -
Page 26: Maintenance & Cleaning
Maintenance & Cleaning Defrosting Note: Care must be taken when performing the following procedure. • The appliance is frost free, so there shouldn’t be any requirement to defrost the freezer. However, in the unlikely event the appliance does need defrosting please follow the below steps: •... -
Page 27: Trouble Shooting
Trouble shooting Problem Solution Check that the appliance is switched on. Check that there has not been a power cut. Check that the plug is not faulty. Check that the fuse has not blown. The fridge/freezer doesn't work Check that the voltage is correct for the appliance. Are there any faults with the socket? For this purpose, try the plug of your appliance by connecting it to a socket which you are sure is working. -
Page 28: Trouble Shooting
Trouble shooting Problem Solution Check all the food and drink that is in the fridge is in date and correctly packaged. If it isn’t then it should be removed immediately or repackaged. Check for spillages on each shelf, rack and drawer. You may need to remove the drawers to check that no spillages have settled underneath them. -
Page 29: Connection To The Mains Supply
Connection to the mains supply For UK use only – Plug fitting details (where applicable): As the colours of the wires in the mains lead of this appliance may not correspond with the coloured markings identifying the terminals in your plug, proceed as follows: The GREEN/YELLOW wire is the EARTH and must be connected to the terminal which is marked with the letter E or by the earth symbol or coloured... -
Page 30: Guarantee
Guarantee This product is guaranteed for 12 months from the date of the original purchase. If any defect arises due to faulty materials or workmanship you must contact Product Care with the original proof of purchase so a replacement or refund can be arranged. Refund or replacement is at the discretion of Product Care. -
Page 31: Technical Specification
Technical Specification Model number RH90FF176 (B) (R) (SS) (W) -WD Rated Voltage 220V – 240V ~ 50Hz Capacity 525L External Dimensions(HxWxD) 178.8 x 89.5 x 74.5cms For Customer Services & Spare Parts please call 0345 208 8750 Opening times: Monday - Friday 8am – 8pm & Saturday 9am – 1pm or visit us at www.productcare.co.uk... - Page 32 For Customer Services & Spare Parts please call 0345 208 8750 Opening times: Monday – Friday 8am – 8pm & Saturday 9am – 1pm or visit us at www.productcare.co.uk Revision 1 This symbol is known as the 'Crossed-out wheelie bin Symbol'. When this symbol is marked on a product/batteries, it means that the product/batteries should not be disposed of with your general household waste.
Need help?
Do you have a question about the RH90FF176-WD and is the answer not in the manual?
Questions and answers