
Related Manuals for Westinghouse iGen4500


Summary of Contents for Westinghouse iGen4500
- Page 1 USER MANUAL REMOTE START PUSH BUTTON ELECTRIC START iGen4500 Digital Inverter Generator 3700 Running Watts | 4500 Peak Watts...
-
Page 2: Table Of Contents
Adding/Checking Engine Fluids and Fuel ..11 iGen4500 Schematic ......23 Checking and/or Adding Engine Oil ... .11 iGen4500 Exploded View . -
Page 3: Technical Specifications
IMPORTANT: KEEP YOUR PURCHASE RECEIPT TO ENSURE TROUBLE-FREE WARRANTY COVERAGE. PRODUCT REGISTRATION To ensure trouble-free warranty coverage, it is important you register your Westinghouse inverter. You can register your generator by either: 1. Filling in the product registration form below and mailing to:... -
Page 4: Safety
NOTE: Indicates a procedure, practice or condition that should be followed in order for the generator to function in the manner intended. 4 | Westinghouse Portable Power... -
Page 5: General Safety Rules
Never use the inverter to power medical support equipment. engine misfires often. Always disconnect tools or Always remove any tools or other service equipment used appliances from the during maintenance from the inverter before operating. inverter before starting. Westinghouse Portable Power | 5... -
Page 6: Assembly
NOTE: The electric start generator is equipped with a battery charging feature. Once the engine is running, a small charge is supplied to the battery via the battery cables and will slowly recharge the battery. Figure 1: Battery Service Panel 6 | Westinghouse Portable Power... -
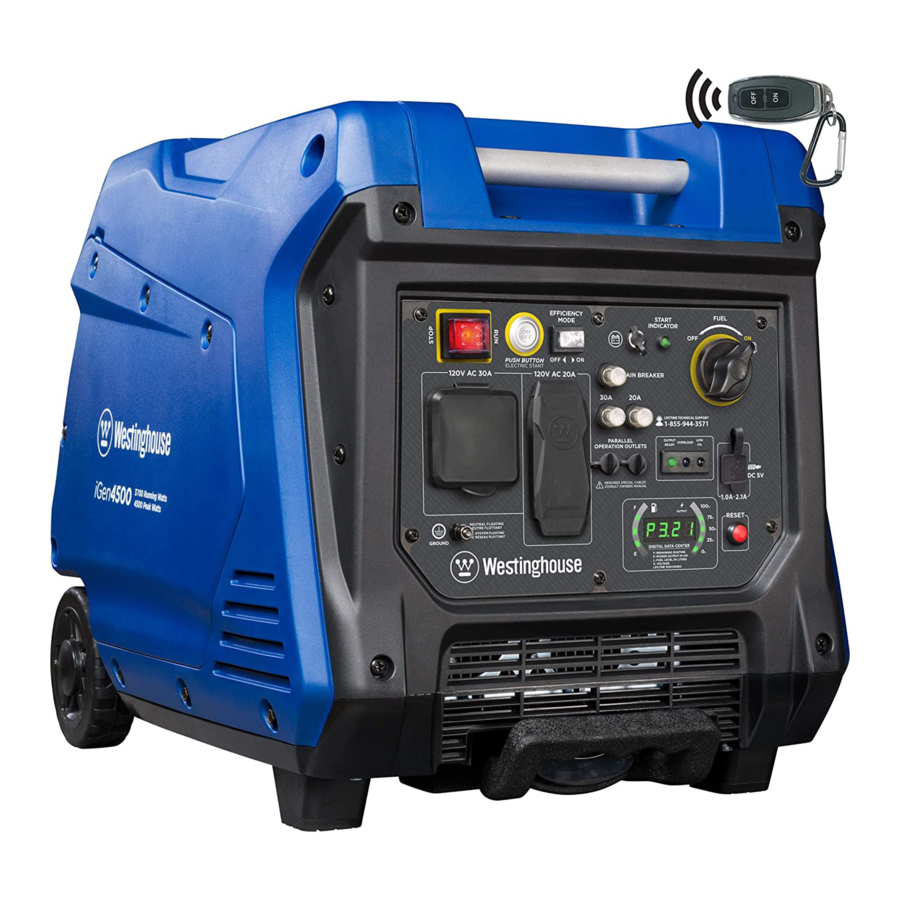
Page 7: Features
FEATURES BASIC INVERTER FEATURES iGen4500 Control Panel: Contains the reset breaker, Roller Board Wheels: For easy portability. outlets and warning lights. Telescoping Handle: Extends and retracts for Oil Access Cover: Remove the cover to easy access. access the oil fill/drain plug. -
Page 8: Control Panel Features
FEATURES CONTROL PANEL FEATURES iGen4500 120-Volt, 20-Amp Duplex Outlet (NEMA 5-20R): The outlet is capable of carrying a maximum of 20 amps. 120-Volt 30 Amp TT-30 Outlet: Travel Trailer outlet can supply a maximum of 30 amps and 120 volts. -
Page 9: Operation
Operating the inverter on a surface with loose if operated in this material such as sand or grass clippings can cause manner. debris to be ingested by the inverter that could: • Block cooling vents • Block air intake system Westinghouse Portable Power | 9... -
Page 10: Powercord
Using Extension Cords Westinghouse Portable Power assumes no responsibility for the content within this table. The use of this table is the responsibility of the user only. This table is intended for reference only. The results produced by using this table are not guaranteed to be correct or applicable in all situations as the type and construction of cords are highly variable. -
Page 11: Initial Oil Fill
4. Do not overfill, if oil level is too high, oil will drain proper oil level is maintained during the operation of out through the fill plug. the generator. Failure to maintain the proper oil level can result in engine damage. Westinghouse Portable Power | 11... -
Page 12: Adding Gasoline To The Fuel Tank
6. Slowly add gasoline into the fuel tank. Be very care- ful not to overfill the tank. The gasoline level should NOT be higher than the red ring (see Figure 5). 7. Install the fuel cap by rotating clockwise. Figure 5: Maximum Gasoline Fill Level 12 | Westinghouse Portable Power... -
Page 13: Electric Start
Let the generator sit idle for 15 seconds and then repeat step 7. If the cranking speed drops after each unsuccessful attempt, then STOP the battery may not be adequately charged. 8. Plug in electronic devices. Figure 10: Wireless Remote - START Westinghouse Portable Power | 13... -
Page 14: Stopping The Inverter
3. As a load is applied, the inverter will sense the load and engine RPM will increase according to the load applied. 4. To run the inverter at maximum power and RPM, press the efficiency mode switch to the OFF position. 14 | Westinghouse Portable Power... -
Page 15: Maintenance
6 Months 6 Months Year Engine Oil Check Level Change Change Cooling Features Check/Clean Air Filter Check Clean* Replace Spark Plug Check/Clean Replace Spark Arrestor Check/Clean *Service more frequently if operating in dry and dusty conditions Westinghouse Portable Power | 15... -
Page 16: Engine Oil Maintenance
Always be environmentally responsible. Follow the guidelines of the EPA or other governmental agencies for proper disposal of hazardous materials. Consult local authorities or reclamation facility. 16 | Westinghouse Portable Power... -
Page 17: Air Filter Maintenance
9. Return the air filter element to its position in the air cleaner housing. 10. Install the air cleaner cover, making sure the knobs lock into place. 11. Install the engine service panel. Figure 14: Unlock Air Filter Cover Westinghouse Portable Power | 17... -
Page 18: Draining The Float Bowl
Always be environmentally responsible. Follow the guidelines of the EPA or other governmental agencies for proper disposal of hazardous materials. Consult local authorities or reclamation facility. Figure 19: Remove Spark Plug 5. Install the engine service panel. 18 | Westinghouse Portable Power... -
Page 19: Cleaning The Spark Arrestor
5. Slide the spark arrestor band clamp off the spark 3. Rotate the engine to top dead center (TDC) of the arrestor screen. compression stroke. Looking through the spark plug hole, the piston should be at the top. Westinghouse Portable Power | 19... -
Page 20: Cleaning The Inverter
Clean All Engine Air Inlet and Outlet Ports – Make sure all engine air inlet and outlet ports are clean of any dirt and debris to ensure the engine does not run hot. 20 | Westinghouse Portable Power... -
Page 21: Storage
3. Start the engine and allow the inverter to run until all the remaining gasoline in the fuel lines and carburetor is consumed and the engine shuts off. 4. Drain any remaining fuel from the float bowl. See Draining the Float Bowl on page 18. Westinghouse Portable Power | 21... -
Page 22: Troubleshooting
RPM. 3. If trying 1-2 above does not solve 3. Take the inverter to your nearest the problem, the cause might be a authorized service dealer. fault in the inverter 22 | Westinghouse Portable Power... -
Page 23: Exploded And Engine Views
SCHEMATIC Westinghouse Portable Power | 23 利用 pdfFactory Pro 测试版本创建的PDF文档 www.pdffactory.com... -
Page 24: Igen4500 Exploded View
EXPLODED VIEW 24 | Westinghouse Portable Power... - Page 25 EXPLODED VIEW PART NUMBERS Part. Description 100561 Enclosure Top 100578 Damper 100560 Side Panel 100562 Enclosure Side 100566 Access Cover 100567 Lift Bar 150527 Vent Hose 150526 Fuel Tank 150529 Strainer 120538 Inverter Module 150534 Fuel Filter 100569 Intake Grate...
-
Page 26: Igen4500 Engine View
ENGINE VIEW 26 | Westinghouse Portable Power... - Page 27 ENGINE VIEW PART NUMBERS Part. Description 180581 Dip Stick 180582 Low Oil Switch 170516 Starter 180580 Spark Plug 170512 Recoil and Housing 160504 Air Box 100548 M6 Nut 140517 Gasket 140532 Carburetor Assembly 140531 Stepper Motor Bracket 140533 M4X25...
- Page 28 Version 10.11.17KD 28 | Westinghouse Portable Power...
Need help?
Do you have a question about the iGen4500 and is the answer not in the manual?
Questions and answers
The generator will only start with the pull cord. I let it run for several hours & it charged the batterey in my RV. After disconnecting my camper, I continued to let the generator run with the "charge battery" switch "on". The battery (which is brand new) never charges. It stay below 0%. What is theproblem & how do I fix it? All authorized service providers are several hours away.
How tocremove fuel basket in gas tank
How do you reprogram the fob
Have a 3500/4500 westinghouse inverter/generator and key fob for remote starting stopped working. Put new battery in and it worked for a while but then stopped working. Blue light comes on but it does not stop or start generator. Do I need a new fob and if so where do I buy one?
If the remote start feature of the Westinghouse iGen4500 generator has stopped working, the issue might be due to drained batteries in the key fob, and replacing the batteries (2 CR2016) is recommended. If the key fob itself is faulty or needs re-pairing, reprogramming it is necessary. A new key fob is only required if the original is missing or cannot be reprogrammed.
This answer is automatically generated