Mitel 6865i User Manual
Hide thumbs
Also See for 6865i:
- User manual (203 pages) ,
- Release notes (41 pages) ,
- Installation manual (24 pages)
Table of Contents
Advertisement
Quick Links
Advertisement
Table of Contents

Related Manuals for Mitel 6865i


Summary of Contents for Mitel 6865i
- Page 1 User Manual 6.00...
-
Page 3: Table Of Contents
Table of Contents Phone Configuration and Usage ..............1 Buttons ....................1 Rebooting the Phone ................2 Cleaning your Screen ................3 Placing a call ..................4 Answering a call ..................5 DND ...................... 5 Call List & Redial ................... 5 Directory .................... -
Page 4: Phone Configuration And Usage
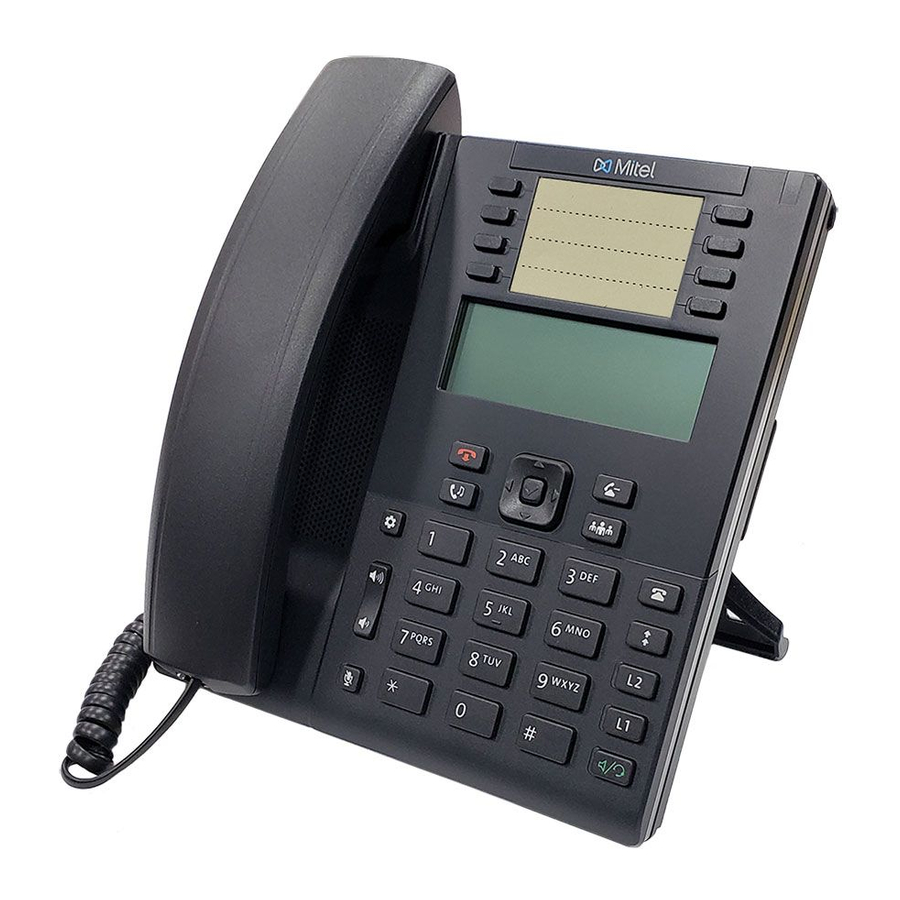
Key Descriptions The following table describes the keys on the 6865i, 6867i, and 6869i: Description Goodbye Key - Ends an active call. The Goodbye key also exits an open list, such as the Options List, without saving changes. Hold Key - Places an active call on hold. To retrieve a held call, press the Hold key again or press the Pickup soft key offered on the display. -
Page 5: Rebooting The Phone
Navigation Keys/Select Button - Multi-directional navigation keys allow you to navigate through the phone’s user interface. Pressing the center Select button selects/sets options and performs various actions (such as dialing out when in the Directory, Callers, and Redial Lists). Transfer Key - Transfers the active call to another number. For more information, see “Transferring Calls”... -
Page 6: Cleaning Your Screen
CLEANING THE PHONE SCREEN To clean the phone’s screen, Mitel recommends the use of a super fine cotton cloth, cotton swab, or microfiber lens cloth made of microfiber suede (preferably one without sewn hems or similar characteristics that would scratch the surface of the screen). You can use the cloth dry for dusting, polishing and light cleaning, or dampen it (with water only) to deep clean the surface. -
Page 7: Placing A Call
Buttons – The phone has both hard-keys and soft-keys. Hard- keys are defined as a key or button that has a fixed function and single purpose, like the HOLD and OPTIONS keys. The soft-keys are located near the backlit screen area of the phone and can be used for multiple functions, depending on the label associated with the key. -
Page 8: Answering A Call
Answering a call -To answer a call, either lift the handset or press the blinking LINE button, or press the Answer soft key. If you do not want to answer the call, you can press ignore on the phone to send the call to voicemail. -
Page 9: Transferring A Call
Transferring a Call- If you would like to transfer a call to another party (in or outside of the office), press the XFER soft button. You will hear another dial tone. Dial the party to whom you are transferring the call. BLIND - If you press the XFER key again at this point, the call will immediately be released to the transferred party. -
Page 10: Group Call Pickup
Directed Call Pickup- To pick up a call for another user whose phone is ringing, press the PICKUP (feature must be preconfigured) button and enter the user’s extension. Group Call Pickup- To pick up a call for another user whose phone is ringing in a group of phones in which you are part of, press the PICKUP button. -
Page 11: Setting Phone Preferences (Options)
because they can affect the phone’s connectivity to your network. Please check with your system administrator if you are not clear about a function. Press on the phone to enter the Options List. Enter the Password then press the ENTER button. To go to an option, use the left and right arrow keys to navigate to the main option and up and down keys to scroll through the sub options. -
Page 12: Voicemail
If you press the Park key prior to selecting the line key, you will not be able to pick up the incoming call on Line 2. Voicemail The Voicemail features can be accessed through one of the following: 1. Pressing the VOICEMAIL button on your phone 2. -
Page 13: Recording Your Greetings
Recording your Greetings. (3 - 1 - 1) Once you have accessed the Voicemail system you will have access to the main menu. Option 3 will allow you to access your greetings. You have several greetings available to you: 1) Personal Greeting 2) After Hours Greeting 3) Extended Absence Greeting (Vacation) Under the Greetings menu, option 1 is the Personal Greeting. -
Page 14: Login
CommPortal CommPortal is a web site and application dedicated to your phone settings. You log in to the site by clicking the arrow on your computer or by going to https://point.gtb.net. If you have installed the Desktop Assistant, you can also click on the icon in your system tray to launch the CommPortal dashboard. -
Page 15: The Dashboard
The Dashboard The Dashboard gives you a quick look at your phone’s status. Similarly to a car’s dashboard, you can see the status of your current environment. The Dashboard is divided into four sections. There is a top menu area, and the left side that shows the name assigned to the phone. -
Page 16: Dnd (Do Not Disturb & Screening)
Do Not Disturb (DND) & Call Screening The DND feature can be activated from a Commportal interface. Using the drop down option in phone status, choose “Do Not Disturb”. Just as when set via the phone, the caller will not receive incoming calls, they will not hear pages through their phone, nor will they get any intercom calls. -
Page 17: Messages And Calls
Messages and Calls This menu option has 6 sub-tabs. 1. Messages – List of all messages in your inbox. 2. Missed Calls - List of calls that rang your phone, but were not answered by you. 3. Dialed - List of calls that originated from your phone. 4. -
Page 18: Forwarding A Voicemail Message Via Email
Forwarding a voicemail message via email Select “Forward as Email” from the Actions options. The voicemail message you are choosing to forward will be placed as a .WAV file attachment into the message. You can now add email addresses as well as type a standard message prior to sending the message. The caller ID of the person whose message you are forwarding will be placed with the attachment. -
Page 19: Voicemail Notification
Voicemail Notification After a message is received in your mailbox, you will see the following: 1. Your phone will have a blinking red light. The light will continue blinking until all new messages have been heard. You will also see a cassette icon on the phone display in the upper right corner. -
Page 20: Voicemail Box Setting
Voicemail Box settings You can choose to customize how your mailbox is accessed and what you get when you press your voicemail key by modifying these settings. Choose the Mailbox Access link on the Message setting page. Mailbox Access Skip Pin: If Skip PIN is enabled, then when accessing your mailbox from your own telephone you are not required to enter your PIN. - Page 21 your contacts. Contacts can be added in Commportal by clicking on any caller id or number on a screen. Contacts can also be added directly into the contacts list at any time. Choose the Contacts menu item from the Home screen. Click on the New Contact menu item You can complete the contact...
-
Page 22: Call Forwarding Your Phone
The last tab is short codes. Short codes allow all company users to speed dial frequently dialed numbers. The codes are added by your company administrator and are shared amongst all the users. To use the codes, enter the short number then press the dial button. Call Forwarding your Phone If you want to forward your incoming calls to another number, open Commportal. -
Page 23: Follow Me
to use your forwarding, follow me, or Do Not Disturb (DND) features. DND is available if you are registered to use the Accession® application. If you are an Accession Suite user, your forwarding tool is below the Phone Status showing you are available. The options next to the line “Incoming calls will:” will have options to Ring your Account Phone (DID) or to Forward to another phone. - Page 24 the voicemail setting, all calls will forward to the voicemail of the alternate phone (i.e. cell Phone) if the device has one. When adding alternate numbers, you can have them ring at the same time, or you can choose to have them ring in sequence.
-
Page 25: Groups
Groups The group tabs shows you whether your phone is part of one of the following: 1) MLHG- Incoming phones ring sequentially on several phones in a certain order. It also may have ACD (Automatic Call Distribution) queuing capabilities. 2) Call Pickup Group- Calls can be picked up by all group members. If you are part of the group, you must be logged in to the group in order to get the... -
Page 26: Acd Agents
ACD AGENT Click on the Agent Dashboard icon to launch the ACD agents view into the queue. From the dashboard and can login or out of their queue. They can their current state to a temporary busy state by choosing from the drop down options. In their queue they can see the current average wait time for those sitting in the queue. -
Page 27: Desktop Assistant
Commportal Desktop Assistant This program is installed on your desktop and can assist you with the following: 1. Sync your contacts. 2. Show popup for incoming calls and new voicemail messages, 3. Activate call forwarding, follow me or ringing your phone. 4. -
Page 28: Remote Dialing (Click To Dial)
Remote Dialing – Click to Dial This feature is available via the website by using the Call Icon in the upper Right area of the screen. You can also use the white empty rectangle placed in your system tray by the Commportal Desktop Assistant. -
Page 29: Phone Configuration
Phone Configuration There are many pre-programmed buttons on your phone, such as Voicemail, Park, Contacts, and Page. You can modify the buttons on your phone to add features or user that you might need often. In the bottom section of the dashboard on the lower left, you will see the link “Devices”. -
Page 30: Programmable Buttons
Programmable Buttons None – To clear the button. Speed Dial – One touch dial of an outside 10+ digit number. Enhanced Speed Dial – One touch transfer of a call to an outside 10+ number. This moves the incoming callers’ caller ID to the transferred phone. Speed Dial / Conference –... - Page 31 Enhanced Call Park - Parks and retrieves a call from a pre-assigned orbit code and displays the orbits that are being used/unused. Park Call - States the orbit code for the call that will be placed. The codes are selected according to availability.
-
Page 32: Enhanced Speed Dial Button Example
Enhanced Speed Dial Example Once you have chosen the Enhanced Speed Dial option, enter the telephone number you wish to dial and a description/label for this number within the 9 character limit. Press the SAVE CHANGES button to complete. Once you save the changes, your phone will now need to be rebooted. You can use the procedure on page 2, or if you’d prefer you can wait for the automatic reboot that will occur between 1am and 4am in your time zone.
Need help?
Do you have a question about the 6865i and is the answer not in the manual?
Questions and answers