Table of Contents
Advertisement
Available languages
Available languages
Quick Links
Advertisement
Chapters
Table of Contents

Related Manuals for Amprobe TACH-10


Summary of Contents for Amprobe TACH-10
- Page 1 TACH-10 Contact / Non-Contact Tachometer Users Manual • Bedienungsanleitung...
- Page 3 TACH-10 Contact / Non-Contact Tachometer Users Manual May 2010, Rev.1 ©2010 Amprobe Test Tools. All rights reserved. Printed in China...
- Page 4 To obtain service during the warranty period, return the product with proof of purchase to an authorized Amprobe Test Tools Service Center or to an Amprobe dealer or distributor. See Repair Section for details. THIS WARRANTY IS YOUR ONLY REMEDY.
- Page 5 Non-Warranty Repairs and Replacement – US and Canada Non-warranty repairs in the United States and Canada should be sent to a Amprobe® Test Tools Service Center. Call Amprobe® Test Tools or inquire at your point of purchase for current repair and replacement rates.
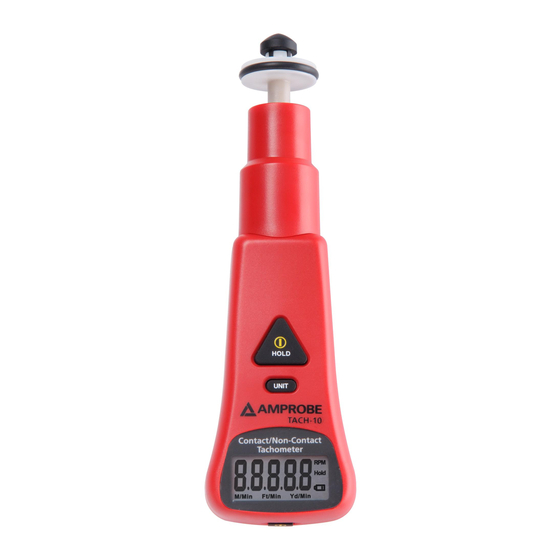
- Page 6 Tach-10 Contact / Non-Contact Tachometer 1). Cone (Convex) contact tip 2). Funnel (Concave) contact 3). Wheel (w/ O-ring) for linear Surface 4). Contact adaptor 5). Non-contact rotation speed sensor 6). Unit select key 7). Power & Hold key 8). Battery cover (rear side) 9).
- Page 7 1). Rotation/Surface speed display 2). Unit of rotation speed 3). Unit of surface speed 4). To freeze the latest display 5). Low battery indicator POWER /HOLD KEY: • To turn on the meter • Push and hold for more than 3 seconds to turn off the meter.
-
Page 8: Table Of Contents
Tach-10 Contact/Non-Contact Tachometer CONTENTS SYMBOLS ................2 Unpacking and Inspection ..........2 Introduction ..............3 Features ................ 3 OPERATION ............... 3 Auto Power Off ............6 SPECIFICATION ..............6 Maintenance and Repair ..........7 Battery Replacement ..........8 Troubleshooting .............. 8... -
Page 9: Symbols
• You can remove the transparent protection film of the LCD if you feel the display is blurred. UNPACKINg AND INSPECTION Your shipping carton should include: TACH-10 meter 9V battery Cone & funnel contact tips Reflective tape If any of the items are damaged or missing, return the complete package to the place of purchase for an exchange. -
Page 10: Introduction
INTRODUCTION Congratulations on your purchase of TACH-10 Contact / Non-Contact Tachometer. A convenient instrument to measure rotation or surface speed via contact or non-contact method. Features • Compact and handy size design • 2 in 1 Contact and Non-contact measurement •... - Page 11 • Push either POWER key to turn on the meter. • Fit the tip into the rotating object and the readings are displayed on the LCD. • For rotating wheels or belts with flat surface, let the O-ring on the meter make contact with the surface.
- Page 12 Step 2: Remove the contact part. Step 3: Attach the reflective tape to the surface of the rotating object. Step 4: Push and hold the MODE SWITCH key to set the meter to RPM. (RPM only ) Step 5: Hold the meter and point it toward the rotating object targeting the reflective tape.
-
Page 13: Specification
Auto Power Off The meter turns OFF automatically after 20 minutes of inactivity. To disable the sleep mode, hold down POWER and UNIT keys simultaneously to turn on the meter. First, release POWER key, and it shows " n " on the LCD (Fig. 3). Then release UNIT key and it enters measuring mode in non-sleep status. -
Page 14: Maintenance And Repair
Weight ~90g (0.2 lb) Battery 9V battery LCD size 15(H)x33(W)mm (0.6 x 1.3 IN) Power consumption 5uA(Idle), 18mA(measurement) Time base 4.0Mhz Quartz Crystal Sampling time 1 second (>60RPM), >1 second (10~60RPM) Measure distance 5~30cm / 2~13 IN (non-contact) � - EMC: Conforms to EN61326-1. This product complies with requirements of the following European Community Directives: 89/ 336/ EEC (Electromagnetic Compatibility) and 73/ 23/ EEC... -
Page 15: Battery Replacement
Battery Replacement Replace your battery when low battery icon appears on LCD. To replace the battery: 1. Open the battery compartment cover 2. Remove the old battery and replace it with a new 9V battery 3. Close the battery compartment cover TROUBLESHOOTINg 1. - Page 17 TACH-10 Berührungsbasiertes / berührungsloses Tachometer Bedienungsanleitung Mai 2010, Rev. 1 © 2010 Amprobe Test Tools. Alle Rechte vorbehalten. In China gedruckt.
- Page 18 Nutzung und Einsatzbedingungen werden nicht durch die Garantie abgedeckt. Händler sind nicht berechtigt, jegliche Erweiterungen der Garantie im Namen von Amprobe in Aussicht zu stellen. Um Serviceleistungen während der Garantiezeit in Anspruch zu nehmen, übergeben Sie das Produkt mitsamt Kaufbeleg einem autorisierten Amprobe-Prüfwerkzeuge-...
- Page 19 Eine Liste mit Distributoren in Ihrer Nähe finden Sie im Bezugsquellen-Bereich bei www.amprobe.com. In den USA und in Kanada können Geräte zum Austausch oder zur Reparatur auch an das Amprobe® Test Tools-Servicecenter (Anschrift weiter unten) eingesandt werden. Reparatur und Austausch außerhalb der Garantiezeit – USA und Kanada Außerhalb der Garantiezeit sollten Geräte in den USA und in...
- Page 20 Tach-10 – berührungsbasiertes / berührungsloses Tachometer 1). Konische (konvexe) Kontaktspitze 2). Trichterförmige (konkave) Kontaktspitze 3). Rad (mit Dichtungsring) für lineare Oberfläche 4). Berührungsbasierter Adapter 5). Berührungsloser Rotationsgeschwindigkeitssensor 6). Einheitenauswahltaste 7). Ein-/Aus- und Halten-Taste 8). Batteriefachabdeckung (Rückseite) 9). Ein-/Austaste (Unterseite) 10). Frontblende und LCD-Display 11).
- Page 21 1). Anzeige der Rotations-/Oberflächengeschwindigkeit 2). Einheit der Rotationsgeschwindigkeit 3). Einheit der Oberflächengeschwindigkeit 4). So frieren Sie die aktuellste Anzeige ein 5). Energiestandwarnung Ein-/Aus- / HOLD-Taste: • Zum Einschalten des Messgerätes • Zum Ausschalten des Messgerätes länger als 3 Sekunden gedrückt halten. •...
- Page 22 Tach-10 – berührungsbasiertes / berührungsloses Tachometer INHALT SYMBOLE ................2 Auspacken und prüfen ............. 2 Einleitung ................3 Merkmale ..............3 Bedienung ................. 3 Automatische Abschaltung ........6 TECHNISCHE DATEN ............6 Wartung und Reparatur ........... 7 Batteriewechsel ............8...
-
Page 23: Symbole
• Sie können die transparente Schutzfolie des LCDs entfernen, wenn Sie den Eindruck haben, dass die Anzeige verschwommen ist. AUSPACKEN UND PRüFEN Folgendes sollte im Lieferumfang enthalten sein: TACH-10-Messgerät 9-V-Batterie Konische und trichterförmige Kontaktspitzen Reflektierendes Klebeband Falls etwas fehlen oder beschädigt sein sollte, lassen Sie bitte das komplette Paket von Ihrem Händler gegen ein... -
Page 24: Einleitung
Einleitung Herzlichen Glückwunsch zum Kauf des berührungsbasierten / berührungslosen Tachometers TACH-10. Ein komfortables Instrument zur Messung der Dreh- und Oberflächengeschwindigkeit mittels berührungsbasierter oder berührungsloser Methode. Merkmale • Kompaktes, handliches Design • Berührungsbasierte und berührungslose 2-in-1- Messung • Drei einfache Schritte zum Wechseln des Messmodus •... - Page 25 • Drücken Sie eine der Ein-/Austasten zum Einschalten des Messgerätes. • Bringen Sie die Spitze im rotierenden Objekt an und die Messungen werden am LCD angezeigt. • Bei rotierenden Rädern oder Gurten mit flacher Oberfläche berühren Sie mit dem Dichtungsring am Messgerät die Oberfläche.
- Page 26 Schritt 2: Entfernen Sie den Kontaktteil. Schritt 3: Bringen Sie das reflektierende Klebeband an der Oberfläche des rotierenden Objekts an. Schritt 4: Halten Sie die Modustaste gedrückt, um das Messgerät auf U/min einzustellen. (RPM only ) Schritt 5: Halten Sie das Messgerät und richten Sie es auf das rotierende Objekt, das das reflektierende Klebeband anvisiert.
-
Page 27: Technische Daten
Automatische Abschaltung Das Messgerät schaltet sich nach 20-minütiger Inaktivität automatisch aus. Zum Deaktivieren des Ruhezustands Ein-/Aus- und UNIT-Taste zum Einschalten des Messgerätes gleichzeitig gedrückt halten. Lassen Sie erst die Ein-/ Austaste los und „ n “ erscheint am LCD (Abb. 3). Lassen Sie dann die UNIT-Taste los und Sie gelangen in den Messmodus (außer im Ruhezustand). -
Page 28: Wartung Und Reparatur
Gewicht Ca. 90 g (0,2 lb) Batterie 9-V-Batterie LCD-Größe 15 x 33 mm (H x B) (0,6 x 1,3 in) 5 uA (Inaktivität), Stromverbrauch 18 mA (Messung) 4-MHz-Quarzkristall Zeitbasis Sekunde (>60 U/min), Abtastzeit1 >1 Sekunde (10 – 60 U/min) 5 – 30 cm / 2 – 13 in Messabstand (berührungslos) �... -
Page 29: Batteriewechsel
Batteriewechsel Ersetzen Sie Ihre Batterie, wenn die Energiestandwarnung am LCD erscheint. So ersetzen Sie die Batterie: 1. Öffnen Sie die Batteriefachabdeckung 2. Entfernen Sie die alte Batterie und ersetzen Sie sie durch eine neue 9-V-Batterie 3. Schließen Sie die Batteriefachabdeckung Problemlösung 1.
Need help?
Do you have a question about the TACH-10 and is the answer not in the manual?
Questions and answers