Yealink CP920 Quick Start Manual
Hd ip conference phone
Hide thumbs
Also See for CP920:
- User manual (176 pages) ,
- Quick start manual (93 pages) ,
- Instruction manual (84 pages)

Related Manuals for Yealink CP920


Summary of Contents for Yealink CP920
- Page 1 HD IP Conference Phone CP920 English | 简体中文 Quick Start Guide (V81.11) www.yealink.com Applies to firmware version 78.81.0.10 or later.
- Page 3 Table of Contents English ............1 简体中文 ............. 7...
-
Page 4: Packaging Contents
Configuring Your Phone for more information. Note: The IP phone should be used with Yealink original power adapter (12V/1A) only. If inline power (PoE) is provided, you don’t need to connect the power adapter. Make sure the hub/switch is PoE-compliant. -
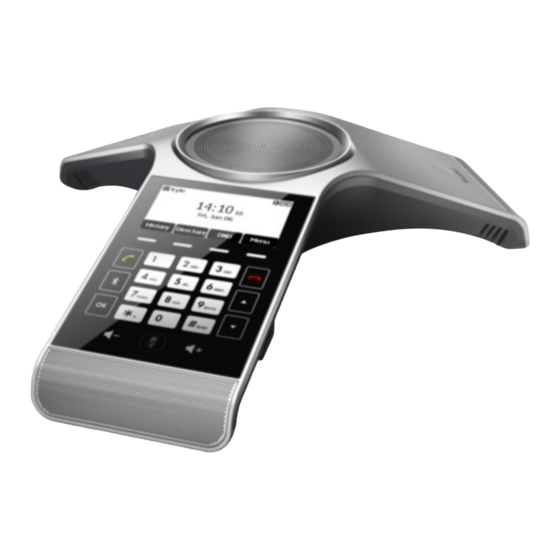
Page 5: Hardware Component Instructions
2. Connect the optional USB flash drive. Startup After the IP phone is connected to the network and supplied with Welcome power, it automatically begins the initialization process. After startup, the phone is ready for use. You can configure the phone Initializing...Please wait via web user interface or phone user interface. -
Page 6: Configuring Your Phone
Configuring Your Phone Configuring via web user interface Accessing the web user interface: 1. Tap OK to obtain the IP address of the phone. 2. Open a web browser on your computer, enter the IP address into the address bar (for example, “http://192.168.0.10”... -
Page 7: Basic Call Features
5. Tap the Connect soft key to connect to the wireless network. 6. If the network is secure, enter its password in the Password field, and then tap the OK soft key. Account Settings: Tap the Menu soft key, select Settings->Advanced Settings (default password: admin) ->Accounts to configure the account. - Page 8 Call Recording You can insert a USB flash drive into the USB port on your phone to record active calls. To record audio calls: 1. Tap the More soft key, and then tap the StartREC soft key during a call. 2.
-
Page 9: Customizing Your Phone
Customizing Your Phone Local Directory To add a contact: 1. Tap the Directory soft key from the Idle screen. 2. Select Local Directory->All Contacts. 3. Tap the Add soft key to add a contact. 4. Enter a unique contact name in the Name field and contact numbers in the corresponding fields. 5. - Page 10 包装清单 7.5米 快速入门指南 IP会议电话 UTP超5类以太网线 电源适配器 说明:我们推荐使用由Yealink提供或经Yealink认可的配件,使用未经认可的第三方配件可能会导致性能的下降。 安装电话 1. 连接电源和网线: 话机支持两种供电方式。请根据实际情况选择以下任意一种方式: AC 电源 简 Internet 体 IEEE 802.3af 标准 电源适配器 PoE 集线器/交换机 中 文 话机也支持连接到无线网络(Wi-Fi)。想要了解更多信息,请参考配置话机章节中的无线网络连接。 说明:我们要求使用Yealink原装电源(12V/1A),使用第三方电源可能会导致话机损坏。如果使用POE供电方式,话机不需要连接电源适配器。 确保交换机/集线器支持POE供电。...
- Page 11 2. 连接U盘(可选): 启动 在话机连接上网络和电源后,话机自动启动。启动完成后, Welcome 话机能正常使用。你可以通过Web界或话机界面配置话机。 Initializing...Please wait 硬件介绍 麦克风 静音键 扬声器 LCD显示屏 Welcome Initializing...Please wait 简 软键 体 拨号键 挂机键 中 向上导航键 蓝牙键 键盘 文 向下导航键 OK键 音量(+)键 音量(-)键...
- Page 12 配置话机 通过Web界面配置话机 访问Web界面: 1.在空闲界面上,按OK查看话机的IP地址。 2.打开电脑上的网页浏览器,在地址栏里输入话机的IP地址。 (例如:http://192.168.0.10或192.168.0.10),按 Enter键。 3.在登录界面的用户名输入框中输入管理员用户名“admin”,密码输入框中输入管理员密码“admin”, 点击提交。 网络配置:点击网络配置->基础->IPv4配置。 你可以通过以下方式配置网络: DHCP:话机默认通过DHCP服务器获取网络配置。例如:IP地址、子网掩码、网关和DNS服务器。 静态IP地址:如果话机无法通过DHCP服务器获取网络配置,你需要手动配置IP地址、子网掩码、网关、首选DNS 服务器和备选DNS服务器。 说明:话机的网络配置也支持IPv6协议,但IPv6默认是关闭的。 错误的网络设置会导致网络不可用,也可能对网络的性能造成影响。请咨询你的系统管理员了解更多信息。 账号配置:点击账号->注册。 账号参数: 注册状态: 显示当前账号的注册状态。 线路激活: 启用/禁用账号。 标签: 显示在显示屏上的账号标签。 显示名称: 呼出号码时,显示在对方话机上的名称。 注册名称: 由网络技术服务提供商提供 (必填)。 用户名称: 由网络技术服务提供商提供 (必填)。 密码: 由网络技术服务提供商提供 (必填)。 SIP服务器: 由网络技术服务提供商提供 (必填)。 话机LCD显示屏显示账号注册状态的图标: 无账号 注册上...
- Page 13 4. 按连接软键。 5. 如果要连接一个加密的网络,在密码区域中输入密码, 然后按OK软键。 账号配置: 在空闲界面上,按菜单软键,选择设置->高级设置(默认密码:admin)->账号。 基本功能 拨打电话 使用下面的任意一种方式拨打: 。 按 输入号码,然后按 , , 或发送软键。 - 输入号码。 按 , , 或发送软键。 接听电话 按应答软键。 结束通话 按挂断软键。 静音或取消静音 开启通话静音: 在通话中,按触摸屏上的 。静音键的LED灯红色常亮。 取消通话静音: 再次按触摸屏上的 。静音键的LED灯绿色常亮。 通话保持和恢复 通话保持: 在通话中,按保持软键。 恢复通话: 按恢复软键。 会议 话机最多支持五方会议。 创建五方本地会议通话:...
- Page 14 通话录音 你可以在话机上插上U盘录制音频通话。 录制音频通话: 1. 在通话中,按更多软键,然后选择开始录音。 2. 按暂停录音软键录音暂停,按恢复录音软键录音恢复。 3. 按停止录音软键录音结束,录音文件自动保存。 如果你结束通话,录音将在通话结束时自动保存。 呼叫转移 你可以转移当前来电,或转移所有来电 。 转移当前来电: 1. 在来电界面,按转移软键。 2. 输入你希望转移到的号码。 你也可以从联系人中选择一个联系人。来电将直接转移到该联系人。 3. 按转移。 转移所有来电: 1. 按菜单软键。 2. 依次选择功能->呼叫转移。 3. 选择呼叫转移的类型: 无条件转移----话机的所有来电,将被无条件自动转移到预先指定的号码。 遇忙转移------当话机忙时,来电将被转移到预先指定的号码。 无应答转移----当话机在指定的响铃时间内无应答时,来电将被转移到预先指定的号码。 4. 打开相应的开关。 5. 输入你希望转移到的号码。 6. 如果选择无应答转移,在响铃时长区域选择转移前等待的响铃时间。 7. 按保存软键保存操作。 通话转接 你可以使用下述三种方式将通话转接到另一方:...
- Page 15 自定义话机 联系人 添加联系人: 1. 在空闲界面上,按联系人软键。 2. 依次选择本地联系人->所有联系人 。 3. 选择需要添加的联系人,按添加软键。 4. 在姓名区域输入联系人姓名,在相应的区域输入联系人号码。 5. 按保存软键操作。 编辑联系人: 1. 在空闲界面上,按联系人软键。 2. 选择本地联系人->所有联系人。 3. 选择需要的联系人,按选项软键,然后选择详情。 4. 编辑联系人信息。 5. 按保存软键操作。 删除联系人: 1. 在空闲界面上,按联系人软键。 2. 依次选择本地联系人->所有联系人。 3. 选择联系人,按选项软键,然后选择删除。 4 显示屏弹出“删除选中条目?”,按确定删除联系人。 说明:你可以从历史记录中添加联系人。了解更多信息,请参考历史记录章节。 历史记录 1. 在空闲界面上,按历史记录软键。 2. 选择所有通话。 3.
- Page 16 “Easy collaboration, high productivity.” The company’s high-quality UC terminal solutions enhance the work efficiency and competitive advantages of its customers in over 100 countries. Yealink is the world’s second-largest SIP phone provider and is number one in the China market.
Need help?
Do you have a question about the CP920 and is the answer not in the manual?
Questions and answers