Table of Contents

Related Manuals for Fluke Ti9


Summary of Contents for Fluke Ti9
- Page 1 Thermal Imager Users Manual PN 2803044 August 2007, Rev.2, 8/10 © 2007-2010 Fluke Corporation. All rights reserved. Printed in USA. Specifications are subject to change without notice. All product names are trademarks of their respective companies.
- Page 2 -20 C, and goes up to +100 C for the TiRx, TiR and TiR1, +250 C for the Ti9 and Ti10 and +350 C for the Ti25. The thermal image can be displayed using any one of a number of color palettes, depending on the model.
-
Page 3: How To Contact Fluke
How to Contact Fluke To contact Fluke, call one of the following telephone numbers: USA: 1-800-760-4523 Canada: 1-800-36-FLUKE (1-800-363-5853) Europe: +31 402-675-200 Japan: +81-3-3434-0181 Singapore: +65-738-5655 Anywhere in the world: +1-425-446-5500 Or, visit Fluke's website at www.fluke.com.... -
Page 4: Charging The Battery
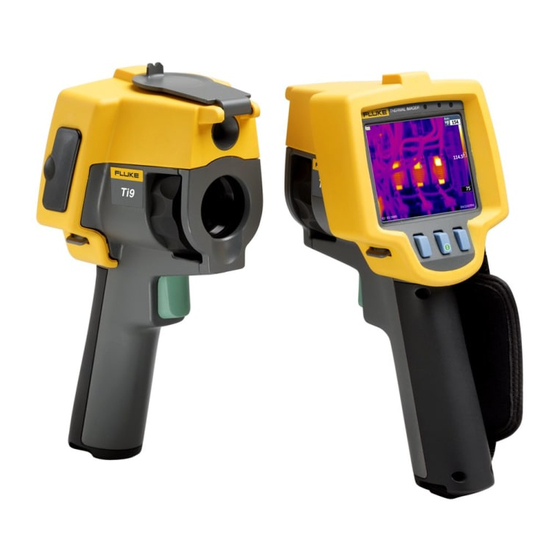
Imager in sleep mode or audio paused. Do not dispose of this product as unsorted municipal waste. Go to Fluke's website for recycling information. Charging the Battery Before using the Imager for the first time, charge the battery for at least two hours. - Page 5 Turning the Imager On and Off To turn the Imager on or off, press the center softkey (2) for two seconds. Features and Controls Item Description LCD Display Function Softkeys (F1, F2, and F3) Battery Cover Speaker Microphone Auto backlight sensor Hand strap AC adapter/charger input terminal SD memory card compartment...
-
Page 6: Using The Menu
Using the Menu The menus, coupled with the three softkeys (c, a, and d), provide access for setting features (date, time, language, units, backlight and spot temperatures), thermal image display, and saving and viewing stored images. To bring up the menu, press a. The text above each function softkey (c, a, and d) corresponds to that softkey throughout all menu screens. -
Page 7: Focusing And Capturing An Image
(approx. 18 inches). IR-Fusion and visible light images are unavailable on the Ti9 or TiRx Thermal Imagers. The Imager can save the image as a simple picture or as a radiometric image that allows further temperature analysis. To change the saved image format, see the “Setting File Format”... - Page 8 Saving Imager Data The Imager saves displayed data on an SD card placed into the camera. See the “Changing the SD Card” section for inserting and ejecting an SD card. The file format set on the Imager determines how the measured information is stored on the SD card.
- Page 9 Fast Auto Rescale (Ti10, Ti25, TiR, TiR1) When in Manual Range and NOT in a menu mode, press F3 for ½ second to automatically rescale the level and span range for objects within the Imager’s thermal field of view. It powers up in the same Range mode, Auto or Manual, as when it powered down. Total Imager Range Level Span...
-
Page 10: Reviewing And Deleting Stored Images
Setting the Temperature Span (Manual) When put into manual ranging, the span setting adjusts the palette over a temperature range within the total range of the Imager. See Figure 1. To adjust the temperature span: 1. After entering the manual range mode (See the “Setting the Range”... -
Page 11: Changing The Temperature Units
The TiR1 and Ti25 have the ability to set emissivity by directly entering a value or using a table of built-in values. The TiRx, TiR, Ti9, and Ti10 have emissivity that is permanently fixed at 0.95, which works well for most surfaces but can provide very inaccurate reading if used directly on a shiny metal surface. -
Page 12: Setting File Format
PC for further analysis and report generation through Fluke SmartView software or non-Fluke software that is available from specially approved software vendors. Visit the Fluke web site or contact Fluke to find out about currently available software options. SmartView Software ... -
Page 13: Setting The Backlight
Always operate the Imager within the temperature range specified in the specifications labeled Temperature – Operating. ~ W Caution Do not incinerate the Imager and/or battery. Go to Fluke’s website for recycling information. -
Page 14: General Specifications
TiR Users Manual General Specifications Temperature Operating............. -10 C to 50 C (14 F to 122 F) Storage..............-20 C to 50 C (-4 F to 122 F) without batteries Charging.............. 0 C to 40 C (32 F to 104 F) Relative Humidity .......... -
Page 15: Detailed Specifications
Thermal Imagers Detailed Specifications Size (H x W x L) ............. 10 in x 5 in x 6 in (25.4 cm x 12.7 cm x 15.2 cm) Weight..............1.1 kg (2.35 lb) Enclosure Rating ..........IP54 Warranty ..............2 years Calibration Cycle .......... - Page 16 Cambridge Carbon Footprint ticamera@cambridgecarbonfootprint.org...
Need help?
Do you have a question about the Ti9 and is the answer not in the manual?
Questions and answers