Table of Contents
Advertisement
Quick Links
Please dispose of packaging for the product in a responsible
manner. It is suitable
environment, take the packaging to the local amenity tip and
place into the appropriate recycling bin.
Never dispose of electrical equipment or batteries in with your
domestic waste. If your supplier offers a disposal facility please
use it or alternatively use a recognised re-cycling agent. This will
allow the recycling of raw materials and help protect the envi-
ronment.
FOR HELP OR ADVICE ON THIS PRODUCT PLEASE CONTACT YOUR DISTRIBUTOR,
OR SIP DIRECTLY ON:
TEL: 01509500400
EMAIL: sales@sip-group.com or technical@sip-group.com
www.sip-group.com
Ref: 290916
for recycling.
Help to protect the
40
190 Amp Welder / Generator
Please read and fully understand the instructions in this manual
before operation. Keep this manual safe for future reference.
25115
1
Advertisement
Table of Contents

Related Manuals for SIP 25115


Summary of Contents for SIP 25115
- Page 1 This will allow the recycling of raw materials and help protect the envi- ronment. FOR HELP OR ADVICE ON THIS PRODUCT PLEASE CONTACT YOUR DISTRIBUTOR, OR SIP DIRECTLY ON: TEL: 01509500400 25115 EMAIL: sales@sip-group.com or technical@sip-group.com www.sip-group.com...
- Page 2 Leicestershire LE12 9NH England As the manufacturer's authorised representative within the EC declare that the SIP 190 Amp Welder / Generator - SIP Part No. 25115 Conforms to the requirements of the following directive(s), as indicated. 2006/42/EC Machinery Directive 2014/35/EU...
-
Page 3: Table Of Contents
NOTES CONTENTS Page 3 Contents Page 4 Safety Symbols Used Throughout This Manual Page 4 Safety Instructions Page 13 Technical specifications Page 13 Contents & Accessories Page 14 Getting To Know Your Welder / Generator Page 15 Electrical connections Page 16 Guarantee Page 16 Assembly Instructions... -
Page 4: Safety Symbols Used Throughout This Manual
SAFETY SYMBOLS USED THROUGHOUT THIS MANUAL NOTES Danger / Caution: Indicates risk of personal injury and/or the possibility of damage. Warning: Risk of electrical injury or damage! Note: Supplementary information. Hot! A warning of parts that may become hot during normal opera- tion Flammable! A warning that there is a risk of fire if not handled safely. - Page 5 KEEP ALL COVERS / PANELS IN PLACE: Never operate the welder/generator with any co- vers / panels removed, this is extremely dangerous. USE ONLY RECOMMENDED ACCESSORIES: Consult this user manual, your distributor or SIP directly for recommended accessories. Follow the instructions that accompany the ac- cessories.
- Page 6 Before starting or servicing the Welder/Generator, read and understand all instruc- tions. Failure to follow safety precautions or instructions can cause equipment dam- Ref. No. Description SIP Part No. Ref. No. Description SIP Part No. age and/or serious personal injury. Retain all manuals for future reference.
- Page 7 EXPLODED DRAWING SAFETY INSTRUCTIONS….cont Be sure to store petrol in clean containers that do not contain water, dirt or rust as ENGINE these contaminants could enter the engine which will reduce the life of the engine, and may void your warranty. Always follow local laws / regulations regarding the storage of fuels.
- Page 8 Earth point Front Panel Ref. No. Description SIP Part No. Ref. No. Description SIP Part No. G01. Washer PW01-00668 G10.
- Page 9 Grounds connected to building frame work or other remote locations from the welding area reduce Ref No. Description SIP Part No. Ref No. Description SIP Part No. efficiency and increase the potential electric shock hazard. Avoid the possibility F01.
- Page 10 Consult HSE INDG214, HSG250 and CS15. HSE docu- ment CS15 includes information on cleaning by thorough steam or solvent/ Ref No. Description SIP Part No. Ref No. Description SIP Part No. caustic cleaning followed by purging and inserting with nitrogen, carbon diox- ide or water filling just below working level.
- Page 11 Protect other nearby personnel from arc rays and hot sparks with a suitable non- flammable partition. VENTILATION Ref No. Description SIP Part No. Ref No. Description SIP Part No Ventilation must be adequate to remove the smoke and fumes during welding D01-D08.
- Page 12 When using the welder always ensure the operator as well as those Ref. No. Description SIP Part No. Ref. No. Description SIP Part No. in the area use a welding mask with the correct shade filter lens.
-
Page 13: Technical Specifications
PARTS LIST TECHNICAL SPECIFICATIONS MAIN PARTS Name SIP 190amp Welder / Generator Part Number 25115 Ref. No. Description SIP Part No. Ref. No. Description SIP Part No. Engine Type 4-stroke, single cylinder, air cooled, OHV Engine PW01-00490 A34. Spring Washer... -
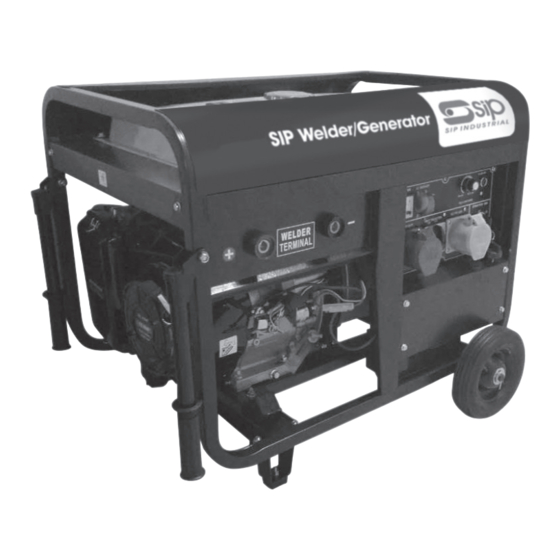
Page 14: Getting To Know Your Welder / Generator
GETTING TO KNOW YOUR WELDER / GENERATOR EXPLODED DRAWING MAIN PARTS Ref: Description Ref: Description Handle Welding Output Control Recoil Assembly Low Oil Alert Air Filter Assembly AC ~ 115v Outlet Fuel On / Off Tap Engine Start / Stop Key Positive Welding Terminal Wheel Negative Welding Terminal... -
Page 15: Electrical Connections
MAINTENANCE ELECTRICAL CONNECTIONS Connecting tools etc. to the generator: Part Action Before First month Every 3 Every 6 Every 12 each use or 20 months or months or months or This welder / generator is fitted with 2 standard 32 amp type sockets (1 x 115V~ & 1 x hours 50 hours 100 hours... -
Page 16: Guarantee
OPERATING INSTRUCTIONS….cont WELDING Guarantee: This SIP welder / generator is covered by a 12 month parts and labour warranty cover- Ensure all protective equipment is worn and bystanders are not in Caution: ing failure due to manufacturers defects. This does not cover failure due to misuse or the vicinity. - Page 17 OPERATING INSTRUCTIONS….cont ASSEMBLY INSTRUCTIONS….cont OPERATING THE WELDER Line up the holes on the foot with the corresponding ones at the bottom of the frame, at the same end as the handles (see above, centre). Secure in place by fitting 2 bolts through the holes and tightening the nuts. Caution: Never operate the generator function at the same time as the Follow these instructions to fit the 2nd foot to the opposite side.
-
Page 18: Operating Instructions
OPERATING INSTRUCTIONS OPERATING INSTRUCTIONS….cont Caution: Before you operate the generator ALWAYS check that no dam- Note: it may take a few sharp pulls to get the engine started. age is present and that everything that should be, is tight and secure. FILLING THE CRANKCASE WITH OIL / CHECKING THE OIL LEVEL Note: Allow the engine to run with no load applied for a few minutes to allow the engine to come up to running temperature. - Page 19 OPERATING INSTRUCTIONS….cont OPERATING INSTRUCTIONS….cont Caution: Be sure oil level is maintained. Failure to do so will invalidate any warranty you may have. Step 4: Once the engine is running and warm enough, push the choke lever to the run position. filler cap (oil gauge) Note: Allow the engine to run with no load applied for a few minutes to...
- Page 20 OPERATING INSTRUCTIONS….cont OPERATING INSTRUCTIONS….cont The amount of fuel can be checked by the fuel meter STARTING THE ENGINE - ELECTRIC START on the top of the tank. When the tank is empty; the window will be all white (see top right). Caution: Never start the engine with any load connected to the generator As the tank is filled;...
Need help?
Do you have a question about the 25115 and is the answer not in the manual?
Questions and answers