Seca 727 Instruction Manual And Guarantee
Wireless baby scale
Hide thumbs
Also See for 727:
- Instruction manual (293 pages) ,
- Manual (37 pages) ,
- Service manual (19 pages)
Table of Contents
Advertisement
Quick Links
Advertisement
Table of Contents

Related Manuals for Seca 727


Summary of Contents for Seca 727
- Page 1 727...
- Page 2 Bedienungsanleitung und Garantieerklärung ..3 Instruction manual and guarantee ....43 Mode d’emploi et garantie ......81 Manuale di istruzioni e garanzia .
-
Page 3: Table Of Contents
7.1 Introduction ....66 5.1 Scope of supply ... 57 seca wireless groups ..66 5.2 Removing transport securing Channels . - Page 4 Activating the wireless 10. What do I do if …? ..74 module (SYS) ... . . 68 11. Servicing ....76 Setting up a wireless 12.
-
Page 5: Full Certification
English 1. FULL CERTIFICATION With seca products, you are not only purchasing tech- nology which has been perfected over 100 years, but also quality with official legal certification confirmed by institutions. seca products comply with European directives, standards and national laws. When you buy seca, you buy the future. -
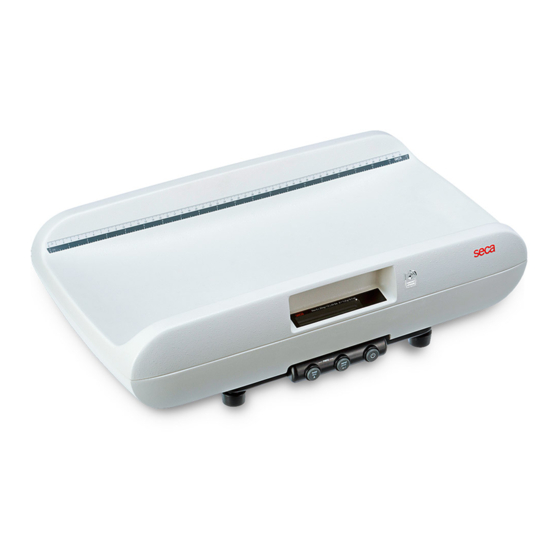
Page 6: Description Of Device
170 years and as a market leader in many countries, is constantly setting new standards with its innovative developments for weighing and measure- ment. -
Page 7: Safety Information
English 3. SAFETY INFORMATION 3.1 Safety information in these instructions for use DANGER! Used to identify an extremely hazardous situa- tion. If you fail to take note of this information, serious irreversible or fatal injuries will occur. WARNING! Used to identify an extremely hazardous situa- tion. - Page 8 The device does not contain any parts for servicing by the user. Only have serv- icing and repairs performed by an authorized seca service partner. • Only use original seca accessories and spare parts, otherwise seca will not grant any war- ranty. CAUTION! Patient hazard, malfunction •...
-
Page 9: Preventing Electric Shock
English • The actual transmission output of HF equip- ment may require minimum distances of more than 1 meter. Preventing electric WARNING! shock Electric shock • Set up the device so that the power supply socket is easy to reach and the device can be disconnected from the power supply quickly. -
Page 10: Avoiding Damage To The Device
Avoiding damage to the ATTENTION! device Damage to device • Ensure that no liquids enter the device. They can damage the electronics. • Switch off the device before disconnecting the power supply unit from the mains socket. • Disconnect the power supply unit from the mains socket if you intend to not use the device for a longer period of time. -
Page 11: Handling The Packaging
Inconsistent measuring results • Before you electronically save measurement values determined using this device and use them further (e.g. in seca PC software or in a hospital information system), make sure that the measurement values are plausible. • If measurement values are transmitted to seca... -
Page 12: Handling The (Rechargeable) Batteries
(incl. rechargeable batteries). This prevents acid from leaking into the device. – If acid leaked into the device, discontinue use. Have the device checked by an authorised seca service partner and repaired if necessary. 52 •... -
Page 13: Overview
English 4. OVERVIEW 4.1 Controls Control Function Arrow key • During weighing: - press briefly: activate Hold function hold - hold down: activate Tare function tare • In the menu: - select submenu, select menu item - set value Enter key •... -
Page 14: Menu Structure
System • Off seca 360° wireless network: • HI Group (ID): • MA Autoprint max. three seca wireless groups: 0, 1, • HI_MA • Off Maximum configuration per wireless group: • Year - 1 baby scale • Month - 1 personal scale •... -
Page 15: Symbols In Display
English 4.3 Symbols in display Symbol Meaning Operation with power pack Non-calibratable function active Battery block low 4.4 Information on device and on rating plate Text/symbol Meaning Model Model number Serial number Follow the instructions for use Type B electrical medical device Protection class II device with protective insulation Value in mass units, which indicates the difference between the values of two adjacent increments... -
Page 16: Information On The Packaging
V max. xxx mA • : note the polarity of the device connector use compatible seca adapter only • : operate device with direct current Do not dispose of device in household waste 4.5 Information on the packaging Protect from moisture Arrows indicate top of product. -
Page 17: Before You Get Started
English 5. BEFORE YOU GET STARTED … 5.1 Scope of supply USA/Japan Euro Australia Component Qty. Scale Length tape measure, self-adhesive Power pack with adapters (depending on model: Euro connector power pack) Battery block, not illustrated Instructions for use, not illustrated 5.2 Removing transport securing device 1. -
Page 18: Inserting And Connecting The Battery Block
This may cause the scale to overheat, catch fire, melt or short-circuit. – Only use genuine seca plug-in power packs with a controlled 12 V output voltage. 1. Insert the power plug necessary for your power supply in the power pack. -
Page 19: Setting Up And Aligning
English 5.4 Setting up and aligning the scale The scale is fully assembled on delivery. Place the scale on a flat, stable surface. NOTICE! Incorrect measurement due to force shunts If the housing of the scale is resting on some- thing, e. -
Page 20: Weighing
1. Ensure that there is no load on the scale. 2. Press the Start key. All the elements of the display are shown briefly, then SECA appears in the display. The scale is ready for operation when the display reads 0.000. -
Page 21: Continuous Display Of Measured Result (Hold)
(see section entitled “Activating the Autohold function (Ahold)” on page 63). Transmitting measured If the scale is integrated in a net- seca 360° wireless work, you can transmit the measured results to results to wireless receive-ready equipment (wireless printer, PC with USB receivers wireless adapter) at the touch of a button. -
Page 22: Switching Off The Scale
Switching off the scale Press the Start key. NOTE The scale switches off automatically after a brief time if no load is placed on it for a certain period. 6.2 Additional functions (menu) Additional functions are available in the menu for the scale. -
Page 23: Activating The Autohold Function (Ahold)
English 3. Keep pressing the arrow key until the required hold tare menu item appears in the display (here: attenuation “FIL”). 4. Confirm your selection with the Enter key. send print The current setting for the menu item or a submenu is displayed (here: level “0”). -
Page 24: Activating Acoustic Signals (Beep)
Activating acoustic You can set whether an acoustic signal is to be emitted signals (BEEP) whenever a key is pressed or a stable weight value has been attained. The latter is relevant for the Hold/Auto- hold function. NOTE The function “Acoustic signal when weighing value is stable”... -
Page 25: Setting The Display Backlighting (Lcd)
English Setting the display You can change the duration and brightness of the backlighting (Lcd) display backlighting. 1. Select the “Lcd” item from the menu. 2. Confirm the selection. 3. Select a menu item – dUr: duration – bri: brightness 4. -
Page 26: Restoring Factory Settings (Reset)
Data can be transmitted to the following devices: • seca wireless printer • PC with seca USB wireless adapter seca wireless groups network operates with wire- seca 360° wireless less groups. -
Page 27: Channels
• 1 personal scale • 1 length measuring rod • 1 seca wireless printer • 1 PC with seca USB wireless adapter Channels Within each wireless group, the devices communicate with each other via three channels (C1, C2, C3). This ensures reliable, troublefree data transmission. -
Page 28: Detecting Devices
• 5, 6 and 8-12: reserved for system expansion 7.2 Operating the scale in a wireless group All the functions required to operate the device in a seca wireless group can be found in submenu “rF”. For information on how to navigate in the menu see page 62. -
Page 29: Setting Up A Wireless Group (Lrn)
NOTE Two-digit channel numbers are displayed with- out a space. The display “C230” means: chan- nel “2”, channel number “30”. 9. Confirm your selection for channel 2. The seca 360° wireless network • 69... -
Page 30: Activating Automatic Transmission (Asend)
The device suggests a channel number for channel 3 (here: “C360”). You can either accept the channel number sug- gested or select another channel number using the arrow key. 10. Confirm your selection for channel 3. The “StOP” message appears in the display. The device is waiting for signals from other devices with wireless transmission capability within range. -
Page 31: Selecting Print Option (Aprt)
NOTE This function is only accessible if the “Learn” function has been used to integrate a seca wireless printer in the wireless group. 1. Switch on the device. 2. Select the menu item “APrt” in the “rF” submenu and confirm your selection. -
Page 32: Hygiene Treatment
4. Set the correct year. 5. Confirm the selection. 6. Repeat steps 4. and 5. as appropriate for “month” (Mon), “day” (dAY), “hour” (hour) and “minute” (Min). 7. Confirm your selection each time. After confirming your setting for “minute”, you exit the menu automatically. -
Page 33: Cleaning
English 8.1 Cleaning Use a soft cloth dampened with mild soapsuds to clean the surfaces of the device. 8.2 Disinfecting ATTENTION! Damage to device The viewing windows of scales and displays are made of acrylic glass. Acrylic glass windows can crack or become cloudy if unsuitable disin- fectants are used on them. -
Page 34: Function Check
“What do I do if ...” in this document, you may not use the device. – Have the device repaired by seca service or by an authorized service partner. – Follow the section entitled “Servicing” in this document. - Page 35 - Wait approx. 15 minutes until scale has adjusted to ambient temperature. The device was unable to send measured results to the wireless receiver (seca wireless printer or PC with seca USB wireless adapter). – Check that the scale is integrated in the wireless network.
-
Page 36: Servicing
(Lrn)” on page 69). 11.SERVICING On leaving the factory, your seca scale has an accu- racy of ±0,15 % or better. To preserve this level of accuracy, the product must be set up with care and serviced regularly. Depending on how frequently the scale is used, we recommended servicing at intervals of 3 to 5 years. -
Page 37: Technical Data
English 12.TECHNICAL DATA 12.1 General technical data General technical data seca 727 Dimensions • Depth 320 mm • Width 551 mm • Height 151 mm Weight approx. 7.1 kg Ambient conditions, operation • Temperature +10 °C to +40 °C (50 °F to 104 °F) •... -
Page 38: Weighing Data
13.OPTIONAL ACCESSORIES seca 360° wireless devices Article number Wireless printer • seca 360° wireless printer 465 Country-specific variants • Country-specific variants seca 360° wireless printer advanced 466 PC software • Application-specific licence seca analytics 115 packages USB wireless adapter • 456-00-00-009 seca 360°... -
Page 39: Spare Parts
English 14.SPARE PARTS Spare part Article number Power pack with Euro connector: 68-32-10-252 230 V~/50 Hz/12 V=/150 mA Switch mode power pack with adapters: 68-32-10-265 100-240 V~/50-60 Hz/12 V=/0.5 A Battery block, 6-part 68-22-12-721 Length tape measure, self-adhesive 19-17-01-264 15.DISPOSAL 15.1 Disposal of device Do not dispose of the device with household waste. -
Page 40: Warranty
The warranty shall become null and void where the device is opened by persons not expressly authorised to do so by seca. We ask customers based abroad to contact their local sales agent directly in the case of warranty claims.
Need help?
Do you have a question about the 727 and is the answer not in the manual?
Questions and answers