
Related Manuals for CareCo Augusta


Summary of Contents for CareCo Augusta
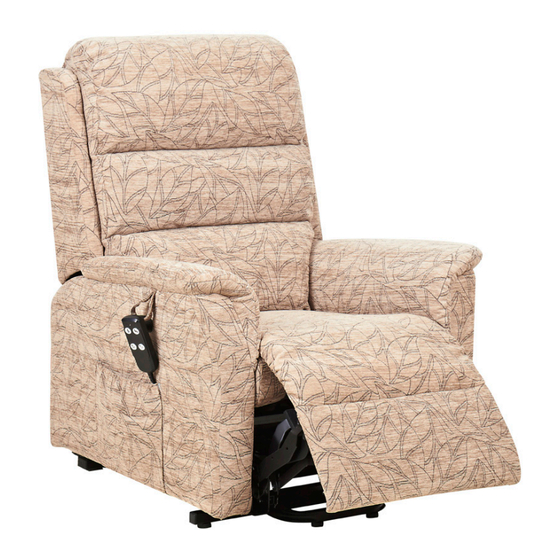
- Page 1 Rise Recliner Chairs OWNERS HANDBOOK CareCo (UK) Ltd Hubert Road Brentwood Essex CM14 4JE...
- Page 2 Customer Services Department via the contact details above for a full explanation. If you think your chair may be damaged, do not use it and contact CareCo for advice. We suggest that you keep this manual in a safe place. It contains essential information regarding the operation of your chair.
-
Page 3: Table Of Contents
Contents ASSEMBLY INSTRUCTIONS – SINGLE MOTOR ASSEMBLY INSTRUCTIONS – DUAL MOTOR ASSEMBLY INSTRUCTIONS – HEAT & MASSAGE REMOTE CONTROL – SINGLE MOTOR HANDSET REMOTE CONTROL – DUAL MOTOR HANDSET REMOTE CONTROL – HEAT & MASSAGE HANDSET POSITIONING YOUR CHAIR GETTING SEATED SAFE SEATING POSITION HAZARD AREAS UPHOLSTERY CARE &... -
Page 4: Assembly Instructions - Single Motor
ASSEMBLY INSTRUCTIONS – SINGLE MOTOR Remove all packaging from the chair base unit and backrest. Carefully unpack all other items and ensure all parts are there. If castors are required: two lockable castors (for rear of chair) and two normal castors (for front of chair) are provided. -
Page 5: Assembly Instructions - Dual Motor
Check that the handset is plugged into Seal fabric from the bottom of the the motor. If not, connect as per diagram backrest to the base of the chair below. using the Velcro strips. Move the chair in the desired position within the room (see section on ‘Positioning Your Chair’) then put your feet up, relax and enjoy! ASSEMBLY INSTRUCTIONS –... -
Page 6: Assembly Instructions - Heat & Massage
Warning! Castors secure the chair but do not lock the chair in place. Castors may not work as well on carpets or rugs with heavy tufting. Slide the backrest into the base using the guides on the sides of the backrest. When the base unit’s protruding prongs are in the guides on either side of the backrest, push down on the backrest to ‘click’... - Page 7 If castors are required: two lockable castors (for rear of chair) and two normal castors (for front of chair) are provided. Remove from packaging. Unscrew the lock- ing nut from the top of the castor and feed through the designated hole on the under- side of the chair.
-
Page 8: Remote Control - Single Motor Handset
Check that the handset is plugged into the motor. If not, connect as per diagram to the left. At the rear of the chair, connect the base and backrest heat and massage functions together by connecting the internal wires (these wires will be loosely protruding from the bottom of the backrest and will be at the rear of the base). -
Page 9: Remote Control - Dual Motor Handset
Opens Footrest/ Opens Footrest/ Lowers Backrest/ Lowers Backrest/ Lowers Chair Lowers Chair Closes Footrest/ Closes Footrest/ Lifts Backrest/ Lifts Backrest/ Lift Chair Lift Chair Push the left-hand button and the chair will rise and automatically stop. Push the right-hand button and the chair will lower. When the chair reaches the sitting position it will automatically go into the recline position. -
Page 10: Remote Control - Heat & Massage Handset
Warning! Never leave the chair unattended with the power on. Warning! Should the heating become uncomfortably hot even when on the LO setting, switch off at the mains and contact CareCo Customer Services. Warning! Should the vibration not stop when commanded or malfunction in any way switch off at the mains and contact CareCo Customer Services. -
Page 11: Positioning Your Chair
POSITIONING YOUR CHAIR If you wish to move the chair for cleaning or for a more comfortable position, please follow the instructions below. Remember to position a telephone within reach so you can call for help in an emergency. • Make sure there is enough space behind the headrest for it to fully recline. -
Page 12: Safe Seating Position
SAFE SEATING POSITION The chair is a lifting device and it is important that you are positioned correctly in the chair when rising and lowering. If the correct body position is not maintained there is a risk of injury or damage to the chair. The central position should be used either in the standing or sitting mode. -
Page 13: Upholstery Care & Maintenance
UPHOLSTERY CARE & MAINTENANCE Caring for Leather & Bonded Leather Upholstery Do not over expose leather or bonded leather to sunlight. Leather and bonded leather furniture must be properly cleaned to keep free of dust and dirt. Please dust frequently and occasionally wipe over with a damp, soft cloth. Let the furniture dry thoroughly before use. -
Page 14: General Trouble-Shooting Guide
Maintenance: The chair is designed to be virtually maintenance free but we do advise that it is checked once every 12 months. Contact Care Co Customer Services on 0845 611 8022 or email: cs@careco.co.uk to arrange a service. On no account should an unqualified person attempt any repairs or maintenance. -
Page 15: Disposal & Recycling
Warning! Springs can cause injury. Be aware that the exposed parts of the mechanism may move quickly and trap fingers or limbs. • Inspect all wiring and connections in the transformer/mains unit and remote control. • Check mechanism is working correctly and is level when raising/lowering. •... -
Page 16: Technical Specification
TECHNICAL SPECIFICATION Weight limits of the CareCo range of Lift and Recliner Chairs is shown below. Do not exceed these limits either by the weight of the person or by having pets, children or other items on your lap when operating the chair. - Page 17 functionally equivalent to, the original product; or 4 Refund the purchase price of the product. A replacement product or part assumes the time remaining on the Guarantee Period of the original product or 30 days from the date of replacement or repair, whichever provides longer coverage.
- Page 18 CareCo (UK) Ltd Hubert Road Brentwood Essex CM14 4JE...
Need help?
Do you have a question about the Augusta and is the answer not in the manual?
Questions and answers