Table of Contents
Advertisement
Quick Links
U
M
ser
anual
Model 381295 and 381295-220
5MHz Dual Channel
True RMS Handheld Oscilloscope
Test Equipment Depot - 800.517.8431 - 99 Washington Street Melrose, MA 02176
FAX 781.665.0780 - TestEquipmentDepot.com
99 Washington Street
Melrose, MA 02176
Phone 781-665-1400
Toll Free 1-800-517-8431
Visit us at www.TestEquipmentDepot.com
Back to the Extech 381295 Product Page
Advertisement
Table of Contents

Subscribe to Our Youtube Channel
Related Manuals for Extech Instruments 381295


Summary of Contents for Extech Instruments 381295
- Page 1 Phone 781-665-1400 Toll Free 1-800-517-8431 Visit us at www.TestEquipmentDepot.com anual Back to the Extech 381295 Product Page Model 381295 and 381295-220 5MHz Dual Channel True RMS Handheld Oscilloscope Test Equipment Depot - 800.517.8431 - 99 Washington Street Melrose, MA 02176...
-
Page 2: Table Of Contents
Setting Trigger Slope..................... 25 Storing and Recalling Screens ................25 Storing Screen....................... 25 Recalling Screen ....................25 PC Interface and Datalogging Software......... 26 Maintaining the Meter ..............29 Battery Replacement................... 259 Appendices ..................31 Troubleshooting guide................... 31 381295 381295-220 V1.3 5/06... -
Page 3: Introduction
Introduction Main Features • Rechargeable batteries and AC Adaptor: Model 381295 (120V, 60Hz) Model 381295-220 (240V, 50Hz) • RS-232C PC interface for viewing, saving, and printing measurement and waveform data. • Dual Channel operation plus Auto Calibration features. • Automatic settings for horizontal and vertical divisions. -
Page 4: Quick-Start Manual
3 Help key: General information for the meter is available with a press of this key. 4 Display back light: Press this button to turn on the backlight. To turn the back light off, press this button again. 381295 381295-220 V1.3 5/06... -
Page 5: Primary Menu Map
2. Pressing moves the waveform down. 3. Pressing moves the waveform left. 4. Pressing moves the waveform right. 381295 381295-220 V1.3 5/06 Test Equipment Depot - 800.517.8431 - 99 Washington Street Melrose, MA 02176 FAX 781.665.0780 - TestEquipmentDepot.com... -
Page 6: Division Key Map
Quick-Start Division key map Pressing DIV calls up the default division menu. 2 Press F2 to control the Channel B Vertical Division. 3 Press F3 to change the Horizontal Division. 4 Press F4 to exit. 381295 381295-220 V1.3 5/06... -
Page 7: Changing Vertical (A/Div Or B/Div) Division
(A/div). 3 Pressing will change Div from MANUAL to AUTO( ). Changing Horizontal division 1 Pressing increases Horizontal division (H/div). 2 Pressing decreases Horizontal division (H/div). 3 Pressing will change Div from MANUAL to AUTO( ). 381295 381295-220 V1.3 5/06... -
Page 8: Trigger Key Map
TRIGGER default menu. 2 Press F2 for Single shot mode. 3 Press F3 for TRIGGER SETUP. 4 Press F4 to exit. Trigger level control 1 Pressing increases the Trigger level. 2 Pressing decreases the Trigger level. 381295 381295-220 V1.3 5/06... -
Page 9: Function Key Map
Quick-Start Function key map 1 Press FUNC to display the FUNCtion default menu. 2 Press F1 for SCOPE SETUP. 3 Press F2 for General SETUP. Press F4 to exit. 381295 381295-220 V1.3 5/06... -
Page 10: Specifications
4 Hours with Backlight OFF, 3 Hours with Backlight Battery Charge Time: 3 Hours approx. AC Adaptor/Charger: Class-2 transformer, Input: 120V AC 60Hz (381295) Input: 240V AC 50Hz, (381295-220) Output: 9V DC 1A Display Type: Super-Twist 132 x 128 pixels Equipment Dimensions: 3.5”... -
Page 11: Oscilloscope Function
50 mV to 500V in 1, 2, 5 sequence Triggering Type CHA, CHB, External Coupling AC, DC Slope Rising (↑) or Falling (↓) edge Internal Trigger 2 / 20 Division Sensitivity Waveform Memory Waveform Memory 16 Screen shots 381295 381295-220 V1.3 5/06... -
Page 12: Digital Multimeter Functions
600V DC or AC rms Frequency Range Resolution Accuracy Overload protection 100 Hz 0.01 Hz 1 kHz 0.0001 kHz 10 kHz 0.001kHz 600V DC ±(0.05%+5) or AC rms 100 kHz 0.01kHz 1 MHz 0.0001MHz 10 MHz 0.001MHz 381295 381295-220 V1.3 5/06... - Page 13 Range Resolution Accuracy 240 - 60,000 1 RPM ±(0.05%+5) Pulse Width Range 2uS-500mS (Pulse Width > 2uS) % Duty Range 25% - 75% 381295 381295-220 V1.3 5/06...
-
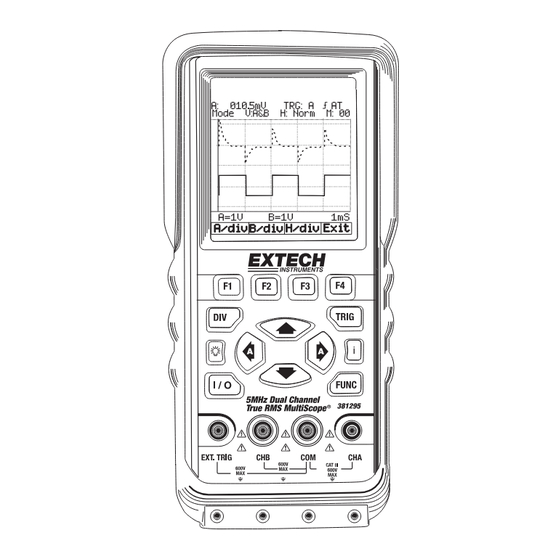
Page 14: Product Description
8) Live Scope Display (Channel A): Displays real time waveforms and freezes held captures. 9) Channel B 10) Channel A Vertical Division 11) Channel B Vertical Division 12) Horizontal Division (Time base) 13) Command Menu Field 381295 381295-220 V1.3 5/06... -
Page 15: Keys Area
Pressing this button changes Vertical division or horizontal division from MANUAL to AUTO. 16) DIV Division key: Set Channel A and B Horizontal Division A/div B/div H/div Exit 381295 381295-220 V1.3 5/06 Test Equipment Depot - 800.517.8431 - 99 Washington Street Melrose, MA 02176 FAX 781.665.0780 - TestEquipmentDepot.com... -
Page 16: Trigger Setup
■ DC □ AC VERTICAL MODE: □ CHA □ CHB □ A&B HORIZONTAL MODE: ■ NORM □ ROLL MEASUREMENTS A: ■ DCV □ ACV □ OHM □ BZ □ HZ □ RPM □ P/W □ DTY Exit 381295 381295-220 V1.3 5/06... -
Page 17: Terminal Area
Use the black COMMON terminal as signal ground for DCV, ACV, Ohm, Continuity, frequency and RPM measurements. ③ CHB: Channel B When measuring two signals, use channel B and channel A. ④ EXT. TRIG External trigger. 381295 381295-220 V1.3 5/06... -
Page 18: Operation
MEASUREMENTS A: ■ DCV □ ACV □ OHM □ BZ □ HZ □ RPM □ P/W □ DTY Exit Use the arrow keys to highlight an item Press F3 to select an item Press F4 to Exit 381295 381295-220 V1.3 5/06... -
Page 19: Frequency Measurements For Cha
You can freeze the screen (all readings and waveforms) at any time. Default (Command Menu) Display: Hold F4 freeze the screen. Highlighted Hold appears at the bottom of the Command Menu area. Hold F4 Resume your measurement Hold 381295 381295-220 V1.3 5/06... -
Page 20: Changing The Graphic Representation
Div is changed to manual mode Decrease the number of periods. Div is changed to manual mode Change Div from Manual mode to AUTO mode 381295 381295-220 V1.3 5/06 Test Equipment Depot - 800.517.8431 - 99 Washington Street Melrose, MA 02176... -
Page 21: Acquiring The Waveform
The roll mode function supplies a visual log of waveform activity and is especially useful when measuring lower frequency waveforms. Note: ROLL MODE operates when the horizontal division is between 1s and 5s Selecting AC-Coupling for INPUT A Highlight AC for INPUT A. F3 SET F4 Exit. 381295 381295-220 V1.3 5/06... -
Page 22: Triggering On A Waveform
(8) Command Menu: Trigger mode (Setup) Setting Trigger level (on NORmal trigger mode) TRIG Open the Trigger menu Singl Tmode Exit Tlvl Adjust the Trigger Level continuously. Observe the horizontal trigger icon on the rightmost time division line. F4 Exit. 381295 381295-220 V1.3 5/06... -
Page 23: Making A Single Acquisition
Tmode Exit Tlvl F3 Open the Trigger Setup TRIGGER SETUP SLOPE: SOURCE: ■ CHA □ CHB □ □ EXT ■ TRIGGER MODE: □ AUTO ■ NOR Exit Highlight an ITEM. F3 Set the ITEM. F4 Exit. 381295 381295-220 V1.3 5/06... -
Page 24: Setting Auto Trigger Level
■ NOR Exit Highlight AUTO. F3 Set AUTO. F4 Exit. Setting Normal Trigger mode Highlight NOR. F3 Set NOR. F4 Exit. Adjust the Trigger Level continuously. Observe the horizontal trigger icon on the rightmost time division line. 381295 381295-220 V1.3 5/06... -
Page 25: Setting Trigger Slope
Memory field (M:00) appears at the top- right corner of the display area. Select the memory address from which to recall the screen. Recall the screen. 381295 381295-220 V1.3 5/06 Test Equipment Depot - 800.517.8431 - 99 Washington Street Melrose, MA 02176 FAX 781.665.0780 - TestEquipmentDepot.com... -
Page 26: Pc Interface And Datalogging Software
Do not run the software program straight from the supplied disk. Main Software Screen After the program is installed, open the program to view the main software screen: 381295 381295-220 V1.3 5/06... - Page 27 Under SETUP select COMM to choose the PC COMM port and the baud rate. Select PRINTER to configure the line printer. Select COLOR to choose the display color configuration. WINDOW Select DATALOGGER to open the Data View recording window (see below) 381295 381295-220 V1.3 5/06...
- Page 28 To open a file of previously stored data, use the BROWSER button. When the file is found and opened, use the LOAD button to recall the data points to the Data View Window. 381295 381295-220 V1.3 5/06...
-
Page 29: Maintaining The Meter
3. Lift the rear cover away from the Meter. 4. Take the battery pack out of the battery compartment. 5. Remove the battery plug from the connector. 6. Install a new battery pack. 7. Reinstall the rear cover and secure the screws. 381295 381295-220 V1.3 5/06... - Page 30 Replacing the Battery 381295 381295-220 V1.3 5/06...
-
Page 31: Appendices
In Auto (AT) mode, the trigger level does not have to be adjusted. • In rare cases, the instrument may require servicing. There are no internal user- serviceable parts. 381295 381295-220 V1.3 5/06 Test Equipment Depot - 800.517.8431 - 99 Washington Street Melrose, MA 02176...
Need help?
Do you have a question about the 381295 and is the answer not in the manual?
Questions and answers