Table of Contents
Advertisement
Advertisement
Table of Contents

Related Manuals for IKEA koppla


Summary of Contents for IKEA koppla
- Page 1 KOPPLA...
-
Page 2: Table Of Contents
CONTENTS START HERE! Insert the batteries in the remote control 4 Set the time and date Program the receiver DIRECT CONTROL Choose channels Functions PROGRAMMING Grouping Choose group Random on/off Delay shut off Timer programming Programming example Deactivate Timer program Activate Timer program OTHER FUNCTIONS Key sound and background... - Page 3 TECHNICAL DATA Remote control Dimmer receiver On/off receiver REMEMBER Installing the wall bracket for the remote control LCD DISPLAY Remote control (fi g 7) Dimmer receiver (fi g 8) On/off receiver (fi g 9) COMPONENT LAYOUT Remote control (fi g 1) Dimmer receiver (fi...
-
Page 4: Start Here
START HERE! Insert the batteries in the remote control Open the battery cover on the back. Insert three AAA/LR03/AM4/ batteries Close the battery cover. Set the time and date Press [FUNCTION] Press [9]... - Page 5 Select time format. You can choose between 12 and 24 hour display. To change between 12 or 24 hour display, press [UP] Press [SET] to continue. 3.1 24 hour display. Enter the time, for example, 15.00. Press [1],[5],[0],[0] 3.2 12 hour display. Enter the time, for ex- ample, 3.00 AM.
- Page 6 State the day of the week. Press [UP] or [DOWN] to change the day of the week. Sunday (SUN) Monday (MON) Tuesday (TUE) Wednesday (WED) Thursday (THU) Friday (FRI) Monday- Friday (M-F) Saturday- Sunday (S-S) Complete week (ALL) Press [SET] to continue.
-
Page 7: Program The Receiver
Program the receiver The receivers must be programmed to recognise signals from the remote control. Each receiver corresponds to a channel on the remote control. Up to 10 channels/receiver can be program- med. Place the receiver in the wall socket. Press [FUNCTION] on the remote control. - Page 8 Press [6] Select channel (1-10), for example, 1. Press Press down one of the buttons on the receiver within 10 seconds. The red lamp on the receiver starts to fl ash to ac- knowledge the receiver has received the signal from the remote control.
-
Page 9: Direct Control
DIRECT CONTROL Choose channels To choose one or more channels (receiver) press [CH] Choose, for example, receiver 2 by pressing [2]. The chosen chan- nels are shown on the top row of the remote control display. If you want to control several receivers at the same time, for exam- ple, receivers 1 and 2,... -
Page 10: Functions
Functions Switching on and off. 1.1 Choose the channel/s. 1.2 Press [ON] to switch on. 1.3 Press [OFF] to switch off. Dimmer. Increase or decrease the brightness. (Only applies to receivers with the dimmer function.) NOTE: Energy saving bulbs do not work. 2.1 Choose the channel/s. - Page 11 Gradual on/off or instant on/off. 4.1 Press [FUNCTION] followed by [1] to switch between gradual on/off and instant on/off. In gradual mode the lights are switched on and off with increasing respective decreasing brightness. In instant mode the lights are switched on and off instantly.
-
Page 12: Programming
PROGRAMMING Grouping Instead of choosing channels one by one you can group and name different channels, e.g. living-room, bedroom, hall, etc. Select group number, for example, 1, by pressing [GRP] followed by [1] Scroll between the groups by pressing [UP] or [DOWN] Press [SET] to state the group names. -
Page 13: Choose Group
Press [SET] to save the group. You can edit the groups by carrying out steps 1-5 to write over or change them. Choose group Select group number, for example, 1, by pressing [GRP] followed by [1] Scroll between the groups using [UP] or [DOWN] Random on/off This function switches chosen lights on... -
Page 14: Delay Shut Off
The function is deactivated by new commands to the chosen channels using the remote control, pressing keys on the receiver or if the receiver is removed from the wall socket. Delay shut off The function switches off the chosen lights after a predefi ned time. You set directly by channel/s or by group. -
Page 15: Timer Programming
Press [FUNCTION] twice followed by [2] State the length of the delay you would like, for example after 15 minutes. The time can be stated between 1-99 minutes. NOTE! Pressing the key again deactivates the function. Timer programming Press [PROG] Select the program number (01-16). - Page 16 Press [SET] to continue. State the time when you would like the command to be ex- ecuted, for example, 6 PM. To state AM/PM press [UP] or [DOWN] Select the day by press- ing [UP] or [DOWN] Sunday (SUN) Monday (MON) Tuesday (TUE) Wednesday (WED) Thursday (THU)
- Page 17 Select the command On = Press [ON] Random on/off = Press [ON] once again. Off = press [OFF] Preset brightness = Press [LEV] followed by a number for the level (1-9). 10. Press [SET] to save the program. 11. You can scroll between the programs by pressing [UP] or [DOWN]...
-
Page 18: Programming Example
Programming example The example shows the following: Switch on (instant) a light connected to receiver/ channel 1 at 18.00 on Saturdays and Sun-days. Switch off the same light at clock 23.00 on Saturdays and Sundays. Each ACTION requires a program, i.e. this example will need two programs saved as PROG 01 and PROG 02. - Page 19 [SET] [ON] [SET] Switch off: [PROG] [0],[2] [SET] [2],[3],[0],[0]...
- Page 20 [DOWN] X times [SET] [SET] [OFF] [SET]...
-
Page 21: Deactivate Timer Program
Deactivate Timer program Choose the program. Press [PROG] followed by the program number. Press [OFF] Activate Timer program Choose the program. Press [PROG] followed by the program number. Press [ON] OTHER FUNCTIONS Key sound and background lighting on/off Press [FUNCTION] followed by [5] Scroll with [ON] or [OFF] to adjust the key... -
Page 22: Key Lock On
Press [SET] to adjust background lighting. Scroll with [ON] or [OFF] to switch the background lighting on or off. Press [SET] Key lock To use the key lock function, enter a 3-digit code by fi rst pressing [FUNCTION] followed by [7] Enter a 3-digit code. -
Page 23: Language Selection
Changing the system code with interference The transmitter automatically sets a sys- tem code when you insert the batteries. If your neighbour also owns a KOPPLA remote control and by chance has the same system code you may experience operating disturbances. You can manu- ally set a system code (01-16). -
Page 24: Receiver
RECEIVER Dimmer receiver (fi g 2) The receiver is only intended for lighting. Installation: Insert the receiver in the outlet socket. The Main lamp, green lamp, comes on when the receiver is connected to the mains supply. Connect the lamp/lamps (max com- bined output 300W) to the receiver. -
Page 25: On/Off Receiver (Fi G 3)
-symbol is shown on the receiver’s LCD display. Press [ON/ OFF] on the receiver for 3 seconds to allow the reception of signals again. Resetting: If commands are not shown on the receiver’s LCD display, strange charac- ters are displayed or it does not react when keys are pressed the receiver needs to be reset. - Page 26 when the receiver powers a connected lamp. Deactivate reception: If do not want the receiver to receive signals from the remote control, press and hold down the [ON/OFF] for 3 seconds. The -symbol is shown on the receiver’s LCD display. Press [ON/ OFF] for 3 seconds to allow the receiver to receive signals from the remote control.
-
Page 27: Technical Data
TECHNICAL DATA Remote control Range: 25 m clear view. Walls and other objects limit the range. Batteries: Three AAA/LR03/AM4/ Micro. Frequency: 433MHz. Dimmer receiver Mains voltage: 120VAC, 60Hz Load: 20- 200W Fuse: 1.6A NOTE: Only incandescent lamps (120V), halogen lamps (120V) and halogen lamps with a transformer (120V) may be connected to the dimmer receiver. -
Page 28: Remember
REMEMBER never overload the receiver. never interconnect the receivers. that the receivers are for indoor use (0°-35°C) and must not be used outdoors. never open the receiver or remote control. never expose the receiver or remote control to strong cleaning agents and moisture. never poke objects in the outlet sockets. -
Page 29: Installing The Wall Bracket For The Remote Control
Installing the wall bracket for the remote control... -
Page 30: Lcd Display
LCD DISPLAY Remote control (fi g 7) Channels Text Off symbol Clock Gradual on/off symbol Instant on/off symbol Signal symbol Battery capacity symbol On symbol 10. Brightness Dimmer receiver (fi g 8) On symbol Brightness Random on/off Reception symbol Channel number On/off receiver (fi... - Page 31 Fig 7 Fig 8 Fig 9...
-
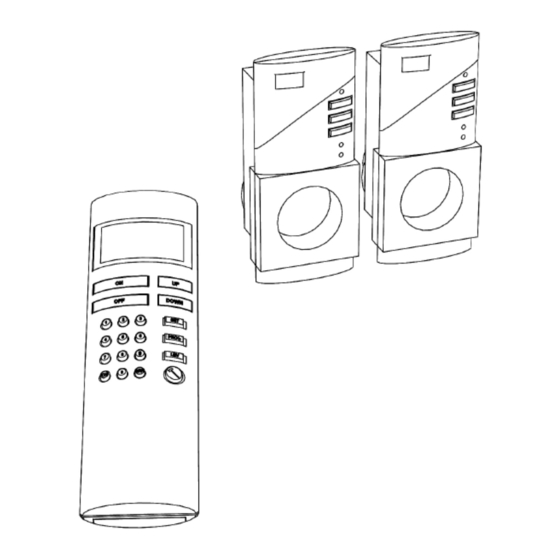
Page 32: Component Layout
COMPONENT LAYOUT Remote control (fi g 1) LCD display (ON) (OFF) Number/letter keys Channel (CH) Group (GRP) Brighter/Menu selection (UP) Darker/Menu selection (DOWN) (SET) 10. Programming (PROG) 11. Brightness level (LEV) 12. Function Dimmer receiver (fi g 2) LCD display (RESET) Brighter (UP) On/Off... - Page 33 Fig 1...
- Page 34 Fig 2 Fig 3...
- Page 35 This equipment has been tested and found to comply with the limits for a Class B digital device, pursuant to Part 15 of the FCC Rules. These limits are designed to provide reasonable protection against harmful interference in a residential installation.
Need help?
Do you have a question about the koppla and is the answer not in the manual?
Questions and answers