PIONEER DJ DJM-S3 Operating Instructions Manual
Hide thumbs
Also See for DJM-S3:
- Firmware update manual (8 pages) ,
- Quick start manual (6 pages) ,
- Operating instructions manual (44 pages)
Table of Contents
Advertisement
Quick Links
Advertisement
Table of Contents

Subscribe to Our Youtube Channel
Related Manuals for PIONEER DJ DJM-S3


Summary of Contents for PIONEER DJ DJM-S3
-
Page 1: Operating Instructions
DJ MIXER DJM-S3 pioneerdj.com/support/ http://serato.com/ The Pioneer DJ site shown above offers FAQs, information on software, and various other types of information and services to allow you to use your product in greater comfort. Operating Instructions... -
Page 2: Table Of Contents
Contents How to read this manual Thank you for buying this Pioneer DJ product. Be sure to read this manual and the “Operating Instructions (Quick Start Guide)” included with the unit. Both documents include important information that you should understand before using this product. -
Page 3: Before Start
(both the individual installing the Program and any single legal This unit is equipped with an internal sound card, enabling you to start entity for which the individual is acting) (“You” or “Your”) and Pioneer DJ playing with Serato DJ immediately by connecting to a computer using a Corporation (“Pioneer DJ”). -
Page 4: Cautions On Installation
In addition to damages and any other remedies to ! The driver software is compatible with the following OSs. which Pioneer DJ may be entitled, You agree that Pioneer DJ may seek Supported operating systems injunctive relief to prevent the actual, threatened or continued breach of macOS Sierra 10.12 (latest update) - Page 5 For information on the latest system requirements, compatibility, and supported operating systems, click [FIND SOFTWARE INFORMATION] on the Pioneer 3 Proceed with installation according to the DJ support page below, and then select [DJM-S3] on the [SOFTWARE INFORMATION] page. instructions on the screen.
- Page 6 7 Click [Close] to quit the Serato DJ installer. Downloading the Serato DJ software manual 1 Launch a web browser on the computer and access the Serato DJ site below. http://serato.com/dj/downloads 2 After clicking [Manuals and Downloads] on the right-hand side of the download page, click the relevant manual.
-
Page 7: Part Names And Functions
Part names and functions Rear panel 1 Cord hook 5 MASTER1 output terminals (page 11 ) Hook the power cord of the AC adaptor to avoid accidentally Connect your equipment, such as powered speakers or a power disconnecting it from the unit. amplifier, to the analog input terminal. -
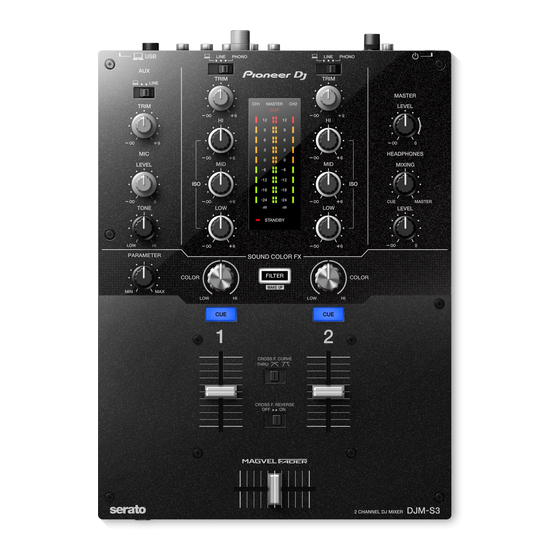
Page 8: Control Panel
Control Panel 1 PHONES terminal (page 11 ) 4 MIC LEVEL control (page 12 ) Connect headphones. Adjust the volume to output from the microphone. This unit supports 1/4” stereo phone plugs and 3.5 mm stereo mini 5 AUX TRIM control plugs. - Page 9 7 TRIM control (page 12 ) Adjust the volume from each channel. 8 ISO (HI, MID, LOW) controls (page 12 ) Adjust the sound quality of the respective channels. 9 Master Level indicator (page 12 ) It shows the volume from the MASTER output. When the volume is too loud, the [CLIP] indicator flashes.
-
Page 10: Connections
! Connect this unit and the computer directly using a USB cable. ! Use USB cables that conform to USB 2.0. ! USB hubs cannot be used. Connecting input terminals Analog player Analog player Microphone Rear panel Computer Pioneer DJ’s DJ player AC adaptor To power outlet Pioneer DJ’s sampler, etc. -
Page 11: Connecting Output Terminals
Connecting output terminals Front panel Rear panel Power amplifier 1 Headphones Powered speakers 1 1 Be sure to use the [MASTER1] output terminals only for a balanced output. Connection with an unbalanced input (such as RCA) using an XLR to RCA converter cable (or converter adapter), etc., may lower the sound quality and/or result in noise. -
Page 12: Operation
Operation Basic Operation Setting the fader curve Switch the [CROSS F.CURVE (THRU, )] selector switch. Outputting sound — [THRU]: Set to this option when not using the cross fader. — [ ]: The curve is increased slowly. 1 Press the switch. —... -
Page 13: Advanced Operations
Advanced Operations Using the SOUND COLOR FX function This is an effect that changes in association with the [COLOR] control. Sound passed through a filter is output. 1 Press the [FILTER] button. The [FILTER] button flashes, and the effect is set for [CH1] and [CH2]. 2 Turn the [COLOR] control. -
Page 14: Using Serato Dj
1 The [EXPANSION PACKS & ACTIVATIONS] icon may appear on the right side of the screen that is displayed when Serato DJ is launched the first time, but there is no need to activate or purchase a license for those using DJM-S3. -
Page 15: Importing Tracks
Importing tracks The following describes the typical procedure for importing tracks. ! There are various ways to import tracks with the Serato DJ software. For details, see the Serato DJ software manual. ! If you are already using Serato DJ software (Scratch Live, ITCH or Serato DJ Intro) and have already created track libraries, the track libraries you have previously created can be used as such. -
Page 16: Using The Dvs System
[DECK2] are input to this unit’s respective channels. The combinations of the decks and the respective channels to which the sound is input are fixed. These combinations are shown below. Correspondence table of Serato DJ software decks and DJM-S3 channels Serato DJ software deck DECK1 DECK2 DJM-S3 channel Set the positions of the controls, etc., as shown... -
Page 17: Controlling The Serato Dj Software
2 Connect the ground wires for the respective analog players to this unit’s [SIGNAL GND] terminals. 3 Set the control vinyls on the analog players. 4 Switch the DJM-S3’s input. Set the input selector switches of [CH1] and [CH2] to the [ ] side. -
Page 18: When Using Dj Players
[DECK2] to the [LINE] terminals of [CH2]. 2 Insert discs recorded with CONTROL signals into the DJ players. 3 Switch the DJM-S3’s input. Set the input selector switches of [CH1] and [CH2] to the [ ] side. Input selector switches 4 Select [SETUP] on the Serato DJ software’s screen,... -
Page 19: When Using Analog Players And Dj Players Simultaneously
[PHONO] terminals of [CH1], and the DJ player used to control [DECK2] to the [LINE] terminals of [CH2]. 2 Switch the DJM-S3’s input. Set the input selector switches of [CH1] and [CH2] to the [ ] side. Input selector switches 3 Select [SETUP] on the Serato DJ software’s screen,... -
Page 20: Checking The Control Signals
3 Move the channel fader away from you. Checking the control signals 4 Turn the [MASTER LEVEL] control to adjust the audio level of the speakers. Press the play button on the connected player and Adjust the sound level output from the [MASTER 1] and [MASTER 2] play track 1. -
Page 21: Changing The Settings
Changing the settings Setting preferences *: Default setting Setting items Setting value Descriptions Setting items Level indicator Setting value Level indicator 0 dB* [CH2] 0 dB or less turns on Set the attenuation level of the sound from [MASTER1] MASTER OUT ATT. [CH1] top indicator flashes –6 dB [CH2] -6 dB or less turns on... -
Page 22: About The Setting Utility Software
For Windows 8.1 In [Apps view], click the [DJM-S3 Settings Utility] icon. For Windows 7 Click [Start] menu > [All Programs] > [Pioneer] > [DJM-S3] > [DJM- S3 Settings Utility]. Setting the audio data to input to this 2 Click the [Mixer Audio Output] pull-down menu. -
Page 23: Checking The Latest Information On The Driver Software
For the latest information on this unit’s dedicated driver software, see transfer of the audio data (latency) increases. the Pioneer DJ site below. pioneerdj.com/support/ ! Operation cannot be guaranteed when multiple units of this mixer are connected to a single computer. -
Page 24: Additional Information
Additional information Troubleshooting ! If you think that there is something wrong with this unit, check the items below, and check [FAQ] for [DJM-S3] on the Pioneer DJ site. pioneerdj.com/support/ Also, check the connected devices. If the problem cannot be resolved, ask your nearest Pioneer authorized service center or your dealer to carry out repair work. -
Page 25: Block Diagram
Block Diagram... -
Page 26: About Trademarks And Registered Trademarks
About trademarks and registered trademarks ! Pioneer DJ is a trademark of PIONEER CORPORATION, and is used under license. ! Microsoft and Windows are either registered trademarks or trademarks of Microsoft Corporation in the United States and/or other countries. ! macOS, OS X, iTunes, and Finder are trademarks of Apple Inc., registered in the U.S.
Need help?
Do you have a question about the DJM-S3 and is the answer not in the manual?
Questions and answers