Minicom Smart CAT5 series Quick Installation Manual
Smart switch 8 and 16 port
Hide thumbs
Also See for Smart CAT5 series:
- User manual (45 pages) ,
- Quick installation manual (10 pages) ,
- User manual (40 pages)
Table of Contents
Advertisement
Quick Links
Download this manual
See also:
User Manual
Supported by:
Technology Corporation
International HQ
Jerusalem, Israel
Tel: + 972 2 535 9666
minicom@minicom.com
www.minicom.com
Smart CAT5 Switch
8 and 16 Port
Quick Installation Guide
®
North American HQ
Linden, New Jersey
Tel: + 1 908 4862100
info.usa@minicom.com
Rackit
®
274 Madison Avenue, New York, NY 10016
Tel: (212) 679-0050 • Fax: (212) 679-0040
1 . 8 0 0 . 6 3 6 . 3 4 3 4
European HQ
Dübendorf, Switzerland
Tel: + 41 1 823 8000
info.europe@minicom.com
Customer support - support@minicom.com
Technology Corporation
Italy
Rome
Tel: + 39 06 8209 7902
info.italy@minicom.com
5UM20113 V1.4 4/04
Advertisement
Table of Contents

Related Manuals for Minicom Smart CAT5 series


Summary of Contents for Minicom Smart CAT5 series
-
Page 1: Smart Cat5 Switch
Linden, New Jersey Dübendorf, Switzerland Rome Tel: + 972 2 535 9666 Tel: + 1 908 4862100 Tel: + 41 1 823 8000 Tel: + 39 06 8209 7902 minicom@minicom.com info.usa@minicom.com info.europe@minicom.com info.italy@minicom.com www.minicom.com Customer support - support@minicom.com 5UM20113 V1.4 4/04... -
Page 2: System Components
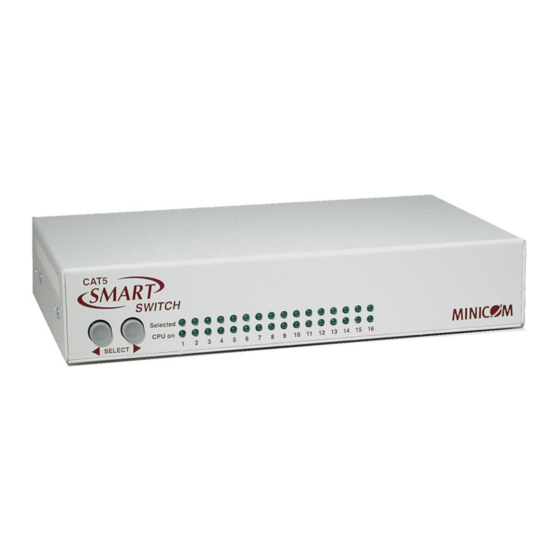
SMART CAT5 SWITCH 1. Introduction Access and control multiple multi-platform computers from one Keyboard Video Mouse (KVM) console with the Smart CAT5 Switch (Smart CAT5) system. The Smart CAT5 comes in 8 and 16 port models. Connect up to 8 computers to the 8 port model, and 16 to the 16 port model. -
Page 3: The Smart Cat5 Models
QUICK INSTALLATION GUIDE 4. The Smart CAT5 models The figure below illustrates the rear panel of the Smart CAT5 16 port unit. The 8 port model is the same but with only 8 Computer ports. COMPUTER POWER 100-250 VAC 50/60 Hz Figure 2 Smart CAT5 16 port rear panel 5. -
Page 4: Connecting The Kvm Console
SMART CAT5 SWITCH Connecting the KVM console Connect a KVM console to the Smart CAT5 as illustrated in Figure 3 above. Connecting a RICC to each computer Connect the 3 types of RICCs as explained below. Connecting a PS/2 RICC Figure 4 illustrates the RICC. -
Page 5: Connecting A Usb Ricc
QUICK INSTALLATION GUIDE Connecting a USB RICC Figure 6 illustrates the USB RICC and its connections. To Video Card To USB Port RICC CAT5 cable to Smart CAT5 Computer port Figure 6 USB RICC Connecting the CAT5 cables 1. Connect one connector to the RICC’s RJ45 port. 2. -
Page 6: Operating The Smart Cat5 System
SMART CAT5 SWITCH 9. Operating the Smart CAT5 system Below is a brief outline of how to switch between computers. See the softcopy User Guide on the Marketing and Documentation CD for the full operating details. Switch between the connected computers by either •... -
Page 7: Rack Mounting The Riccs
QUICK INSTALLATION GUIDE 12. Rack mounting the Smart CAT5 Make sure that the screws used for connecting the bracket to the Smart CAT5 unit, do not exceed 5mm. Use the L-shaped brackets and screws provided to mount the Smart CAT5 on a server rack as illustrated below. - Page 8 Left Ctrl + Alt + F12 Left Windows key Sun Left ◊ key Right Windows key Sun Right ◊ key Alt-Graph Right Alt or Alt Gr Stop A Left Ctrl + Alt +1 © 2003 Minicom Advanced Systems Limited. All rights reserved.
Need help?
Do you have a question about the Smart CAT5 series and is the answer not in the manual?
Questions and answers