
Subscribe to Our Youtube Channel
Related Manuals for Rowi HGK 1000/2/1 TDF Premium


Summary of Contents for Rowi HGK 1000/2/1 TDF Premium
- Page 1 HGK 1000/2/1 TDF Premium HGK 2000/2/1 TDF Premium Article number : 1 03 03 0069; 1 03 03 0070 Bedienungsanleitung Operating Instructions...
- Page 2 Sehr geehrte Kundin, sehr geehrter Kunde, wir freuen uns, dass Sie sich für ein Qualitätsprodukt aus dem Hause ROWI entschieden haben und danken Ihnen für das uns und unseren Produkten entgegengebrachte Vertrau- en. Auf den folgenden Seiten erhalten Sie wichtige Hinweise, die Ihnen eine optimale und sichere Nutzung Ihres Wärmekonvektors erlauben.
- Page 3 Wichtige Warnhinweise Kinder fern halten oder beaufsichtigen. Kinder jünger als 3 Jahre sind fernzu- halten, es sei denn, sie werden ständig überwacht. Kindern ab 3 Jahren und jünger als 8 Jahre dürfen das Gerät nur ein- und ausschalten, wenn sie beaufsichtigt wer- den oder bezüglich des sicheren Gebrauchs des Gerätes unterwiesen wurden und die daraus resultierenden Gefahren verstanden haben, vorausgesetzt, dass das Gerät in seiner normalen Gebrauchslage platziert oder installiert ist.
-
Page 4: Table Of Contents
Inhaltsverzeichnis Konformitätserklärung Produktbeschreibung Allgemeines Typenschild Anwendungsbereich und bestimmungsgemäße Verwendung Produktsicherheit Technische Daten Untersagte Anwendungsbereiche Sicherheitsinformationen 1.7.1 Allgemeine Sicherheitshinweise 1.7.2 Spezifische Sicherheitshinweise Vorbereitung des Produktes für den Betrieb Auspacken des Lieferumfanges Aufbewahren der Originalverpackung Aufstellen des Gerätes 2.3.1 Montage Standfüße 2.3.2 Wandmontage Betriebsanleitung Geräteübersicht Inbetriebnahme und Bedienung... -
Page 5: Konformitätserklärung
Verkehr gebrachten Ausführung den einschlägigen, grundlegenden Sicher heits- und Gesundheitsanforderungen des Produktsicherheitsgesetzes (ProdSG) entsprechen. Bezeichnung des Gerätes: HGK 1000/2/1 TDF Premium Glas-Wärmekonvektoren1000 W Premium, Thermostat + LCD-Display + Fernbedienung HGK 2000/2/1 TDF Premium Glas-Wärmekonvektoren 2000 W Premium,... -
Page 6: Produktbeschreibung
Produktbeschreibung Allgemeines Konvektor-Heizgeräte übertragen durch Konvektion erwärmte Luft in den Raum. Die von unten in den Heizkörper einströmende kühle Raumluft wird im Inneren des Konvektors mit Hilfe von Heizstäben erwärmt. Die so erwärmte Luft strömt an der Oberseite des Geräte geräuschlos in den Raum. -
Page 7: Technische Daten
160 cm Schutzklasse Aufbaumaß (B x T x H) 54,0 x 11,0 x 47,0 cm Produktgewicht 6,6 kg Tab. 1a: Technische Daten HGK 1000/2/1 TDF Premium Modell HGK 2000/2/1 TDF Premium Artikelnummer 1 03 03 0070 Netzanschluss 230 V~50 Hz Max. -
Page 8: Sicherheitsinformationen
Sicherheitsinformationen Allgemeines Eine unsachgemäße Benutzung dieses Gerätes kann schwerwiegende und weit reichende gesundheitliche sowie immense Sachschäden verursachen. Lesen Sie deshalb die folgenden Hinweise sorgfältig durch. Machen Sie sich mit dem Gerät gut vertraut, bevor Sie es in Betrieb nehmen. Nur so kann ein sicherer und einwand- freier Betrieb gewährleistet werden. -
Page 9: 1.7.2 Spezifische Sicherheitshinweise
Mängel. Netzkabel prüfen. Verwenden Sie das Gerät nicht, wenn das Netzkabel Beschädigungen aufweist. Wenden Sie sich bei einer Beschädigung des Netzkabels unbedingt an das ROWI Service-Center. Netzkabel nicht zweckentfremden. Ziehen Sie das Gerät nicht am Kabel und benutzen Sie es nicht, um den Stecker aus der Steckdose zu ziehen. -
Page 10: Vorbereitung Des Produktes Für Den Betrieb
P Das Gerät darf nicht in Umgebungen aufgestellt und betrieben werden, in denen sich Säuren, Dämpfe, explosive oder entflammbare Gase befinden. P Beachten Sie bei der Aufstellung die vorgeschriebenen Sicherheitsabstände. Halten Sie zu allen Seiten sowie zu brennbaren Materialien (Möbel, Gardinen etc.) einen Sicher- heitsabstand von mind. -
Page 11: 2.3.2 Wandmontage
Löcher Ø8 mm (Dübel). 4. Stecken Sie die Dehnbolzen samt Schrauben und die Dübel in die gebohrten Löcher . ca. 22,0 cm Verschlussstück Abb. 1a: Verschlussstück Abb. 1b: Bohrlöcher HGK 1000/2/1 TDF Premium ca. 53,5 cm Haken Dehnbolzen Schraube Haken Dübel... -
Page 12: Betriebsanleitung
5. Drehen Sie anschließend die Schrauben aus den Dehnbolzen heraus. 6. Führen Sie nun die Schrauben durch die Wandhalterung in die vorgebohrten Löcher. 7. Ziehen Sie die Schrauben leicht an. 8. Setzen Sie die Wandhalterung auf die unteren Schrauben auf. Ziehen Sie anschließend alle Schrauben fest an. -
Page 13: Inbetriebnahme Und Bedienung
Inbetriebnahme und Bedienung Nachdem Entfernen der Verpackung und der Montage kann das Gerät in Betrieb genom- men werden. Gehen Sie dabei wie folgt beschrieben vor: 1. Vergewissern Sie sich, dass der Ein-/Ausschalter (siehe Abb. 2, Nr. 3) auf „0“ steht. Schließen Sie dann den Wärmekonvektor an eine geerdete, durch einen FI-Schutzschal- ter abgesicherte Steckdose an. - Page 14 Mit der Taste „ON/OFF“ wird der Standby-Modus aktiviert ON/OFF ON/OFF und wieder deaktiviert. POWER Mit der Taste „POWER“ können Sie zwischen den 2 POWER Heizstufen sowie der Frostschutzfunktion wechseln. Temperatur Mit der Taste „TEMP“ kann die gewünschte Raumtemperatur TEMP von 15 - 50°C eingestellt werden Timer-Funktion Mit der Taste „TIME“...
-
Page 15: Einstellung Der Timer-Funktion
Bei Anwahl des Komfort- oder Sparbetriebs erscheint die Heizspirale im Display. Das Gerät beginnt zu heizen. 4. Wurde die gewünschte Raumtemperatur erreicht unterbricht ein integriertes Thermostat automatisch den Heizvorgang. Ist die Umgebungstemperatur 5°C unter der eingestell- ten Raumtemperatur, beginnt das Gerät wieder zu heizen. Im Display erscheint die Heizsprirale Bei der ersten Inbetriebnahme oder nach einer längeren Heizpause kann es zu einer kurzzeitigen Geruchsbildung kommen. -
Page 16: Abschalten Des Gerätes
Abschalten des Gerätes 1. Um den Heizvorgang zu unterbrechen drücken Sie so oft die Taste „POWER“ (siehe Abb. 4) bis das Frostschutzsymbol (siehe Abb. 3) blinkt. 2. Die Heizspirale (siehe Abb. 3) auf dem Display verschwindet und das Gerät hört auf zu heizen. -
Page 17: Instandhaltung
P Reinigen Sie das Gerät nur mit einem trockenen, weichen Tuch. Verwenden Sie auf keinen Fall scharfe und/oder kratzende Reinigungsmittel. Instandhaltung Beachten Sie, dass bei Reparatur- und Wartungsarbeiten nur Originalteile verwendet wer- den dürfen. Wenden Sie sich ggf. an das ROWI Service-Center (siehe Kapitel 5). Fehlersuche und Reparatur Störung Mögliche Ursache(n) Abhilfe Das Gerät startet nicht. -
Page 18: Reinigung Und Instandhaltung Durch Qualifizierte Personen
Wartungsarbeiten, die nicht in Kapitel 4.2 - 4.3 aufgeführt sind, dürfen nur durch das ROWI Service-Center (siehe Kapitel 5) durchgeführt werden. Bei Wartungsarbeiten inner- halb der ersten 24 Monate, die von nicht durch ROWI autorisierten Personen und Unter- nehmen durchgeführt wurden, verfallen sämtliche Gewährleistungsansprüche. -
Page 19: Online-Registrierung
Service-Leistung ggf. im Rahmen der Gewährleistung abgewickelt werden. P Service-Formular anbringen Befestigen Sie das ausgefüllte Service-Formular gut sichtbar, außen auf der Transport- verpackung. P Gerät einsenden Erst nach Rücksprache mit dem ROWI Service-Center senden Sie das Gerät an folgende Adresse: ROWI Schweißgeräte und Elektrowerkzeuge Vertrieb GmbH Service-Center Augartenstraße 3... -
Page 20: Ersatz- Und Ausstattungsteile
Email. Und schon haben Sie Zugriff auf das umfangreiche Ange- bot von ROWI Inside. Wir wünschen Ihnen viel Spaß damit. Bitte beachten Sie, dass ROWI Inside ein reiner Online-Service ist. Eine postalische Registrierung ist daher nicht möglich. - Page 21 Pos. Bezeichnung Artikel-Nummer Halterung Wandmontage 4 03 03 0640 Hintere Gehäuseabdeckung 4 03 03 0641 Ein-/Ausschalter 4 03 03 0642 Abdeckung Temperaturfühler 4 03 03 0643 Kabelhalterung 4 03 03 0644 Gehäuse Platine 4 03 03 0645 Netzplatine (PCB) 4 03 03 0646 Signalplatine (PCB) 4 03 03 0647 Blechplatte...
-
Page 22: Schaltplan
Schaltplan Heizelement Licht Thermoschutz- schalter Thermosicherung Abb. 6: Schaltplan Entsorgung Die Verpackung sowie sämtliche Verpackungsmaterialien bestehen aus umweltfreundlichen, zu 100 % recyclingfähigen Materialien. Korrekte Entsorgung dieses Produkts Innerhalb der EU weist dieses Symbol darauf hin, dass dieses Produkt nicht über den Hausmüll entsorgt werden darf. -
Page 23: Garantieerklärung
Garantieerklärung Unbeschadet der gesetzlichen Gewährleistungsansprüche gewährt der Hersteller eine Garantie gemäß den Gesetzen Ihres Landes, mindestens jedoch 1 Jahr (in Deutschland 2 Jahre). Garantiebeginn ist das Verkaufsdatum des Gerätes an den Endverbraucher. Die Garantie erstreckt sich ausschließlich auf Mängel, die auf Material- oder Herstellungs- fehler zurückzuführen sind. -
Page 24: Important Information
Dear customer, We are pleased that you have chosen a quality product made by ROWI and would like to thank you for recognizing the high standard of our company and our products. The following pages contain important information allowing you to use your thermal convector optimally and safely. - Page 25 Important Warnings Hold or supervise children away. Children younger than 3 years stay away, unless they are constantly monitored. Children from 3 years and younger than 8 years may operate the equipment on and off, only if they are supervised or the safe use of the equipment have been trained and the resulting risks has been under- stand, provided that the device is placed in its normal position of use or is installed.
- Page 26 Table of Contents Declaration of Conformity Product Description General Type plate Area of application and intended use Product safety Technical data Prohibited areas of application Safety information 1.7.1 General safety notes 1.7.2 Specific safety notes Preparing the Product for Operation Unpacking the scope of supply Keeping the original packaging Setting up the device...
-
Page 27: Declaration Of Conformity
Product Safety directives (ProdSG). Designation of the device: HGK 1000/2/1 TDF Premium Glass thermal convectors 1000 W Premium, thermostat + LCD display + remote control... -
Page 28: Product Description
Product Description General Convector heaters transfer air heated by convection into the room. The cool room air flowing into the heater is heated inside the convector by means of a heating rod. The air heated in this way flows at the top of the device silently into the room. The heated air rises upwards, the cold air "falls"... -
Page 29: Technical Data
Protection class Setup dimensions (W x D x H) 54.0 x 11.0 x 47.0 cm Product weight 6.6 kg Tab. 1a: Technical Data HGK 1000/2/1 TDF Premium Model HGK 2000/2/1 TDF Premium Article number 1 03 03 0070 Power supply 230 V~50 Hz Max. -
Page 30: Safety Information
Safety information General An improper use of this device can cause serious and extensive harm to heath as well as immense material damage. Therefore carefully read through the following notes. Familiarize yourself well with the device before putting it into operation. Only in this way can a safe and fault-free operation of the thermal convector be ensured. -
Page 31: 1.7.2 Specific Safety Notes
Check power cord. Do not use the device if the power cord shows is damaged. It is imperative to contact the ROWI Service Centre in the event of damage. Do not use power cords for other purposes. Do not pull the device at the cable and do not use it to pull the plug out of the socket. -
Page 32: Preparing The Product For Operation
P Only operate the device with the power cord fully rolled out. Never wind the power cord around the device. Make sure that the power cord does not come into contact with hot surfaces. Route the cable so that nobody can trip over it. P Never cover the device so as to avoid overheating. - Page 33 4. Insert the expansion bolts together with the screws and dowels into the drilled holes. ca. 22,0 cm Connecting piece Fig. 1a: Connecting piece Fig. 1b: Drill holes HGK 1000/2/1 TDF Premium ca. 53,5 cm hooks expansion bolts screw...
-
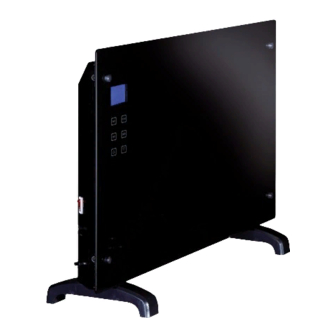
Page 34: Operating Instructions
Operating Instructions Device overview Fig. 2: Device overview Designation LCD display Control panel ON/OFF switch Supporting feet Tab. 2: Device description Commissioning and operation After removing the packaging and assembly, the device can be put into operation. Proceed as follows for this: 1. -
Page 35: Temperature Setting
3. Press the "ON/OFF" button on the control panel (see Fig. 3). The LCD display lights up blue. The device is now in Standby mode. Once the device is in Standby mode, the ambient temperature and time "00:00" appear on the display and the frost protection symbol and flashes on the side. Temperature setting The following buttons are provided on the control panel/remote control: Comfort mode... -
Page 36: Setting The Timer Function
1. Press the "TEMP" button (see Fig. 3) in Standby mode. The room temperature is shown in the display. 2. You can use the Up and Down arrow buttons to set your desired room temperature of 15 - 50°C . The temperature can also be changed during operation. -
Page 37: Switching Off The Device
1. Press the "TIME" button (see Fig. 3) in Standby mode. The first two digits of the time "00:00" hh:mm begin to flash. 2. You can use the Up and Down arrow buttons to set your desired operating time. Pressing the "TIME"... -
Page 38: Repacking For Private Transport Purposes
P Only clean the thermal convector with a dry, soft cloth. Never use strong and/or abrasive cleaning agents. Maintenance Note that only original parts may be used for repair and maintenance work. Contact the ROWI Service Centre if need be (see Chapter 5). 38/48... -
Page 39: Troubleshooting
Maintenance work that is not listed in Chapters 4.2 - 4.3 may only be carried out by the ROWI Service Centre (see Chapter 5). In the case of maintenance work within the first 24 months that has not been carried out by persons or companies authorized by ROWI, all warranty claims shall become null and void. -
Page 40: Warranty
Warranty Scope ROWI grants the owner of this product a warranty of 24 months from the date of purchase. Material or production defects shall be rectified free of charge by the ROWI Service Centre within this period. Defects that are not due to material or production faults are excluded from the warranty, e.g. -
Page 41: Online Registration
76698 Ubstadt-Weiher GERMANY Online registration Service knows no limits at ROWI. We would therefore like to thank our customers with a comprehensive online service. Register and enjoy the numerous advantages we provide exclusively for our premium customers. It's really easy: 1. - Page 42 3. Enter your contact data. You will then automatically receive your access data by email. This gives you access to the extensive service scope of ROWI Inside. We wish you every success with this. Please note that ROWI Inside is a purely online service. A postal registration is not therefore necessary.
-
Page 43: Replacement And Spare Parts
Item Designation Article number Temperature sensor cover 4 03 03 0643 Cable clip 4 03 03 0644 Circuit board housing 4 03 03 0645 Power circuit board (PCB) 4 03 03 0646 Signal circuit board (PCB) 4 03 03 0647 Metal plate 4 03 03 0648 Cable protection... -
Page 44: Circuit Diagram
Circuit Diagram Heating Element Light Thermal link Thermal cut-out Fig. 6: Circuit Diagram Disposal The packaging and all packaging materials are made from environmentally friendly, 100% recyclable materials. Correct disposal of this product Within the EU, this symbol indicates that this product may not be disposed of as normal household refuse. -
Page 45: Statement Of Guarantee
Statement of Guarantee Irrespective of the statutory warranty claims, the manufacturer shall ensure a guarantee pursuant to the laws of your country, but no less than 1 year (in Germany 2 years). The guarantee shall commence on the sales date of the device to the end consumer. The guarantee shall only extend to defects that are due to material or manufacturing faults. - Page 46 Notizen 46/48...
- Page 47 Notizen 47/48...
- Page 48 Contact ROWI Schweißgeräte und Elektrowerkzeuge Vertrieb GmbH Augartenstraße 3 76698 Ubstadt-Weiher Germany www.rowi.de...
Need help?
Do you have a question about the HGK 1000/2/1 TDF Premium and is the answer not in the manual?
Questions and answers