Table of Contents
Advertisement
Quick Links
Advertisement
Table of Contents

Subscribe to Our Youtube Channel
Related Manuals for DeLonghi ESAM 04.110


Summary of Contents for DeLonghi ESAM 04.110
- Page 1 5713212551/ 06.09...
- Page 3 A4 A5 B2 B3B4 B5B6 B12 B13 B14...
-
Page 6: Table Of Contents
CONTENTS 17. MEANING OF LIGHTS DURING NORMAL OPERATION ..........16 1. IMPORTANT SAFEGUARDS ......7 1.1 California Proposition 65 ......7 18. MEANING OF THE ALARM LIGHTS ....17 1.2 Short cord instructions .........8 19. TROUBLESHOOTING ......... 18 2. INTRODUCTION ..........8 2.1 Symbols used in these instructions ....8 2.2 Letters in brackets .........8 2.3 Troubleshooting and repairs ......8 2.4 Video instruction manual available on: ..8... -
Page 7: Important Safeguards
1. IMPORTANT SAFEGUARDS When using electrical appliances, basic safety precautions should always be followed, including the following. • Read all instructions carefully. • Make sure the voltage of your electrical system corresponds to the voltage shown on the bottom of the machine. -
Page 8: Short Cord Instructions
It is vitally important to observe these warnings. Danger! Failure to observe the warning could result in life threatening 2.4 Video instruction manual available on: injury from electric shock. http://esam04110.delonghi.com Important! Failure to observe the warning could result in injury or damage DESCRIPTION to the appliance. -
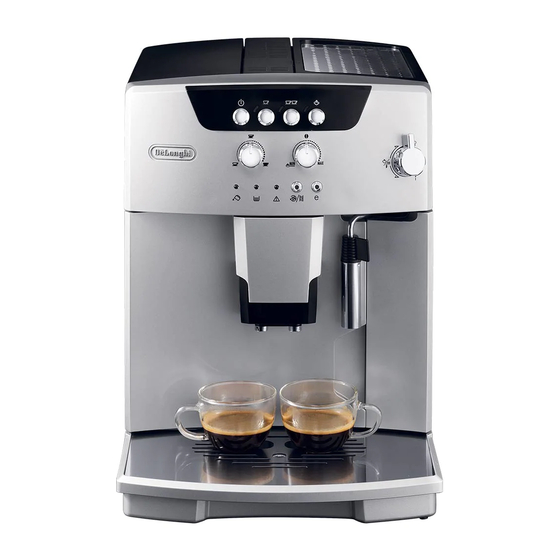
Page 9: Description Of Control Panel
A15. Drip tray • Arrange the power cable in such a way that it cannot be A16. Infuser door damaged by sharp edges or contact with hot surfaces (e.g. A17. Coffee grounds container electric hot plates). A18. Coffee spout (adjustable height) A19. -
Page 10: Turning The Appliance On
the lights at the bottom of the control panel come on (see Please note : image after point 2). • When using the appliance for the first time, you need to 2. Select the required period of time (15 or 30 minutes or 1, make 4-5 cups of coffee or 4-5 cappuccinos before the ap- 2 or 3 hours) by pressing the (B7) button (see the... -
Page 11: Making Coffee
10. MAKING COFFEE To obtain delivery not a drop at a time, turn one click clockwise towards “7”. 10.1 Selecting the coffee taste For fuller bodied creamier coffee, turn Turn the coffee taste selection knob (B9) to select the required one click anticlockwise towards “1”... -
Page 12: Making Coffee Using Pre-Ground Coffee
In choosing the size of the container, bear in mind that the Please note: milk doubles or triples in volume; For hotter coffee, see the section “10.4 Tips for a hotter coffee:”. Please note: Important! For a richer denser froth, use skimmed or partially skimmed •... -
Page 13: Heating Water
11.1 Cleaning the cappuccino maker after use 13. CLEANING Clean the cappuccino maker (A9) each time you use it to avoid 13.1 Cleaning the coffee maker the build-up of milk residues or blockages. The following parts of the machine must be cleaned regularly: the appliance’s internal circuit;... -
Page 14: Cleaning The Water Tank
Before the indicator protrudes from the cup tray (A14), the drip tray must be emptied and cleaned. To remove the drip tray: 1. Remove the drip tray and the grounds container (fig. 18); 2. Empty the drip tray and grounds container and wash them; 3. -
Page 15: Setting Water Hardness
Place an empty container with a minimum capacity of The machine can also be programmed according to the hardness 57.48 fl.oz./1.7 litres under the hot water spout (A18). of the mains water in the various regions so that the machine 4. - Page 16 17. MEANING OF LIGHTS DURING NORMAL OPERATION LIGHTS DESCRIPTION MEANING The lights flash (B2 and B4) The coffee maker is not ready to make coffee (the water has not yet reached the ideal temperature). Wait for the lights to come on steadily before ma- king coffee or (if the appliance is too hot to make coffee) open the steam/hot water knob and let the water flow out of the cappuccino maker into a...
-
Page 17: Meaning Of The Alarm Lights
18. MEANING OF THE ALARM LIGHTS LIGHTS DESCRIPTION MEANING WHAT TO DO The light (B11) is on Insufficient water in tank Fill the tank (A12) with water and/ steadily or tank not correctly in or insert it correctly, pushing it as place far as it will go until it clicks into place. - Page 18 There is an unusual The infuser has not been Leave the service door (A16) closed noise and the lights replaced after cleaning and the infuser (A20) out of the flash alternately coffee maker. Press the (B3) (B5) buttons toge- ther until the four lights go off. Only when all four lights are off can the door be opened and the infuser inserted.
- Page 19 The coffee is delivered The coffee is ground too finely. Turn the grinding adjustment knob (A1) one click too slowly or a drop at clockwise towards “7” while the coffee mill is in a time. operation (fig. 7). Continue one click at a time until coffee delivery is satisfactory.
Need help?
Do you have a question about the ESAM 04.110 and is the answer not in the manual?
Questions and answers