Advertisement
Table of Contents
- 1 Table of Contents
- 2 Assistance and Spare Part
- 3 Important Notes and Precautions for Use
- 4 Description of the Appliance
- 5 Instructions for the User
- 6 Instructions for the User
- 7 Troubleshooting
- 8 Instructions for the Installer
- 9 Technical Features
- Download this manual
See also:
Operating and Installation Instruction
Advertisement
Table of Contents

Subscribe to Our Youtube Channel
Related Manuals for EURO EG90GFSX


Summary of Contents for EURO EG90GFSX
- Page 1 A GUIDE TO USE, INSTALLATION AND REGULATION OF YOUR COOKERS Models: EG90GFSX EE900GSXS EP90DMSX EG900GDSX EG900GDCRM EG900GDANT ES90GFTSS ES900DTSX ES900EETSX MANUFACTURED BY: TECNO 461308131...
- Page 2 The appliance was designed and made in accordance with the European standards listed below: => EN 30-1-1, EN 30-2-1 and EN 437 plus subsequent amendments (gas) => EN 60 335-1 and EN 60 335-2-6 (electrical) plus relative amendments appliance complies with the prescriptions of the European Directives as below: =>...
-
Page 3: Table Of Contents
ASSISTANCE AND SPARE PARTS Before this appliance left the factory it was tested and set by specialized, expert personnel in order to guarantee the best functioning results. Any subsequent repairs or adjustments that may be necessary must be done with the maximum of care and attention by authorised personnel. -
Page 4: Important Notes And Precautions For Use
IMPORTANT NOTES AND PRECAUTIONS FOR USE removed from the outer surfaces and You have purchased one of our the various inner parts, thoroughly condition. If you have any doubts do modern, functional and practical, made not use the appliance and call in an with top quality materials, will meet all authorised person. - Page 5 IMPORTANT NOTES AND PRECAUTIONS FOR USE WARNING - Accessible parts may ensure the oven is empty and its door become hot during use. To avoid closed, heat the oven at maximum temperature for two hours. This away. will allow the protective coating on WARNING - Accessible parts may the interior of the oven to be burnt become hot when the grill is in use.
- Page 6 IMPORTANT NOTES AND PRECAUTIONS FOR USE • The appliance is not intended to be panel. operated by means of an external • Switch off the electrical supply before timer or separate remote-control you start cleaning or servicing the system appliance. •...
-
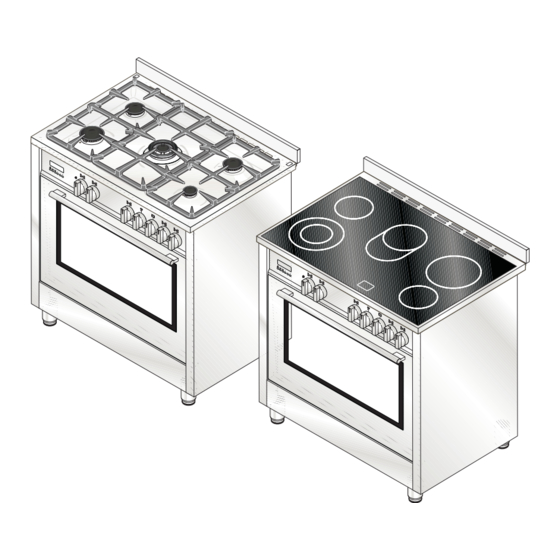
Page 7: Description Of The Appliance
DESCRIPTION OF THE APPLIANCE PRESENTATION be placed. Supply and quantities vary from model innovative burner hotplate offers you more scope and • oven shelf rack (Gf). Ensure shelf is located with round burners are graduated in their size and output dish and tray stop pointing upwards and at rear of to provide the exact heat required for every style of oven. - Page 8 DESCRIPTION OF THE APPLIANCE DESCRIPTION OF THE CONTROLS HOB GAS BURNER KNOB (A) = Closed position = “Full on” position = “Reduced rate or Low” position GAS OVEN/ELECTRIC GRILL THERMOSTAT KNOB (B) = Closed position from Min. to Maxi (260°C) = Oven temperatures grill OVEN ELECTRIC THERMOSTAT KNOB (C)
-
Page 9: Warning Light Will Only Switch Off When The Temperature In 4
DESCRIPTION OF THE APPLIANCE RED WARNING LIGHT or one of the oven electric components is on. YELLOW WARNING LIGHT the light will switch off when the set temperature is to switch on and off several times as the oven tempe- rature is controlled. - Page 10 DESCRIPTION OF THE APPLIANCE TIMER (I) number of minutes you want. The timer will ring when the set time has elapsed. ELECTRONIC CLOCK (L) counter. The digital display always shows the time but will display the minute counter time when this function is set.
- Page 11 DESCRIPTION OF THE APPLIANCE ELECTRONIC PROGRAMMER TOUCH. Setting the time. After connecting to mains or after a power cut, sym- display. Keep pressed for some seconds simultaneously + and - buttons or just MODE button, till when symbol “A” turn off. Time can be set just when the dot between the num- Program selection Keep pressed for some seconds MODE button and...
-
Page 12: Description Of The Appliance
DESCRIPTION OF THE APPLIANCE ELECTRONIC PROGRAMMER - Minute counter - Manual operation mode 1 2 3 4 5 6 - Setting time forward Automatic operation The digital display (N) always shows the time and (with the start of cooking time delayed) minute counter time by pressing the corresponding symbol will turn on) and then the end of push button. -
Page 13: Instructions For The User
INSTRUCTIONS FOR THE USER ABNORMAL OPERATION HOB: GENERAL NOTES ON SAFETY Any of the following are considered to be abnormal sure that pan handles are positioned correctly and • Burners not igniting properly. • Burners failing to remain alight. • Do not use aerosols or sprays near the appliance •... - Page 14 INSTRUCTIONS FOR THE USER HOT SURFACE • Never cover the base of the oven or the oven shelf with aluminium foil or other materials, as this creates pan. The water prevents the grease from burning more water during grilling to compensate for evaporation.
- Page 15 INSTRUCTIONS FOR THE USER GENERAL INFORMATION AND INSTRUCTIONS FOR USING CERAMIC GLASS HOBS N.B.: Using the glass scraper, push immediately away from the cooking zone, any pieces of tin foil or plastic material in ceramic, can have an uneven surface. You objects that could have melted or stuck;...
- Page 16 INSTRUCTIONS FOR THE USER OVEN: GENERAL SAFETY INSTRUCTIONS • Do not leave the oven unsupervised during use. the appliance. • Do not spray aerosols in the vicinity of this appliance while it is operating. • Always grip the centre of the oven door when opening.
- Page 17 INSTRUCTIONS FOR THE USER lower shelves being used for a greater degree of base HOW TO USE GAS OVEN browning. • foods. thermocouple so, once the burner has been lit, • Best results are achieved when preparing large keep the knob pressed for about 15 seconds. If, at quantities or using two shelves simultaneously by the end of this time, the burner fails to light, release positioning serves with an «air space»...
- Page 18 INSTRUCTIONS FOR THE USER HOW TO USE THE MULTIFUNCTION OVEN CONVENTIONAL GRILL COOKING (turnspit is only on some selected models) DEFROSTING AT ROOM TEMPERATURE food you want to defrost inside the oven. The length of time required depends on the quantity Selecting this function the top central heating element and type of food.
- Page 19 INSTRUCTIONS FOR THE USER TIME AND TEMPERATURE CHART FOOD ITEM QUANTITY OVEN POSITION TEMPERATURE °C APPROXIMATE TIME CAKES Sponges SCONES - plain BISCUITS Anzacs Burnt butter biscuits MERINGUE - small allow to cool in oven PASTRIES Fruit pies - biscuit pastry, Sausages rolls PIZZA OVEN MEAL...
- Page 20 INSTRUCTIONS FOR THE USER Meat: USEFUL COOKING TIPS Cakes and bread: residual heat (energy saving). cold air would stop the yeast from rising. • Do not use the enamelled oven tray or drip pan, • For a tasty roast, lard and spice the meat. to ripen longer.
- Page 21 INSTRUCTIONS FOR THE USER the glass. NEVER use sponges or abrasive products, CLEANING AND MAINTENANCE and aromatic or aliphatic solvents to remove stains or adhesives on the painted or stainless steel surfaces. • Prior to any maintenance work or cleaning, disconnect the appliance from the electricity mains.
-
Page 22: Instructions For The User
INSTRUCTIONS FOR THE USER HOW TO CLEAN THE INNER OVEN DOOR GLASS oven door glass can be easily removed for cleaning without the aid of specialized personnel. Just open the oven door and remove the support securing the glass ATTENTION!! This operation can be done also with the door that when the glass is pull upwards, the force of the hinges can close the door roughly. -
Page 23: Troubleshooting
TROUBLESHOOTING Some problems can be caused either as the results of simple maintenance operations or by incorrect selection PROBLEM REMEDY the system call an electrician in. • Contact Service Centre.. The oven light does not switch on following the instructions given the <REPLACING THE OVEN LAMP> paragraph. - Page 24 INSTRUCTIONS FOR THE INSTALLER LEVELLING THE COOKER • Adjustable feet, The appliance should be positioned in good light and free from draughts. Any adjoining wall surface situated This can be done by means mm for the entire length of the hob. Any combustible •...
- Page 25 INSTRUCTIONS FOR THE INSTALLER COOKER IN FINAL POSITION PULL BOTH SAFETY CHAINS AND SECURE THEM TO THE INSIDE OF Note:- The installation of the chain provided THE CUPBOARD WITH TWO SCREWS ON EACH is for safety reasons, it must be installed as SAFETY CHAIN.
- Page 26 INSTRUCTIONS FOR THE INSTALLER INSTRUCTION FOR STABILIZING THE COOKER The installation of the brackets provided is for safety reasons and must be installed as indicated below. EQUIPMENT QUANTITY n°2 n°2 n°4 WARNING on the oven door or where users put extreme weight on the door when in open position, properly may cause personal burn injuries and damage to the gas pipe.
- Page 27 INSTRUCTIONS FOR THE INSTALLER (fig.2) tance, (X (fig.3) Drill two holes in the (fig.4) against the wall. into position, check that the cooker does not tilt forward or sideways Hose Restraint Chain...
- Page 28 INSTRUCTIONS FOR THE INSTALLER permanent deformation and should be able to be GAS CONNECTION inspected along its entire length. Unions compatible This appliance shall be installed only by authorised personnel and in accordance with the manufacturer’s outlet should be at approximately the same height as municipal building codes, water supply regulations, •...
- Page 29 INSTRUCTIONS FOR THE INSTALLER ELECTRICAL CONNECTION All gas taps are male cone type with only one way of The electrical connection must be carried out in passage. The adjustment screw (V) is on the side of accordance with the current standards and laws the stem.
- Page 30 INSTRUCTIONS FOR THE INSTALLER Hot Plate Ignition Failure GAS CONVERSIONS REPLACING THE INJECTORS location and ambient conditions. Our burners can be adapted to different types of gas by simply installing the injectors suitable for the gas Before Leaving you want to use. To help the installer, the table (see TECHNICAL FEATURES paragraph) gives the burner water.
- Page 31 INSTRUCTIONS FOR THE INSTALLER MAINTENANCE Prior to any maintenance work or changing parts, disconnect the appliance from the gas and electricity power sources. Servicing must only be carried out by authorised personnel. REPLACING THE TAPS Remove pan supports, burner heads. for ultrarapid burner and two for the other burners) •...
- Page 32 INSTRUCTIONS FOR THE INSTALLER MAINTENANCE REPLACING THE ELECTRICAL COMPONENT Prior to any maintenance work or changing • The rear protection will have to be removed in parts, disconnect the appliance from the gas order to change the electrical heating elements, and electricity power sources.
-
Page 33: Technical Features
TECHNICAL FEATURES BURNER DISPOSITION BURNER TECHNICAL DATA TABLE BURNER Operating Diameter Primary Rating DENOMINATION Pressure kPa Injectors 1/100 mm aeration MJ/h Large Left front Natural Medium Right rear Natural Small Right front Natural Center Natural Oven Natural ELECTRICAL TECHNICAL DATA Voltage - Frequency Total rating electrical... - Page 34 TECHNICAL FEATURES ELECTRICAL COMPONENTS - NOMINAL DATA DESCRIPTION EG90GFSX EG900GDSX - EP90DMSX EE900GSXS EG900GDCRM- EG900GDANT Lower heating element of the oven Top heating element of the oven-grill Rear heating element Grill heating element Oven lamp Oven cooling fan Fan of the rear heating element...
- Page 35 W h i t e sec. 0.5 Blue sec. 1 Grey sec. 0.5 Violet s e c . 1. 5 W h i t e sec. 0.5 Black sec. 0 .5 White sec. 0.5 Blue sec. 1.5 Violet sec. 1 Grey sec.
- Page 36 W h i t e sec. 1 Grey sec. 0.5 Black sec. 0 .5 White sec. 0.5 Blue sec. 1.5 Violet sec. 1 Grey sec. 1.5 White sec. 1.5 Black sec. 1.5 Yellow/Green sec. 1.5 Yellow/Green s e c . 1.5 Ye l l o w / G r e e n sec.
- Page 37 White White sec.0.5 White Rotary Switch sec.0.5 GRILL GRILL White O.E. sec.0.5 Black sec.0.5 White sec. 0.5 White sec. 0.5 White sec. 0.5 White sec. 0.5 Blue sec. 0.5 Blue sec.1.5 White sec. 1 Black sec.1.5 White sec.1.5 Yellow/Green sec.1.5 Yellow/Green sec.
- Page 38 sec. 0.5 White/Blue sec. 0.5 White/Blue sec. 0.5 White/Blue sec. 0.5 White/Blue sec. 0.5 White/Red sec. 0.5 White/Red sec. 0.5 White/Red sec. 0.5 White/Red White sec. 0.5 Blue PILOT PILOT PILOT sec. 0.5 Violet sec. 0.5 Blue sec. 1.5 Blue sec.
- Page 40 SPACE FOR DATA LABEL 461308131...
Need help?
Do you have a question about the EG90GFSX and is the answer not in the manual?
Questions and answers