Table of Contents
Advertisement
Quick Links
6-in-1 DIY Educational Solar Toy Kit
Thank you for purchasing this Merlin Product. Please read the
instruction manual carefully before using the product.
The documentation provided will allow you to fully enjoy all the
features this unit has to offer.
Please save this manual for future reference.
The following items are enclosed in the box. Please note that this
product contains small plastic items that can easy be swallowed
by children. Adult supervision is recommended when having
children assemble this product.
Colored Box
Gear ( Orange )
Gear with Shaft ( Purple )
Motor with Connectors
Adhesive Tape
Eyes
Rubber Band
Aditional recycled items required for assembly
of different toys:
Gear with Shaft ( Green )
Round Shaft
Solar Panel
Sponge
Wing
Rubber Belt
Tools you may need:
Diagonal Cutter
Scissors
Pencil
Instructions:
For the assembly of all the different toys in this product two items
need to be assembled first. The Gearbox and the Solar Module.
Hint: Use a small side cutter to remove the individual pieces from
the main plastic assembly. Also remember to cut off the burr to
make a smoother edge.
1). Gearbox:
The gearbox drives the different toys.
a) Start by fitting the motor in its slot as per figure
1 and 2. Be careful to not put the motor in skew it can
damage the plastic parts.
Black
Red
Push
1
Advertisement
Table of Contents

Related Manuals for Merlin 6-IN-1 DIY Educational Solar Toy Kit


Summary of Contents for Merlin 6-IN-1 DIY Educational Solar Toy Kit
- Page 1 Tools you may need: Diagonal Cutter Scissors Thank you for purchasing this Merlin Product. Please read the instruction manual carefully before using the product. The documentation provided will allow you to fully enjoy all the features this unit has to offer.
- Page 2 2) Solar Module: b) Now place the black and red terminals in their positions and route the wires. The Solar module provides power to the gearbox and makes the toy come alive. a) Place the adhesive pads (P8) on plastic module (A16) and then place the solar cell (P6) onto it.
- Page 3 How To The Gear Box Notice: Find and make sure correct direction of “ “ on gearbox rst, it would help you to install the parts correctly Gear Box Solar Module Green White GREEN WIRE WHITE WIRE CONNECT CONNECT PUSH PUSH GREEN d) The completed Solar and Gearbox Modules should look like...
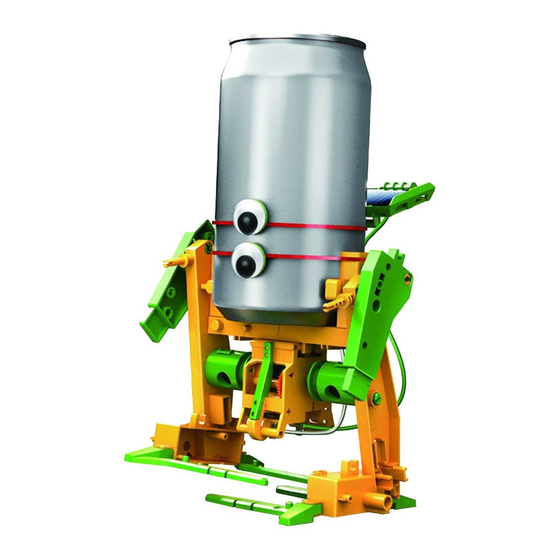
- Page 4 Running wheel assembly. e) This unit can be disassembled. If this is done please follow these instructions to carefully remove the CD’s from the bushing. Disassemble: CD & Plastic Parts 2. Walking Robot To make the walking robot you will need an empty soda can of capacity between 330 and 355ml.
- Page 5 d) Now it is time to place the eyes on your robot and then hook up the Solar module. Side View Solar Module Front View Part Side View c) The next step is to attach the rubber band and insert the old soda can.
- Page 6 3. Drummer Robot For the Drummer robot an empty soda can or similar sized soda bottle can be used as the drum. Drummer Robot Assembly & Play Recycle Parts required Plastic Bottle Soda Can a) Start by assembling the eyes and attaching it to the main body.
- Page 7 Running Gear Plastic Bottle Soda Can White Solar Green Module Adjust Robot’s arm to have stronger weak of drumbeat Part d) You can customize the beat and strength of your robot’s tune by making minor adjustments. To get a strong or weak beat adjust the angle of the beat arm.
- Page 8 connecting the wires. Add the eyes to the assembly too. Gear Solar Module WHITE WIRE CONNECT GREEN WIRE CONNECT b) Next clip on the parts that form the clamp to hold the bottle in place (fig 2). Then fit the plastic bottle and rubber band to keep it in place (fig 3.).
- Page 9 c) Assemble the drive shaft unit and attach it to the Gearbox unit. (Fig 3 -4) d) The final step to take is put some coin in the bottom of the Yacht in the holder provided. This acts as a weight to keep the Yacht in the water.
- Page 10 f) Take assembly 1 (which was made in the beginning) and Adjust Part 2 to balance lever. attach the Solar module to this arm (fig 10). Attach the arm to the Gearbox unit and connect the wires from the Solar Module to the Gearbox Module (Fig 11).
- Page 11 Trace around the top of the can Unfold colored gift box to create two circles in the colored gift box. Part Part Using scissors cut out the two circles Part A Using any sheet of paper, trace around the top of can to create a circle and cut it out Paper A Can’s...
- Page 12 The repaired/replaced product will then be returned to the client via courier mail at Merlin’s cost, as long as the warranty period is still active. Important: This limited warranty DOES NOT COVER normal wear and tear, accidents, damage during transit, misuse, abuse or neglect.
- Page 13 To learn more about Merlin products visit our site at: www-merlin-digital.com or like our Facebook page on facbook.com/merlin.digital.gadgets For enquiries and information call our toll free number 800-MERLIN (Sat-Thu, 9 am - 6 pm) REGISTER Contact our support staff for troubleshooting and any other enquiries relating to for exclusive your Merlin product by sending an email at support@merlin-digital.com...
Need help?
Do you have a question about the 6-IN-1 DIY Educational Solar Toy Kit and is the answer not in the manual?
Questions and answers