Merlin 6-IN-1 DIY EDUCATIONAL SOLAR ROBOT KIT Manual
Hide thumbs
Also See for 6-IN-1 DIY EDUCATIONAL SOLAR ROBOT KIT:
- Instruction manual (14 pages) ,
- Manual (13 pages)
Table of Contents
Advertisement
Quick Links
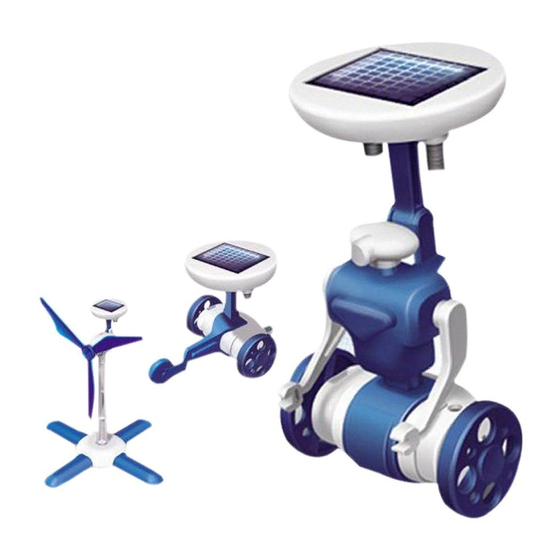
6-IN-1 DIY EDUCATIONAL
Solar Robot KIT
Thank you for purchasing this Merlin Product. Please read the instruction
manual carefully before using the product.
The documentation provided will allow you to fully enjoy all the features
this unit has to offer.
Please save this manual for future reference.
The following items are enclosed in the box. Please note that this
product contains small plastic items that can easy be swallowed
by children. Adult supervision is recommended when having
children assemble this product.
Instructions:
For the assembly of all the different toys in this product two
items need to be assembled first. The Gearbox and the Solar
Module.
Hint: Use a small side cutter to remove the individual pieces from
the main plastic assembly. Also remember to cut off the burr to
make a smoother edge.
1. Gearbox:
The gearbox drives the different toys. There are two different
types of gearboxes, A and B. Ensure you have the correct
gearbox for the toy you want to construct.
Gearbox A:
a) Start by fitting the main gear axel(P3) into plastic part D20 as
in step 1.
b) In step 2 fit the motor(P5) in its slot. Be careful to not put the
motor in skew it can damage the plastic parts.
c) Close the gearbox by fitting the cover (D21). Carefully put the
wires through the space provided.
d) The finished gearbox should look like the one in step 4.
Gearbox B:
a) Start by fitting the main gear axel(P2) into plastic part (D20) as
in step 1.
b) In step 2 fit the motor(P5) in its slot. Be careful to not put the
motor in skew it can damage the plastic parts.
c) Close the gearbox by fitting the cover (D21). Carefully put the
wires through the space provided.
d) The finished gearbox should look like the one in step 4.
2) Solar Module:
The Solar module provides power to the gearbox and makes the
toy come alive.
a) Place the adhesive pads (P4) on plastic module D22 (Step 1)
and then place the solar cell (P1) onto it (step 2). Be careful not
to bend the terminals. Remove the protective film that covers
the solar cell.
b) The final step in the assembling the solar module is place the
protective cover onto the module (step 3) to have the
completed solar module which should look like step 4.
1
Advertisement
Table of Contents

Subscribe to Our Youtube Channel
Related Manuals for Merlin 6-IN-1 DIY EDUCATIONAL SOLAR ROBOT KIT


Summary of Contents for Merlin 6-IN-1 DIY EDUCATIONAL SOLAR ROBOT KIT
- Page 1 The finished gearbox should look like the one in step 4. Thank you for purchasing this Merlin Product. Please read the instruction manual carefully before using the product. The documentation provided will allow you to fully enjoy all the features this unit has to offer.
- Page 2 3) How the Solar and Gearbox Modules work together: Now that the Gearbox and Solar Modules are completed we d) Place the gearbox and windmill assembly on the tower. can put them together and start making some of the toys. The wires can now be connected from the gearbox to the solar module.
- Page 3 b) Next place the mounting bracket(B4) on the wheeler followed by the solar module (step 3). The final step is to connect the wires from the gearbox to the solar module (Step 4). c) The completed Solar Wheeler should look like the one in step 5.
- Page 4 now be clipped to the turning arm. Next attach mounting bracket (B4) and clip the solar module onto it as shown in step 2. c) The last step of assembly is connecting the wires from the gearbox to the solar module. Carefully feed the wires under the turning arm so they stay out of sight (step 3).
- Page 5 To learn more about Merlin products visit our site at: www-merlin-digital.com or like our Facebook page on facbook.com/merlin.digital.gadgets For enquiries and information call our toll free number 800-MERLIN (Sat-Thu, 9 am - 6 pm) REGISTER Contact our support staff for troubleshooting and any other enquiries relating to for exclusive your Merlin product by sending an email at support@merlin-digital.com...
Need help?
Do you have a question about the 6-IN-1 DIY EDUCATIONAL SOLAR ROBOT KIT and is the answer not in the manual?
Questions and answers