Juniper SRX345 How To Set Up
Hide thumbs
Also See for SRX345:
- Hardware manual (154 pages) ,
- Quick start manual (12 pages) ,
- Manual (10 pages)
Table of Contents
Advertisement
How to Set Up Your SRX345 Services Gateway
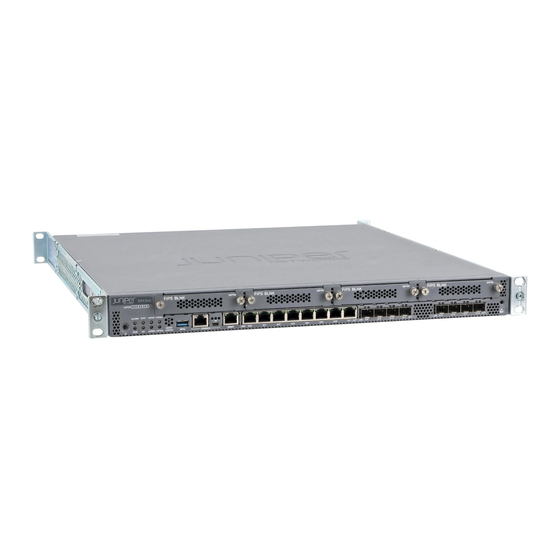
The SRX345 Services Gateway consolidates security, routing, switching, and
WAN interfaces for midsize distributed enterprises. With advanced threat
mitigation capabilities, the services gateway provides cost-effective and secure
connectivity across distributed enterprises.
The SRX345 Services Gateway has a capacity of 5 gigabits per second (Gbps)
and is 1 rack unit (U) tall. The services gateway has eight 1-Gigabit Ethernet
RJ-45 ports, eight 1-Gigabit Ethernet SFP ports, one management port, 4 GB of
DRAM memory, 8 GB of flash memory, and four Mini-Physical Interface Module
(Mini-PIM) slots.
The SRX345 Services Gateway is available with either a single AC power supply
or dual AC power supplies.
Package Contents
Verify that you have the following parts available:
• SRX345 Services Gateway (with either a single power supply or dual power
supplies)
• RJ-45 cable with DB-9 adapter
• Power cable for AC models only (1 for single power supply; 2 for dual power
supplies)
• Mounting brackets and screws
• USB cable
• Warranty and registration information
• End User License Agreement
• Safety Guide
• Quick Start Guide
Front Panel
Reset Config
Serial Console
Management
button
port
port
Power
LEDs
USB
Mini-USB
button
port
Console port
Back Panel (Single AC Power Supply)
SSD slot
Fans
Back Panel (Dual AC Power Supplies)
SSD slot
Specification
Single AC Power Supply
Dimensions (D x W x H)
14.57 in. x 17.36 in. x 1.72 in.
(37.01 cm x 44.09 cm x 4.37 cm)
Chassis weight
10.80 lb (4.89 kg)
Average power
122 W
consumption
Average heat dissipation 420 BTU/hour
Relative humidity
5% to 90%, noncondensing
Mini-PIM
slots
1G Ethernet
1G SFP
ports
ports
AC power input
Power
Fans
supply inputs
Dual AC Power Supplies
18.70 in. x 17.36 in. x 1.72 in.
(47.49 cm x 44.09 cm x 4.37 cm
14.33 lb (6.50 kg)
122 W
420 BTU/hour
5% to 90%, noncondensing
ESD
point
1
Advertisement
Table of Contents

Related Manuals for Juniper SRX345


Summary of Contents for Juniper SRX345
-
Page 1: Front Panel
The SRX345 Services Gateway has a capacity of 5 gigabits per second (Gbps) and is 1 rack unit (U) tall. The services gateway has eight 1-Gigabit Ethernet RJ-45 ports, eight 1-Gigabit Ethernet SFP ports, one management port, 4 GB of DRAM memory, 8 GB of flash memory, and four Mini-Physical Interface Module (Mini-PIM) slots. -
Page 2: Factory Default Settings
3. Have a second person install a mounting screw into each of the two aligned holes. Use a number-2 Phillips screwdriver to tighten the mounting screws. Protocols Protocols RSTP (all interfaces) Screens Screens Basic set of screens are enabled on the untrust zone How to Set Up Your SRX345 Services Gateway... - Page 3 ESD point and place the other end of the strap around your bare wrist. 1. Insert the appliance coupler end of the power cord into the appliance inlet on the power supply faceplate. How to Set Up Your SRX345 Services Gateway...
- Page 4 RJ-45 cable. NOTE: If you are using a SRX345 Services Gateway with dual AC power supplies, then repeat Step 1 through Step 3 for the second power supply. 4. Note the following LED indications. Wait until the STATUS LED is solid green Management port before proceeding to the next step.
- Page 5 The initial configuration requires that you specify the device name and root password. You can skip all the other steps and go directly to the Confirm & Apply page to apply the configuration. How to Set Up Your SRX345 Services Gateway...
- Page 6 3. Configure the basic settings: a. Device name b. Password for the root account (Use the password that you entered in Step 1 of the “Configure the Device Using J-Web” section.) c. Management interface How to Set Up Your SRX345 Services Gateway...
- Page 7 Confirm & Apply page to reconnect, if required. You can also configure the services gateway using the CLI, by connecting to the Console port or the management port. For details, see the SRX345 Services Gateway Hardware Guide. How to Set Up Your SRX345 Services Gateway...
-
Page 8: Power Off The Device
NOTE: With this step, you have successfully completed the initial configuration, and your SRX345 Services Gateway is ready for use. Power Off the Device You can power off the device in one of the following ways: •... -
Page 9: Reset The Configuration
For information on configuring features on your services gateway, refer to the following: • Junos OS Documentation/Feature Configuration http://www.juniper.net/techpubs/en_US/release-independent/junos/ information-products/pathway-pages/srx-series/product/index.html • Getting Started Knowledge Base Article https://kb.juniper.net/InfoCenter/index?page=content&id=KB15694 Reference Technical Support http://www.juniper.net/support/requesting-support.html SRX345 Services Gateway Hardware Guide http://www.juniper.net/techpubs/en_US/release-independent/junos/ information-products/pathway-pages/hardware/srx345/index.html Supported Transceivers https://pathfinder.juniper.net/hct/product/#prd=SRX345 How to Set Up Your SRX345 Services Gateway... - Page 10 Copyright © 2017, Juniper Networks, Inc. All rights reserved. Juniper Networks, Junos, Steel-Belted Radius, NetScreen, and ScreenOS are registered trademarks of Juniper Networks, Inc. in the United States and other countries. The Juniper Networks Logo, the Junos logo, and JunosE are trademarks of Juniper Networks, Inc.
Need help?
Do you have a question about the SRX345 and is the answer not in the manual?
Questions and answers